Tomato-based sauces are immensely satisfying projects that can be homegrown and homemade from start to finish. The beginnings of my first batch of pizza sauce started with 18 tomato plants we’d planted. We grew a variety of types, and nothing beats the satisfaction of turning fresh tomatoes into a delicious sauce.
Paste tomatoes are the best option for creating sauces, since they have more “meat” and less liquid. That said, you can use any tomatoes if you have the patience to cook the puréed tomatoes down to sufficient thickness. If you’re using non-paste varieties, expect to use additional tomatoes to get a thicker sauce. I ended up using non-paste tomatoes, and here’s what happened.
Ripening Tomatoes
Most tomatoes won’t fully ripen before the first frost in our short-season northern climate. Each fall, right before the first frost kills the garden, we harvest every green tomato we can pluck off the plants. We take them indoors, lay them in an enclosed box, drop in a couple of bananas or apples, and enjoy ripe red tomatoes for two months. (Bananas and apples are abundant natural sources of the fruit-ripening gas ethylene.) As an extra precaution, we often drape netting over the box to keep fruit flies away.
As the tomatoes ripen, we collect them and run them through a food strainer to remove seeds and skin. Alternatively, you can pulse the peeled tomatoes in a food processor if you want a smoother consistency before cooking. We bag the resulting tomato purée in 1-gallon bags and freeze them. When deep winter comes, it’s time to turn this summer bounty into tomato sauce, including pizza sauce.
As a rule of thumb, it takes about 6-1/2 lbs of tomatoes to produce a quart of finished pizza tomato sauce. Use this to estimate how many tomatoes you’ll need and how much finished product will result from your harvest. Each batch of tomatoes varies slightly in water content, so adjust your process accordingly.
Cook Down the Tomatoes

Fresh (or frozen) tomato purée from non-paste tomatoes is runny and watery, unsuited for much of anything. But cooked down? Ah, that’s another story.
Cooking down tomato purée is simply applying low heat for a long time. I prefer to wait until our wood cookstove is in constant use during the cold winter months. Others use the stovetop at low heat, a slow cooker, or an oven. At first, I sometimes use medium-high heat to get things moving, then lower the temperature to avoid scorching.
All of these options aim to reduce the water content of the purée until the liquid thickens into something that can be used as a base for everything from soup to paste. If you like your sauce silky smooth, an immersion blender is excellent for breaking down remaining chunks into a thicker sauce.
In our case, I start by defrosting some of the bags of frozen purée overnight in a bowl. By allowing the purée to defrost overnight, some liquid escapes from the bag (leaving the more solid portions inside), which means less to cook down.

After this, I nest two large pots together in a double-boiler style. A double boiler keeps the sauce from scorching and is infinitely preferable to cooking the purée over direct heat. However, it’s important to monitor the larger pot’s water level to ensure it doesn’t boil dry.
While cooking purée down to sauce is a slow process, it’s almost maintenance-free. All I have to do is make sure the lower pot doesn’t boil dry and give the sauce the occasional stir. That’s it.
The first time I cooked down tomato purée, I despaired of ever turning this watery gloop into sauce. It seemed to take forever (three days, in fact). I wondered if I was wasting time.
And then something magical happened: It cooked down into the most beautiful smooth tomato sauce. I couldn’t believe it. he hot tomatoes were transformed into a rich, flavorful sauce ideal for storage. This tomato sauce recipe is one we now use every winter.
At this stage, tomato sauce can be “specialized” by flavoring it. (Mexican? Italian? Middle Eastern? Russian?) I prefer to keep my sauce unflavored, which means I can flavor it however I want down the line. After adding an acidifier, I can most of my tomato sauce in pint jars in a water bath.
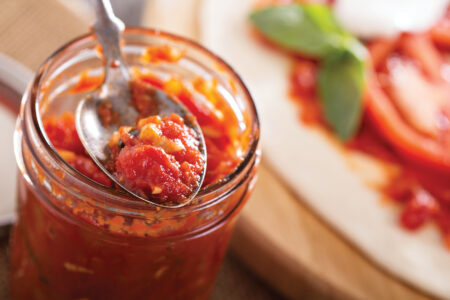
Pizza Sauce Process
I reserve some for making pizza sauce, which means it must be cooked down even further, to a consistency between sauce and paste. Once this process is complete, the bare pizza sauce can be flavored. Pizza sauce is infinitely versatile, depending on one’s taste. You can add spices (black pepper, garlic powder, crushed red peppers, basil, oregano, etc.) or vegetables (onions, bell peppers, hot peppers, mushrooms, zucchini, artichoke hearts, etc.).
However, how you flavor the pizza sauce will determine whether it should be water bath canned or pressure canned. For safety reasons, when you are learning how to can, always follow approved recipes exactly. Recipes will specify if the sauce must be pressure canned or if you can safely water bath can it. You can learn more from the National Center for Home Food Preservation.
If the sauce is purely tomatoes with no additions except herbs, it can be water bath canned (along with an acidifier; more on that below). If you add low-acid ingredients, such as mushrooms, onions, bell peppers, or other foods, then the sauce must be pressure canned. No exceptions. Be sure to follow pressure canning instructions carefully.

Proper Acidity
Note on acidifiers: When canning any tomato product, adding an acidifier is necessary. Modern tomato varieties – even heirloom varieties – are often on the razor-thin safety borderline for pH levels for water bath canning, hence the need for an acidifier. To quote Penn State Extension, “Tomatoes are on the cusp of what food scientists would consider to be ‘acidic’ foods, and failing to adequately increase the acidity can result in deadly botulism poisoning.
To assure safe acidity in whole, crushed, or juiced tomatoes, add two tablespoons of bottled lemon juice per quart of tomatoes or one tablespoon per pint. Only use bottled lemon juice because the acidity level is constant.” The U.S. Department of Agriculture (USDA) also recommends adding acidifiers, even to pressure canned tomato products. Check out the USDA Complete Guide to Home Canning for further safety guidelines.
Most people prefer using lemon juice or citric acid as an acidifier since vinegar may alter the product’s flavor. Remember, all canning recipes for tomato-based products are based on acidified tomatoes. A touch of sugar can offset any bitterness resulting from acidifiers. This results in a more balanced, flavorful sauce.
Canning Homemade Tomato Sauce
As a rule of thumb, 1 pint of pizza sauce is usually enough to cover two 14-inch pizzas. If you make one pizza at a time, can the sauce in half-pint jars so the extra sauce doesn’t go to waste. Each jar of tomato sauce should be carefully labeled and dated after processing.
To water bath can pizza sauce, make sure the sauce is hot. Add your desired spices. Ladle the hot pizza sauce into pint or half-pint jars. To each jar, add the required amount of acidifier. Take a minute to double check your elevation if you don’t know it exactly. You may need to add extra time to your processing. Be sure the water in your hot water bath canner is already at a full rolling boil before inserting jars.
Canning jars should be cleaned with hot soapy water before use, and inspected for chips or cracks to avoid jar breakage during processing. After filling the jars, leave a 1/2-inch headspace, remove bubbles, wipe rims, and center lid on each jar. Tighten rings fingertip-tight.
Canning Tip:
Always inspect the canner lid to ensure it’s clean and seated correctly for a tight seal during processing. Cover the jars with at least one inch of boiling water. Process jars in a water bath canner for the time recommended for your altitude and recipe.
Once processed, remove jars with a jar lifter and place them on a kitchen towel to cool. Never set hot jars directly on a cold surface. Let them sit undisturbed for 12-24 hours, then check the seals. Safe tomato canning depends on clean jars, correct acidification, and proper seal formation.

Can Sauce with Low-Acid Ingredients
As stated previously, if your pizza sauce contains any low-acid ingredients, it must be pressure canned. The rule of thumb is to process a food product in accordance with the ingredient requiring the longest processing time. It’s essential to have an up-to-date USDA-approved canning reference guide to know the proper processing times for each food. Pressure canning instructions will indicate the correct pounds of pressure based on your elevation and the food’s density.
If you’re unsure about the proper amount of time to process pizza sauce with low-acid ingredients in a pressure canner, the safest option would be to add fresh low-acid ingredients to the pizza during the pizza-making process, rather than worrying about canning those ingredients with the pizza sauce. Always ensure your canner lid is properly locked before bringing the pressure up.
Homemade pizza is far cheaper than frozen or restaurant pizza and can be customized precisely to taste. I haven’t yet found a restaurant pizza – much less a frozen one – that beats homemade. With a homemade tomato sauce recipe using fresh tomatoes and excellent seasonings, the results speak for themselves.

And it’s made all the better by home-canned pizza sauce, a great method of using up garden tomatoes, especially those paste tomatoes. Having jars of pizza sauce in the pantry, ready to use, means Homemade pizza is that much easier to make.
If the basil, oregano, and garlic powder are similarly homegrown, you’ll have the additional satisfaction of knowing your pizza is a product you created from start to finish. Home-canned tomato sauce ensures that the taste of tomatoes harvested in peak season can be enjoyed year-round.
Patrice Lewis is a wife, mother, homesteader, homeschooler, author, blogger, columnist, and speaker. An advocate of simple living and self-sufficiency, she has practiced and written about self-reliance and preparedness for almost 30 years. She’s experienced in homestead animal husbandry and small-scale dairy production, food preservation and canning, country relocation, home-based businesses, homeschooling, personal money management, and food self-sufficiency.


