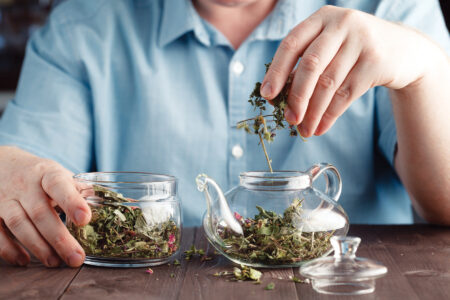
For several years, my family has been making what we refer to as our “house tea.” We gather botanical ingredients from our garden and surrounding property to create a unique herbal blend. No recipe exists for our tea, because we brew it fresh every day, and the ingredients change based on our preferences and what we have on hand. We make use of the plants around us and incorporate them into our diets in a simple, no-fuss manner. Plus, a hot mug of homegrown tea really hits the spot at the breakfast table!
Here are some of my family’s favorite plants for growing or foraging. I hope you’ll be inspired to make your own custom tea blend.
Blackberries (Rubus fruticosus) and red raspberries (Rubus idaeus) both grow in our garden. Although you certainly can use the berries in tea, we generally save them for jams and baked confections. Blackberry leaves are a good source of vitamin C and are traditionally used as a remedy for sore throats.
Blackberry leaves are our staple house tea ingredient. We dry them in quantity after the berries are gone but before winter destroys the leaves, and we store them in bags in a dry cupboard. You can do the same thing with red raspberry leaves. Or, you can store fresh leaves in the freezer.
Both the fruit and leaves of blueberries (Vaccinium cyanococcus) are a delicious addition to tea. Loaded with antioxidants, blueberries may help with eye and heart health, diabetes, and immune support. Just harvest the berries or leaves and freeze or dry them. We grow blueberries in our garden, where they need well-drained, acidic soil and plenty of light.
Elderberries (Sambucus nigra) also are loaded with antioxidants, and they’re high in vitamin C. Elderberry blossoms remind me of a lace parasol, and I love their delicate, sweet scent. We harvest the umbels in late spring and early summer, and we pick the ripe berries in fall. The berries shouldn’t be consumed raw, but they can be steeped when freshly harvested or after they’ve been dried or frozen.
Elderberries grow extensively across the United States. They prefer partial shade and can be introduced into your garden, although they’re equally at home in fence rows and hedges. A word of caution when you hunt elderberries: As with any wild edible, make sure you harvest the real deal. Impostor plants that might look like elderberries to casual observers include American pokeweed (Phytolacca americana), water hemlock (Cicuta douglasii ), and Hercules-club (Zanthoxylum clava-herculis). Avoid eating the green berries, stems, leaves, bark, and roots, as they’re toxic to humans.
Hibiscus (Hibiscus sabdariffa) blossoms add a rich color and sweet flavor to tea. Commonly known as “roselle,” hibiscus is loaded with antioxidants and can also help with managing blood pressure. We usually buy dried hibiscus flowers in bulk.
Peppermint leaves are a classic addition to tea. Peppermint (Mentha piperita) can help soothe an upset stomach; treat headaches, cramps, and heightened stress levels; and increase blood flow. Other types of mint include chocolate, spearmint, and pineapple mint, each with its own unique flavor. Simple to grow in the garden, peppermint likes moist soil and plenty of sun. Make sure it’s well-contained, because it spreads freely! To harvest, pluck off the leaves to make some tea immediately, or dry them for later use. Peppermint tea makes a refreshing summer drink when served over ice.
Pine needles are a vitamin C powerhouse. Indigenous peoples used pine for generations to fend off scurvy when fresh fruits and vegetables weren’t seasonally available. Pine needle tea shouldn’t be consumed during pregnancy.
To harvest pine needles with a mild flavor, select those that are young, brightly colored, and located at the tips of the branches. Or, you can pick older, more mature needles near the base of the branches for a more bitter flavor with a higher vitamin C concentration. We pack the needles into bags in the freezer. The common Eastern white pine (Pinus strobus) is a great, recognizable choice to harvest for tea. Be sure to avoid toxic yew (Taxus baccata), cypress (Cupressus spp.), and Norfolk Island pine (Araucaria heterophylla).
Rose hips contain vitamin C and can be harvested from rosebushes, typically around the time of the first frost, well after blooming season has ended.
We have a profusion of wild roses in our area that give small but delicious hips that I enjoy eating right off the bushes. Size, flavor, and beneficial properties vary depending on the cultivar. For the best rose hips, many folks recommend Rosa rugosa or dog rose (Rosa canina).
After picking the hips, split them and remove the seeds. You can brew either fresh or dried rose hips for tea.
Brewing Tips
After we’ve gathered our tea ingredients, it’s time to make tea! You can have your house tea ready to use at a moment’s notice by mixing together thoroughly dried materials in an airtight container. We use a combination of dried and frozen materials, with a ratio of roughly 1 cup fruit and herbs for every 2 to 3 cups water. First, heat the water in a pot, adding frozen fruits (such as 1 cup of frozen elderberries) early to give them time to thaw and release their juices. When the water is hot but not boiling, remove the pot from the heat and add the herbal ingredients, such as a handful of dried hibiscus flowers, frozen pine needles, and dried blackberry leaves. Steeping time is a matter of personal preference; we steep our house tea for 3 to 5 minutes. Additions during steeping can include a bag of store-bought black or green tea, a cinnamon stick, or a squeeze of fresh lemon or orange juice. To serve, add honey if desired and pour into a mug.
Research to correctly identify any wild plants added to your house tea and to ensure you’re foraging in a sustainable way. Harvest from uncontaminated sites, avoiding those near roadsides or areas that may have been sprayed with pesticides.
Consult your doctor before using any of these botanical materials, especially if you’re pregnant or breastfeeding, or have health conditions.
Maggie Bullington
Athens, Alabama
Snagging a Good Harvest

Growing blueberries has been a longtime dream of ours, so we planted six bushes shortly after we bought our country homestead. Figuring out how to protect our little harvests became a challenge. Initially, we placed black netting over the bushes, but with limited success. The netting snagged the blueberry branches, making it difficult to weed around the base of the plants, and small wildlife occasionally became entangled in the netting.
Last year, anticipating a bountiful harvest, my husband, Kevin, built these protective cages from scrap lumber. He stapled new black netting to the sides and tops. The cages keep the netting away from the branches. They’re sturdy and easy to remove for weeding and picking berries, but they still allow sunlight, rain, and air to reach the bushes. We tied strips of cotton to each side of the cages to deter animals. So far, no wildlife has become entangled.
Denise Connolly
New Windsor, Maryland
Lightbulb Moment
 I found a collection of old, ripped lampshades and had the idea of recycling them into plant protectors to keep the birds off my young plants. I replaced the shade’s torn cloth covers with chicken wire and gopher wire. Chicken wire allows bees to get inside and pollinate the plants. The gopher wire works best to keep out pesky lizards.
To make these plant protectors fun to look at and easy to lift, I added different drawer pulls to the tops.
Oksanna Pope
Placerville, California
Better Than Candy
 We host a large Easter egg hunt each spring, so we have a lot of decorative buckets on hand. When we recently heard a forecast calling for frost and freezing temperatures, we became concerned for the tender tomato and pepper plants in our garden. Because we like to reuse things, we covered the plants with our Easter buckets.
Irene Boren
Paris, Illinois
Free Cover-Ups
Bottled water companies will give you leaky plastic jugs for no charge, and I’ve found a good way to recycle them into something useful for my garden. I cut off the bottoms to create large cloches to protect young plants during cold spring weather (pictured at right). I cut off the base using a circular saw outfitted with a fine-toothed blade; ideally, you’d use a grit-edged blade. Then, I coat half of the cut jug with silver spray paint, and it’s ready to use.

I face the painted silver side to the north to reflect additional sunlight onto the plant, or I rotate the silver side to face south when a transplanted seedling has recently been put into the ground. On really cold nights, I stack a few cloches on top of each other with the tops plugged for extra thermal protection.
To store my homemade cloches when they’re no longer needed, I string them together and hang them.
Philip S. Getty
New Hope, Pennsylvania
Cans Full of Worms
At Mis-Bee-Haven Farm, we grow 50 to 60 tomato plants during the growing season. Tomato hornworms are a problem. We have a no-spray philosophy to protect our bees, so we’ve had to watch for signs that hornworms are munching away on our plants, including stripped leaves and droppings. The hornworms themselves are elusive and hard to see. But we’ve found a high-tech solution we’d like to share.
Hornworms are fluorescent under ultraviolet light, showing a bright lime green against the tomato plants’ dark-green foliage. We head out into the garden at night with a UV flashlight and pluck containers of hornworms off our tomatoes. The worms are really easy to find with the UV light, and we’re rewarded with healthy, intact plants.
Mike Harrison
Palmyra, Virginia
Top-Drawer Idea for Garden Starts
Two years ago, my old refrigerator stopped working. I kept the drawers from the refrigerator, thinking I could find a use for them.

I’m not fond of allegedly reusable plant-starting pots, so I thought of using the fridge drawers to grow seedlings for my garden. I also purchased a 10-foot length of plastic guttering, plus gutter end caps, and I cut the guttering into four sections. I drilled 3 to 5 drainage holes into each fridge drawer and each gutter section, and my new units were ready to go.
I’ve used these recycled plant starters quite successfully for two years with no sign of deterioration. The gutters are especially convenient, because I only have to remove the end cap and slide the plants and potting mix into their spots in the garden. I simply hose off the drawers and gutter sections at the end of the growing season for storage.
Patricia Ducharme
Charlottesville, Virginia
Garden Hose Grip
If your old garden hose is still flexible in some sections, you can cut it into a comfortable grip for a 5-gallon bucket handle.
Here’s how I do it. I carefully cut a short piece of hose that’s the same length as the straight portion of the bucket’s bail handle. Then, I cut a slit down the length of the hose. It’s best to position the slit at the top of the hose’s preexisting curve. Slip the hose over the bucket’s wire handle.
If your bucket handle still has its original plastic roller grip, you can slip the hose piece over it or over the parts of the roller that remain. Simply pop the hose piece onto the wire to one side of the roller grip, then slide it into place, coaxing it over the plastic roller. This technique helps prevent the hose piece from sliding off-center on the bail handle, and the plastic roller gives more support to the hose. I’ve also found that it makes the plastic roller last longer, because it’s protected from the sun. Sure makes carrying heavy buckets a lot more comfortable!
Alina Niemi
Honolulu, Hawaii
Net Gain
I buy inexpensive netting at the local fabric store to cover my raspberry bushes, strawberry plants, and small cherry trees, because the birds won’t share the harvest with me. After a couple of years, though, the net deteriorates from weeks in the hot sun and easily develops holes. So, I’ve found another function for it. As apples mature on my trees, the fruits add a lot of weight to the limbs. To prevent broken branches, I cut strips from the old net, 12 to 14 inches wide by 10 to 12 feet long. I then roll the net and use it as a strong sling for the fruit-laden branches.
Mary Martin
Rexburg, Idaho
Out of the Weeds
I recently cleaned out my shop and found some old shingles. Instead of throwing them in a landfill, I repurposed them for weed control.
I put half of a shingle around a seedling tree to keep the weeds down and to prevent me from having to use the string trimmer nearby. I also placed some shingles under the fuel tank to keep tall weeds from growing around it. And finally, I laid down repurposed shingles along the side of my pole building in an area I can’t reach with the lawn mower.
Not only do the old shingles prevent weeds, but I also like the finished look they give to areas that used to be overgrown.
Michelle Fryc
Harris, Minnesota
At Arm’s Length
 After holes form in my heavy winter socks, I remove the foot and keep the upper section to protect my forearms from scratches. They work well when I’m carrying sharp-edged firewood or when I’m picking or weeding in thorny areas on hot days. I also like to slide them up under my winter clothing to keep sore elbows warm.
Philip S. Getty
New Hope, Pennsylvania
Outsmarting Raccoons
Raccoons kept getting into our steel garbage cans. Garbage was strewn everywhere. We tried everything suggested to us, but nothing worked.
Finally, we came up with an unlikely combination. First, we secured each lid on its can with a bungee cord. Then, we sprinkled ground cayenne pepper on the can, especially the lid. The raccoons didn’t like the hot pepper. The cayenne pepper had to be reapplied whenever it rained, but we’d found a simple solution to our problem.
Katie Martin
Danbury, North Carolina
He Knows Beans
In my 40 years of gardening, I’ve found pole beans to be the most rewarding and prolific vegetables to grow. Here in the Midwest, I get almost three months of continuous harvest by mulching heavily, watering when necessary, picking daily, and choosing the right cultivars. I grow ‘Emerite’ (green) and ‘Monte Gusto’ (yellow). Both beans stay tender even when large, are virtually stringless, and have a mild flavor most people like.

Pole beans do, of course, require support. I use 3/8 -inch rebar cut to 10-foot lengths. The rebar is widely available at hardware stores. I’ve found these poles will store easily and last forever. I sink them about 2 feet into the ground. I use four rebars per hill, crossing the bars at about waist height. I find that by crossing them lower than the usual tipi technique, I get better use of my plot’s three-dimensional space, and the beans are easier to pick. The photo above shows such a setup in a 4-by-8-foot raised bed in my garden. (The leaves on the left in the photo are on a bitter melon vine.)
David Marsolo
Westerville, Ohio


