Learn about milpa agriculture techniques, how to start a farmstand from home, build a hotbed from straw, sprout mung beans and make a salad from your sprouted beans, all tips from readers.
Milpa Agriculture Techniques
If you love gardening like I do, you’ll want to bring milpa, with its combination of corn, beans, and squash, to your patch of earth. It’s so easy, forgiving, productive, and almost impossible to mess up that it ought to be a yearly staple in every garden.
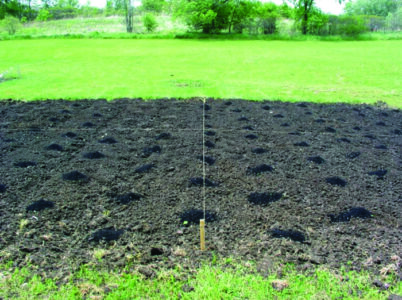
In my plot, I start by laying out a simple grid using two strings stretched diagonally across the space. I mound the soil into little hills about the length of a hoe handle apart. This is just the right spacing to give each hill room to spread out, while still letting its neighbors grow close enough to share shade and strength. Corn is the backbone, so it goes in first, and I work in plenty of compost and worm castings as I plant. Once the corn is about 6 inches tall, it’s time for the beans and squash. From there, nature takes over: corn for structure, beans for nitrogen, squash for ground cover. Each plant does its job, and together they outshine anything a monoculture bed could ever dream of.
Milpa isn’t about fancy tools or pricey fertilizers from garden centers. It’s about trust – trusting soil, seed, and the quiet systems that have proven themselves for millennia. Around our homestead, we save and reuse anything we can. Old mesh produce bags work great for storing your crops over the winter. They’re free, breathable, sturdy, and one less chunk of plastic headed for the landfill. That’s the very spirit of milpa: Reuse, renew, and make the most of what’s already right in your hands. And speaking of reuse, there are heirloom cultivars for every milpa crop, providing food this year and free seeds for next year. You can’t beat that.
Milpa has a way of teaching you humility too. When you plant this way, you learn fast that you’re not the one in charge – the soil is, the weather is, the worms and unseen life under your boots are. Sometimes you’re the student instead of the expert, and that’s more than fine with me. The underbelly is clean, cool, and miraculously weed-free, a far cry from the constant hoeing most gardens need or even demand.
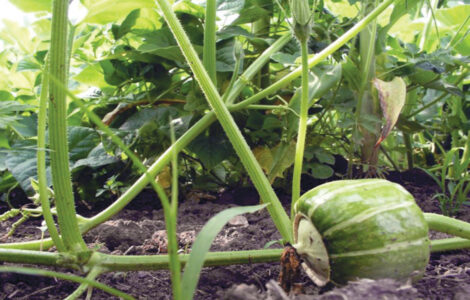
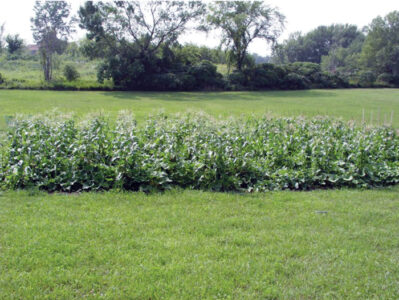
Every milpa patch I’ve ever planted has surprised me somehow. One year it might be the beans climbing to the sky, the next a single squash vine taking over the whole place like it paid for the deed. The young squash look like they’re resting in little cradles, a nursery only a milpa could make. And then there was the summer of the watermelon, an heirloom volunteer that decided it was joining the party whether it was invited or not. I didn’t have the heart to say otherwise. It sprawled into the garden, rolled over a row of corn, and reminded me that some of the best harvests are the ones you never plan for – like the scruffy puppy that wandered onto my porch many years ago and, through sheer lovable dog-ness, earned a place by my feet and my fire for one of the best decades I ever lived.
Even our basement has joined the milpa spirit – shelves of seed trays under grow lights and wrapped softly in a tarp to contain the light and warmth; worms chewing their way through yesterday’s salad and veggies; and buckets of castings that smell like clean earth after a spring rain. Down there, life keeps right on going no matter what’s happening upstairs. There’s a quiet peace in seeing rows of colorful jars lined up in the cool dim of a pantry, each one a promise kept between you and the soil. They remind you that the earth still provides, and that honest work fills more than just a stomach.
At season’s end, when the larder is full and the last vines have settled back onto the ground, I feel that old satisfaction, the quiet joy of being part of something far bigger than myself. That’s the milpa way: give, take, renew, repeat, just as growers have done for thousands of years. Look closely and you’ll see the symmetry nature lays out for us if we just give her room.
From my soil to yours, may your hands stay busy, your compost rich, your dog warm, and your harvests heaping. Try milpa this year! I can assure you without doubt that you won’t regret it.
Frank, Virginia
How to Start a Farmstand from Home
This spring, I decided to start a roadside stand, but I quickly became frustrated by the lack of guidance around it. I learned quite a bit getting it up and running and hope these tips make it easier for you. Farmstands are so much fun, and it’s a thrill to see people stop their car to browse!
- Find out what’s allowed. Start by checking local or county regulations for any guidance or requirements. They’ll usually state what’s allowed; for example, only products produced on your land, or only refrigerated eggs in clean containers. If you aren’t sure or can’t find answers, contact your town’s planner or clerk’s office, and they can point you in the right direction. They can usually answer specific questions about the rules too.
- Decide what to sell. This is the fun part, but also the hardest to keep in mind. Start small: Vegetable seedlings, produce, and handicrafts are excellent first offerings, and they often require little to no restriction per most town’s regulations. Value-added products, such as soaps, baked goods, and items from local sources other than your farm or homestead, are great additions and typically sell for more, but they require more input from you to curate and keep stocked. These types of products also tend to be more regulated. Eggs, cut flowers, and seedlings were my most popular items when I started. I had potted native plants that I thought would do great, but they ended up not getting much attention.
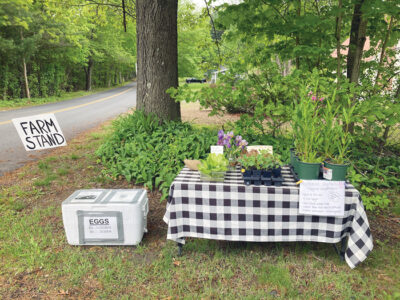
- How will you sell? What will your farmstand look like? How will it operate? Check the regulations for any signage rules. You’ll have much more success if people know your stand is there and what’s for sale. Setting up your display is fun too; make sure to keep it neat and organized. Get creative and have fun finding what works for you. I opted for a folding table with a tablecloth at the end of the driveway. I painted two old campaign yard signs and put them at the edges of the property along the road. If my stand is successful and grows, I’d love to build a three-sided wooden stand with a roof so it looks more permanent. It would also allow me to sell products year-round despite the snow.
![]()
Effective pricing will also be part of your selling strategy. To get an idea of price points for your items, check out other stands nearby, the local farmers market, and even the supermarket. Find a price you’re comfortable with, but be ready to adjust it depending on the demand. I’ve found that putting small price tags with each product worked better than a single sign with all the prices.
- Marketing and making sales. Next, it’s time to drum up some sales. Signage will be the most obvious and helpful marketing tool, but consider advertising too. Instagram was helpful and easiest for me, and I enjoyed taking pictures and videos to post. Oddly, the day-to-day content was what people were most interested in: Restocking videos, straightening things up, and explaining what I was doing were the most popular. It really helped people remember the stand was there, stocked with goodies. Posting in my town’s Facebook group and on Marketplace was another easy and free way to advertise, especially since they target local people. Just remember to post regularly about what’s available so customers can rely on your stand.
Get ready to keep track of sales next. I made notes of what sold and for how much. I think it will be helpful to look back and see what were the most and least popular items, and whether I need to adjust the price on anything. It will also help me prepare for next year; for example, whether I should try a different veggie variety or omit anything.
Also consider how customers will pay. I set up a lockable cash box on a 4×4 post and nailed my laminated Venmo QR code to it, so they had payment options. The honor system is best, but be ready for the occasional shoplifter, be it a person or hungry squirrel. - Have fun! At the end of the day, setting up a farmstand is an easy, fun, and affordable way to expand your hobbies and connect with your community. Nothing beats the excitement of a car pulling up to the stand to shop or checking the egg cooler to see how many dozens sold at the end of the day.
Change things up to follow your interests. I want to sell take-home salsa kits complete with tomatoes, a jalapeño, and some cilantro, because I think it would be a cute addition.
Regardless of what you try out, your customers will love the ingenuity and personality of your stand. If you keep at it, it can become a real neighborhood landmark.
Juliana, Massachusetts
My Garden Is a Hotbed of Seedy Activity!
Since I began gardening 26 years ago, I’ve been fanatical about composting. I fervently believed that my big, enclosed pile, steaming away beautifully all winter in a far corner of the yard, was not just helping my own garden by adding organic matter to my clay-heavy Colorado soil, but also doing its part to make the world a better place. I’d always heard that by returning carbonaceous plant debris to the soil, composting keeps that carbon out of the atmosphere. Not only that, but composting diverts my kitchen scraps and garden “waste” from the landfill, where they’d decompose anaerobically and release methane, another potent greenhouse gas. And I buy fewer polluting inputs that have to be manufactured and transported from far away – from petrochemical fertilizers to soil amendments in plastic bags. When you learn about the magical power of compost, it can become not only another good gardening practice, but also, as Michael Pollan puts it, a moral imperative.
But moral issues that seem very black and white usually turn out to be more complex, with real life adding shades of gray. As I learned more over the years, I began to wonder whether traditional composting is really the most environmentally sound way to recycle organic matter. Sure, some of the carbon in the heap gets sequestered in the soil, but as the plant material breaks down, it also releases carbon, in the form of carbon dioxide, into the air. Not as much as a coal-fired power plant, but we’re all trying to reduce our carbon footprint in our small way, right?
As always, the solution to this gardening problem is to follow nature’s lead. Nature doesn’t recycle its organic material by putting it in big piles out in the open, away from growing plants. Plant matter just drops to the forest floor, so the carbon it releases as it decays is “breathed in” by the canopy of trees and other plants still growing above. You’ve heard of “vicious cycles”? Those are all created by humans. Nature’s cycles, including this elegant carbon cycle, are virtuous.
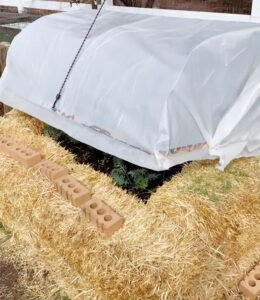
So now, I build an easy, cheap hotbed every year that’s a compost pile, raised bed, straw bale garden, and state-of-the-art carbon-capture technology system all in one! It not only eases my conscience, but I also get an early start on the growing season.
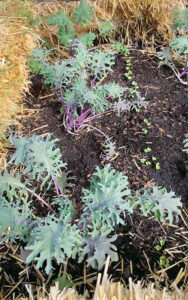
Here’s how it works: In early spring, I get six bales of straw and lay them out in the yard in a rectangle. I start composting in the enclosure by adding organic matter. Materials for compost can be hard to come by this time of year, so we have to get creative. Along with my own kitchen scraps, I collect grounds from local coffee shops and imperfect organic produce from the health food store. (Some of the produce isn’t all that imperfect by my standards, so I admit I eat some too.) Most of that stuff is high-nitrogen “greens,” so if I don’t have enough dry plant residue from last season lying around, I buy an extra bale of straw to add some carbonaceous “browns.” Then, I mix it up and moisten it. After a couple of weeks, the hotbed will be generating gentle heat, and it will start to shrink, leaving room to add a half-foot or so of finished compost or soil on top. This seems to give the new plants room to grow without mixing too much with the actively decomposing material, which can rob nitrogen from them. I transplant hardened-off kale, broccoli, and other seedlings into the bed and also direct-seed radishes, arugula, and cilantro. The straw bales are multitasking throughout the season. They form the insulated walls of the compost-bin-raised-bed combo, and they can also support a cold frame for early season protection. Then, all summer, I can grow lots of veggies in them using trendy straw bale gardening techniques!
This system works in harmony with nature. Carbon dioxide is only bad when it floats up from an isolated compost bin into the atmosphere. But to the plants growing above my compost, both in the hotbed and in the straw bales, carbon dioxide is as delicious as oxygen is to us, and they eagerly capture it. This carbon dioxide is actually a major plant nutrient, essential for photosynthesis. I’ve noticed that plants growing above my hotbed are more robust.
Like any natural system, this method generates no waste, only more useful material. At the end of the season, the compost inside is ready to be spread throughout the garden, and the straw bales can be composted or used as mulch.
I still think composting is a great thing to do. This system just makes it a little more natural and therefore even more beneficial to the garden and the planet.
John, Colorado
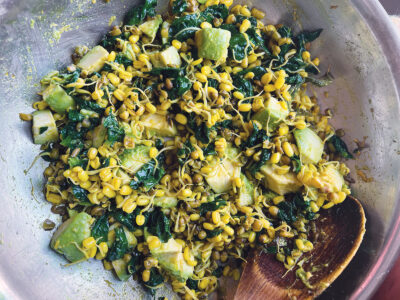
Sprouted Mung Bean and Avocado Salad Recipe
This fresh salad is perfect any time of year and is especially good with early-season greens from the garden. Yield: 4 servings.
Ingredients
- 2 tablespoons ghee or oil of your choice
- 1/4 teaspoon turmeric
- 1/2 teaspoon ground cumin
- 1/2 teaspoon ground fennel
- 1/2 teaspoon ground coriander
- Salt, to taste, about 1 teaspoon
- 2 teaspoons freshly grated ginger
- 2 cups sprouted whole mung beans
- 2 cups fresh greens (spinach, kale, collards), washed and chopped
- 1 ripe avocado, chopped
- Juice of 1 lime
Warm oil in pan. Add spices and salt and cook on medium until they just begin to sizzle. Add sprouted mung beans and cook on medium until they tenderize, 7 to 10 minutes. Add greens. Once greens are about done, add the lime juice. Mix well and finish cooking the greens. Turn off heat and add avocado. Mix well and serve warm.

Sprouting Mung Beans
I use a quart jar with a breathable piece of fabric fitted over the lid. You could also use a metal mesh lid. I start with 1/4 cup of dried mung beans, which leaves extra for salads or snacking. Rinse the beans, place them in the jar, and soak them overnight. Rinse and drain twice a day for two days. Keep out of direct light. I lay the jar on its side to allow the beans more room for expansion.
Bryn, Wisconsin
We Pay for Top Tips
Do you have handy home, farm, or garden advice? We’ll pay you $25 for each tip we publish, plus another $25 if we use your photos.
So, send your niftiest tips to us at Letters@MotherEarthNews.com.
Originally published in the June/July 2026 issue of MOTHER EARTH NEWS and regularly vetted for accuracy.


