
If out of season or just fragile by nature, nurturing seedlings to maturity can be a difficult feat. The first three to four weeks of any plant’s lifecycle is often the most delicate and that fact can be compounded upon by uncertainties with climate. However, these considerations and difficulties can be eased by harboring seedlings in a safer environment and then moving them to their permanent residence – in other words, transplanting.
Transplanting is the process of moving a plant from one growing medium to another. The process gives gardeners the ability to nurture a seedling in a safe and controlled environment, away from unexpected hot or cold spells or seedling hungry pests, so it can establish itself. The grower then takes the plant, slowly introduces it to the elements of its more permanent home (sun, rain, temperature fluctuations).
Along with providing safety from elements, transplanting is often used to extend the growing season of a plant so a gardener can have a head start on production. For example, tomatoes are fairly cold-weather sensitive. If your area advises to plant them in early April, but you get ambitious, plant them outdoors in mid-March and your area has an unexpected cold snap at the end of March, there’s a good chance your seedlings die causing you to start growing all-over again. However, ambitions can live on if you start the seedlings indoors in mid-March, let them grow in a more controlled environment, and wait to transplant them outdoors until the likelihood of a cold snap decreases.
Yet, despite transplanting giving gardeners flexibility and plant germination safety, the process can come at a cost. Simply put, plants don’t like to be moved. The process of transplanting, if not done so with care and patience can kill the plant from what’s called, transplant shock.
Using Seed Trays and Mediums
To germinate seeds, you will need a container large enough to house growing seedlings for a few weeks. Generally, 1.5 to 2 square inches of root growth (roughly the size of an individual egg crate section) is enough area to nurture a seedling. Ensure your container has good drainage with whichever option you choose and fill it with nutrient rich soil such as a potting mix or compost mixed soil — avoid using soil from your yard as it often contains weed spores and won’t be as nutrient rich and balanced for the seedlings. It may work, but with the small volume needed for the seedlings, you might as well opt for the good stuff.
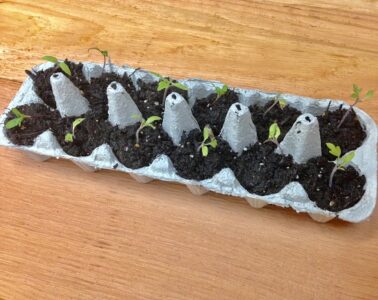
Larger containers such as flower pots are a good solution for starting seedlings, however may be overkill in terms of size and soil volume. At GardenInMinutes, we personally like to use egg crates, as shown in the picture above. However, make sure to use the paper variety. Along with allowing for water to drain out, the beauty of the paper egg crate is that when transplanting time comes, you simply tear each slot off with the plant, place it in your soil, and the paper composts into the soil. More on that later, though.
When planting, reference the seed’s packet as it will identify germination time for the plant and recommended planting depth. Tomatoes for example are recommended to plant just a ¼ inch under soil. Allow the seed to grow indoors with frequent water and moderate amounts of direct sunlight or larger amounts of indirect sunlight. In roughly 6 weeks, the seed will have transformed into a seedling; almost ready for transplanting.
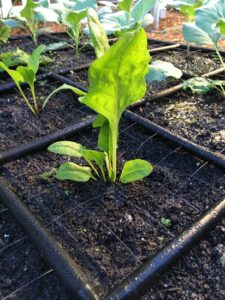
When observing your seedlings, know the appropriate time to transplant your seedling will depend upon the development of true leaves as opposed to early leaves, known as cotyledons. Cotyledons are the first set of leaves a plant produces (often the first 1 to 3), true leaves on the other hand come after and are often darker and larger. After a few true leaves have formed, your plant should be ready to be transplanted.
Hardening Off
If you read one section on the appropriate process for transplanting seedings, read this one. Hardening off is the period of time where you begin to introduce your seedling to their future and permanent environment. It’s critical to the success of your plant once transplanted. If you’ve owned a fish tank you will know that you must slowly introduce any new fish to the temperature of the water as to not kill it from a severe temperature change – you’ll liken that experience to that of hardening off your plants.
Seedlings need time to adjust to their new environment before being transplanted and the best way to do that is to periodically increase the time they spend in it. Over the course of one to two weeks bring your seedlings outdoors for increased durations of time to allow them to become accustomed to the temperate, humidity, etc. When a plant is hardening off, its appearance may not change, but the cellular structure of its stem and leaves will adjust so that the plant can survive in a new environment. Prior to actually transplanting, the plant should be spending the majority of its day outside in its new environment. Without this step, the likelihood of your new seedlings surviving a transplant will be much lower.
Garden Preparation and When to Transplant Seedlings From Seed Tray
While the plant is in the hardening off process, spend some time preparing environment that you plan to plant the seedling in. We recommend energizing the soil where you plan to plant by adding compost and fertilizer so there are plenty of nutrients for the young plant to consume.
After enriching your soil it’s technically ready for the new seedlings, however keep an eye on the soil’s temperature and the weather of the day you decide to transplant. If soil is still very cold it can shock the roots, so check the plant’s ideal growing temperature. If you’re in a heatwave and there isn’t a cloud in the sky, it could burn the plants and cause them to wilt. Ideally, you want to transplant on a mild, partly cloudy day – avoid extremes.
Transplanting
A few weeks have passed, the weather nice, your soil is nutrient rich, your seedlings have grown their first true leaves, and you’ve hardened off the plants – it’s time to transplant!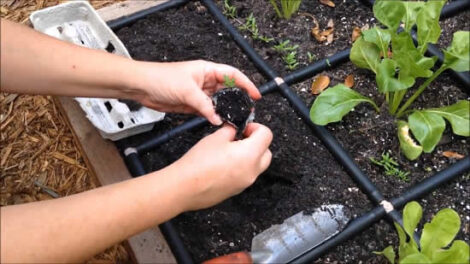
Bring your plants to your garden area and dig a hole suitable for them to fit in. Carefully remove the plants from their containers by pushing them out by loosening the soil and pushing on the bottom of the pot (if the pot is plastic and moveable). This is the gentlest way to remove a plant from its home, and helps ease the transition. You’ll want to maintain the root ball and any attached soil as best as you can. If using the paper egg crate as mentioned earlier, gently tear each egg slot away from the crate (at this point the paper should be fairly soft due to watering) while keeping the seedling intact, bring it over to your garden and gently tear the sides of the paper so roots can more easily grow through after setting the seedling and newly torn egg slot into the garden hole you’ve dug for it.
Place the plant into the hole and fill remaining space with the nutrient rich soil you dug out. Once firmly in place, drench the soil surrounding the plant with water – be cognizant not to wash the soil away from the plant. This reacts with water-soluble nutrients and the roots will reach out to grow in the new environment. If the plant exhibits signs of transplant shock – wilting, scorching, or yellowing of leaves – shade the plants intermittently from long hours of direct sunlight, but still try to maintain soil warmth. Shade the plant intermittently for a few days, water it well, and gradually reduce the shaded time until the plant begins to strengthen.
Transplant Shock
Transplant shock happens most often because of damage a plant sustains during the transplant process. If a plant’s roots or stem are harmed, the plant will lose nutrients and go into shock. Seedlings are delicate and in a critical time of growth, so this is why you have to be careful when transplanting them and make sure they’re hearty enough to survive the move.
Transplanting is a delicate process, but offers so many benefits to the gardening enthusiast. Remember to follow these simple steps: allow the seedling to grow indoors until true leaves appear, allow the seedling to harden over time, prepare the garden, know when to transplant seedlings from seed tray particularly for the type of crop, transplant carefully, and watch for transplant shock symptoms for the first few days. Do those things and your plants will flourish long after the transplanting process is over.
Video: Success with Seedlings

Bryan Traficante is one of the co-founders of GardenInMinutes.com, where his family and he have one mission: making it easier for you build and grow great garden. They’re the inventors of the Garden Grid watering system, crafters of modular garden beds, and share time saving gardening advice on Facebook, Instagram, Pinterest, and their video series, aptly named Easy Growing.
All MOTHER EARTH NEWS community bloggers have agreed to follow our Blogging Guidelines, and they are responsible for the accuracy of their posts. To learn more about the author of this post, click on their byline link at the top of the page.


