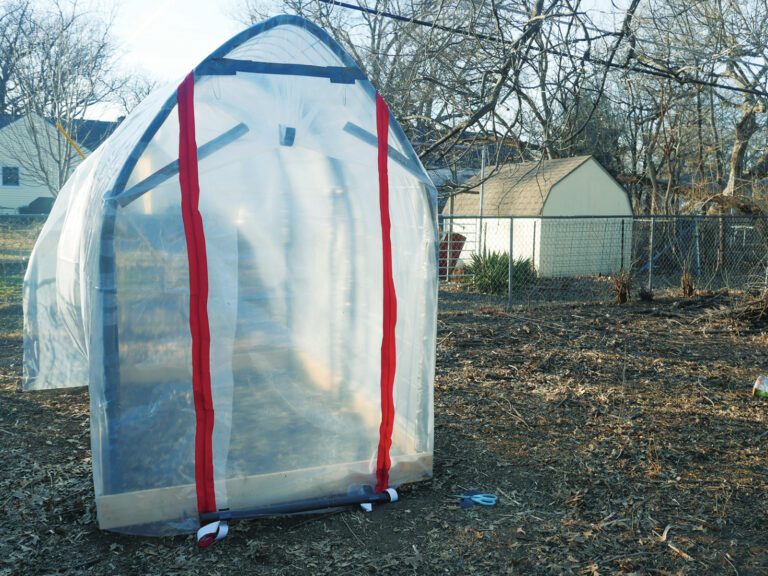
Build a double cattle-panel greenhouse with plans and a material list to extend your growing season, start plants weeks earlier, and grow plants your local garden center probably doesn’t carry.
Until recently, the largest thing I’d ever built in my life was a balsa wood birdhouse in grade school. Now, I have an awesome hoop house in my backyard that we built in a day – and you can too.
One of the best things about working for Mother Earth News is being surrounded by incredibly skilled makers who genuinely love teaching others. So, when the Mother Earth News editor-in-chief shared a hoop house plan with the group, I thought, “I can do this.”
For someone with my level of building experience, that was an extremely optimistic thought. But I had a sunny spot in the backyard, the power of friendship, and an endless supply of free pallets from the Mother Earth News warehouse. Surely that was enough for success.
Our inspiration came from a cattle-panel hoop house originally published by our sister publication Countryside & Small Stock Journal. The design is beautifully simple: Build a rectangular wooden base, bend cattle panels into arches over metal T-posts, cover every sharp edge with foam pipe insulation and lots of duct tape, then stretch greenhouse plastic over the entire structure.
Naturally, a few challenges popped up along the way. First, we built the frame from reclaimed lumber salvaged from a double pallet, so the available wood determined the final size of the hoop house. Second, the original plans didn’t include doors. Josh Wilder, our content director, solved that problem with heavy-duty adhesive construction zippers, creating simple walk-in access without building a wooden doorframe. Third, the original design was intended for milder coastal weather – not the spring and summer windstorms, hail, and tornado watches that roll across the Plains. That required a call to editor Karmin Garrison for a few Texas-tested weatherproofing tricks.

And finally … chickens. I have anywhere from 5 to 11 birds, depending on where we are in the chicken cycle. They’re endlessly entertaining, they’re excellent insect hunters (they’ll also happily eat mice and baby rabbits), and they keep us supplied with rich, golden-yolked eggs. Unfortunately, they also think foam pipe insulation is delicious. If your flock has free range of the yard, do yourself – and your feathered dinosaurs – a favor and buy an extra roll of duct tape. Cover every bit of exposed foam, or at least as high as you think your chickens can jump. Trust me.
Despite those small obstacles, this is a surprisingly approachable project. Honestly, the hardest part was getting the cattle panels home from the farm store. One determined person could probably build it over a weekend, but having one or two extra sets of hands turns the project from “a little frustrating” into “actually, this is pretty fun.”
The finished hoop house is just wide enough for two double rows of cool-season crops, such as spinach, beets, Asian greens, or daikon radish, while also providing room for trays of early seedlings in spring. It may not sound enormous, but it’s enough to extend your harvest, start plants weeks earlier, and grow plants your local garden center probably doesn’t carry. For me, that means locally adapted seedlings alongside Thai round eggplant, winged beans, and whatever other vegetables catch my eye.
Cattle Panel Greenhouse Material List
- Drill
- T-post driver
- Staple gun
- Sharp utility knife or box cutter
- Exterior screws
- 1/2-inch staples
- Twine
- 4 rolls of duct tape
- 1-by-6-by-10-foot rough-cut pine boards (2)
- 1-by-6-by-8-foot rough-cut pine boards (2)
- Scrap-wood corner blocks
- 6-foot metal T-posts (6)
- 20 foam pipe insulators
- 16-foot-by-50-inch cattle panels (2)
- 1 sheet of 12-by-25-foot, 6-mil greenhouse plastic
- 4 heavy-duty adhesive zippers

- Build the wooden base. Lay the boards into a rectangle and place a scrap-wood block inside each corner. Square the frame against each block, then screw each side securely into the corner blocks.

- Install the T-posts. Drive three T-posts along each long side of the frame – one at each corner and one centered between them. Pound each T-post until it’s firmly set and upright to be nearly flush with the frame.

- Protect the contact points. Slide foam pipe insulation over the top of every T-post and secure it with duct tape. These padded spots prevent the cattle panels from rubbing against bare metal.
- Install the cattle panels. Stand the first panel against one side of the frame and tie it to the corner and center T-posts with twine. Carefully bend the panel across the frame and secure it to the T-posts on the opposite side. Repeat with the second panel. Ours overlapped slightly in the middle, creating a stronger roof. (A note from Karmin’s Texas build: Attach the panels to the frame boards to make it a bit sturdier. Using U-shaped nails, such as 1/2-inch, every foot-ish should be plenty.)

- Cover every sharp edge. The cut ends of cattle panels are surprisingly sharp and can quickly puncture greenhouse plastic. Cover every exposed end with foam pipe insulation and secure it thoroughly with duct tape. Yes, this part is tedious. We highly recommend show tunes.
- Install the plastic. Choose a calm day with little or no wind. Drape the plastic evenly over the frame, leaving enough material hanging down each side to anchor securely. Pull the plastic snug – but not drum-tight – before fastening it. Trim away excess plastic after everything is secured. (See “Weatherproof Your Plastic” below before finishing this step.)
- Add the doors. Cut greenhouse plastic to fit each open end. Apply the adhesive zipper carefully, removing the paper backing a little at a time as you press it into place.Take your time. Once the adhesive sticks, it’s staying put. These doors will also serve as ventilation; your plants will thank you for it in summer. Bonus ventilation if you add a small vent opposite the door and cover it with mesh or screening so you don’t just have a hole.
- Celebrate. Step back, admire your work, high-five your building crew, and start planning what you’ll grow first.


This little hoop house isn’t fancy, and that’s exactly why I like it. You don’t need specialized skills, expensive tools, or a heroic budget – just a few reused materials, a free weekend, and maybe someone willing to help wrangle cattle panels. In return, you’ll get a sturdy growing space that can help you start seedlings earlier, stretch the harvest later, and give tender crops a fighting chance when the weather gets weird.
I can already see how one hoop house could become two. Once you’ve stepped inside your own protected growing space – especially one you built yourself – it’s hard not to start eyeing the next sunny patch of yard. That’s the best part of a good homestead project: it doesn’t just solve one problem. It quietly expands what you think you can do next.
Weatherproof Your Plastic
A hoop house is only as durable as the plastic covering it. If you live in an area with strong winds, thunderstorms, or heavy snow, taking a little extra time during installation can dramatically extend the life of your hoop house. Choose a calm day. Installing plastic on a windy afternoon is an exercise in frustration – and it’s far more likely to stretch unevenly or tear before you’re finished.
- Place it in the right spot. If you mostly have wind blowing from one direction, build your hoop house so the wind will hit the broadest side. Facing the narrower sides into the wind will almost guarantee that it will become a kite or be shredded after the first hard wind.
- Leave a little give. Pull the plastic smooth, but don’t stretch it super tight. Plastic expands and contracts with changing temperatures, and a little flexibility will reduce stress on the material. Too much shrinkage will cause tears if the wind puffs just right, and heat will cause the plastic to get weak and, therefore, easily punctured. I used industrial-strength, double-sided tape to secure fabric mesh I had left over from another project to make some windows; this gave mine more ventilation and a little more wiggle to withstand weather.
- Secure the sides well. Instead of simply stapling the plastic to the frame, you’ve got options! You can bury the edges in shallow trenches, anchor them with boards, or weigh them down. The more evenly the load is distributed, the less likely the wind will be to grab an edge. For mine here in East Texas (aka Tornado Alley), I lined the frame with a strip of 6-inch-wide landscape fabric before attaching the plastic. Once the plastic was positioned (attached – you don’t want a ton of holes in it), I used heavy-duty staples and U-nails to attach pallet boards lined with more landscape fabric. Basically, it’s a sandwich of 2x4s, fabric, plastic, more fabric, and pallet boards.
- Protect against abrasion. Any exposed metal, screwheads, or sharp corners will eventually wear holes in the plastic as it moves in the wind. Cover contact points with foam insulation, tape, or old garden hose before installing the plastic. One of my greenhouses even has bits of pool noodles and inflatable pool floats on rough spots. Is it pretty? Eh. Is it functional and so far indestructible? Yep.
- Check it seasonally. Every few months, inspect the plastic for loose spots, small tears, or worn areas. Repairing tiny holes early can add years to the life of your covering.
– Karmin Garrison
More Hoop House Help
- Is this your first hoop house? Run the math based on frost, plan your season extension, and plant seeds around the Persephone Period.
- Need ideas for how to leverage your greenhouse in spring and fall? Check out our Greenhouse Gardening course for growing guidance.
- We actually built this. Watch us construct this hoop house from start to finish in our latest video at www.MotherEarthNews.com/videos.
Originally published in the October/November 2026 issue of MOTHER EARTH NEWS and regularly vetted for accuracy.