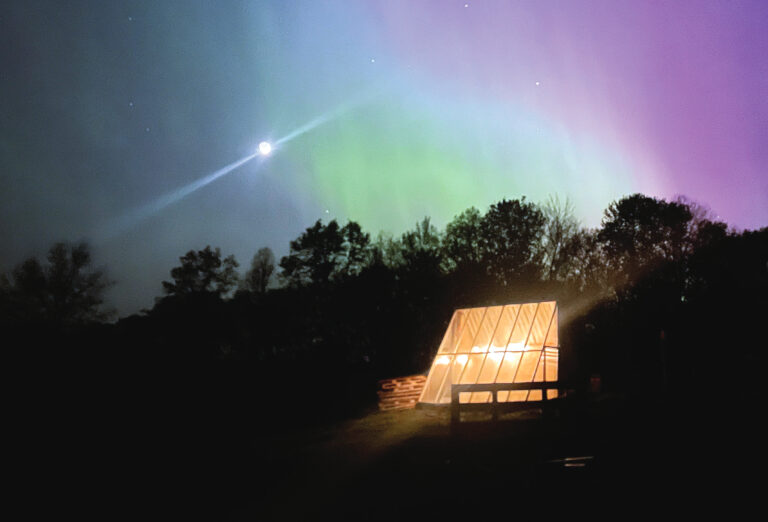
Build this passive-solar winter Wisconsin greenhouse with deep winter greenhouse plans to keep plants warm using thermal mass.
When we bought our farm in 2019, one of our big dreams was to build a hothouse for figs, which won’t overwinter outdoors here in southwest Wisconsin. On a whim in 2020, we started an earth-bermed, passive-solar greenhouse on a south-facing slope. It’s still a work in progress. The footprint is 9 by 15 feet, and the peak rises about 15 feet above the gravel floor. Materials came in under $1,000 because we leaned hard on salvaged block and glass. We tackled the build over three growing seasons – weekends, evenings, and whenever else we had the energy. We recently asked a plant mentor to pick figs for our greenhouse. He chose some 8-year-old trees: ‘Black Bethlehem’ and ‘O’Rourke.’ If we’re good to them, they may make fruit this year, and we can at last make jam from our own figs.
What follows is what went into building our greenhouse, why we made the choices we did, and how the whole thing works day to day.
Deep Winter Greenhouse Plans
We chose a hill facing slightly east of due south – sunny all day, with natural drainage that carries water away from the site instead of into it. The hillside becomes the back wall. And because the soil below the frost line sits around 50 degrees F year-round, we start from a much warmer baseline than the winter air outside.
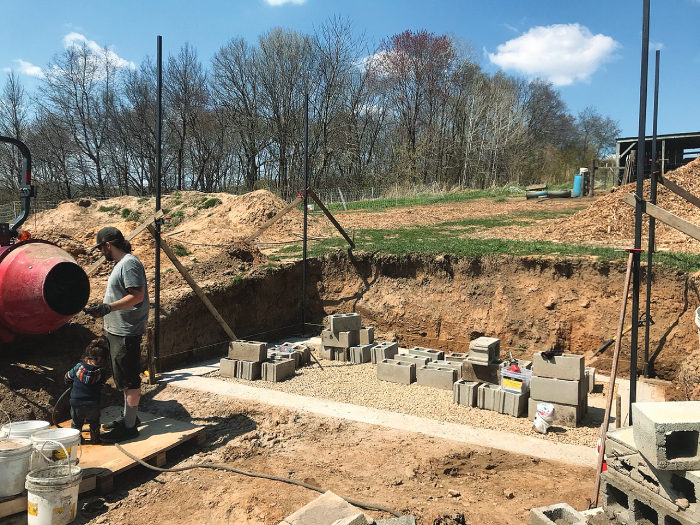
We excavated with a tractor and a shovel, then shaped the grade so water from uphill is forced to go around the greenhouse, not through it. Then we poured a continuous concrete footer below the frost line (about 48 inches in southwest Wisconsin – go deeper if your frost line is deeper). That footer is the foundation: It supports the cinder-block walls and gives the steel rafters something solid to bear on (they sit in pockets in the block). Skimp here and you risk cracked walls or, worse, a slow-motion structural failure. We mixed concrete in small batches using a 3-point mixer on the tractor.
Our footer is 16 inches wide and 8 inches thick, poured on a compacted gravel base. We mixed our own concrete from Portland cement, gravel, and sand. Ordering ready-mix would’ve been easier, but it likely would’ve doubled our cost – so we traded money for time. While the concrete was still wet, we set anchor bolts, so the first course of block is mechanically tied to the footer (think of it as a belt-and-suspenders connection that helps the wall stay put).
Mortar Combat
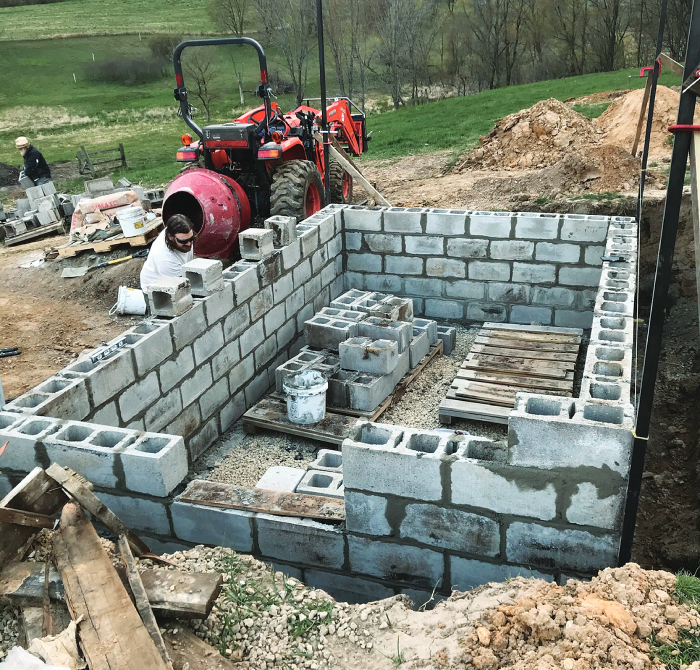
The walls are 8-inch cinder block. The back wall ends up roughly 15 feet tall – and not because we love stacking blocks. The wall height determines roof geometry, creating a steep, south-facing angle for the greenhouse’s glass.
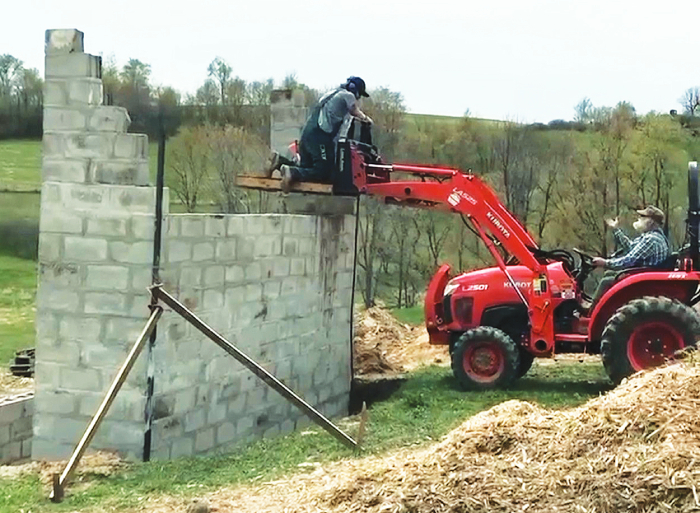
We laid the blocks in mortar and then filled the cores of the blocks to make them solid – course by course. A fully grouted cinder-block wall is heavier, stiffer, and stores more heat than hollow block, which matters in a passive-solar design. We ran vertical rebar through grouted cores at corners and around the door openings, tying that steel into the footer rebar below. At the top, more steel caps the wall, and we welded the roof rafters to the steel. It was a few long days of laying block, plus extra time and concrete to grout every course, but the added thermal mass was worth it. After the wall cured, we backfilled soil against the back wall and the lower parts of the east and west sides to about 3 feet.
High Beams and Higher Hopes
The rafters are 1-1/2-inch-square steel tube from a local supplier, spaced about 24 inches apart and pitched at 66.5 degrees. We went with steel because it simplified construction and won’t rot. I painted everything with a galvanizing finish for rust protection and then touched up the spots where welding burned it off (because welding always wins).
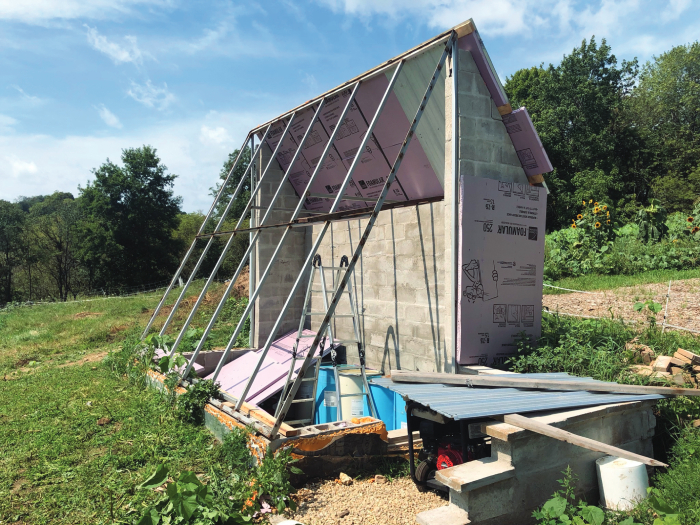
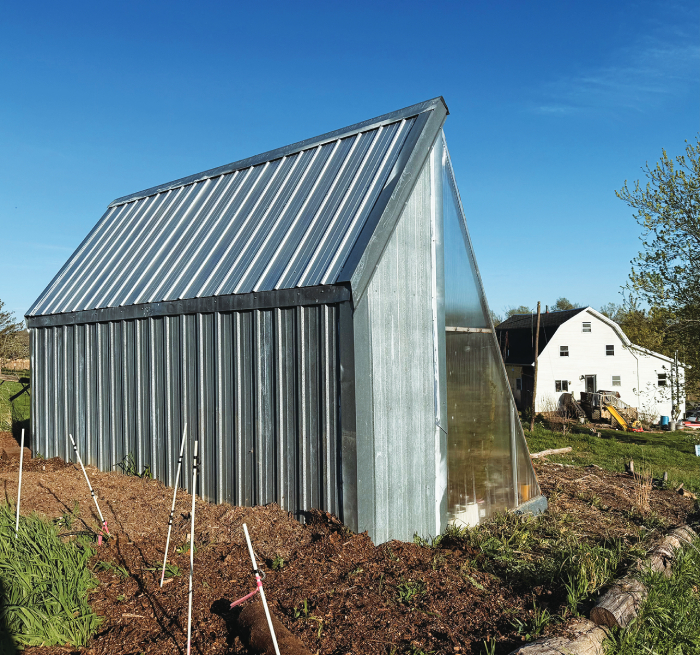
We covered the roof on the back side behind the peak and the north half of the end walls with corrugated steel sheeting on light framing over rigid foam insulation.
Angles, Algebra, and Ambition
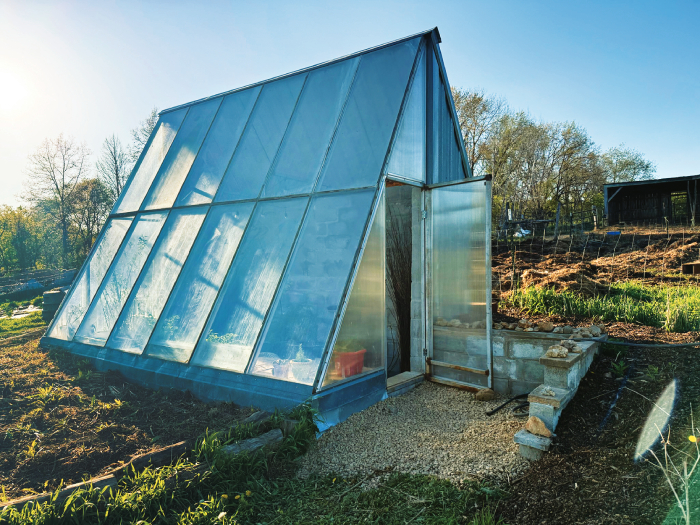
The steep pitch is all about the winter sun. At 43 degrees north on Dec. 21, the sun at noon is only about 23 degrees above the horizon. If you want sunlight to hit the glass close to straight-on, the glazing needs to be tilted about equal to your latitude and adjusted by about 15 degrees for winter sun; in our case, that’s 67 degrees up from horizontal. That one number more or less dictates the whole building’s geometry. The bonus to the steep slope is snow shedding. In summer, the high sun hits the glass at a shallow angle, so more light reflects and less heat pours in.
We salvaged double-pane sealed units from old patio doors for glazing – and then designed the roof around whatever size glass we could get for free.
We set each glass panel onto the steel rafters using double-sided glazing tape and then sealed the edges with clear silicone. Some of the factory seals on the old double-pane units eventually failed, and a few panes fogged. If I did it again, I’d leave the panels in their original doorframes until the last possible moment – less handling, less stress on the seals, and less chance of moisture getting trapped inside.
The east and west gables are twin-wall polycarbonate above the berm with rigid foam insulation added outside the block below where the gable meets the soil. The polycarbonate lets in light from two more directions on a sunny day, making a noticeable difference in the morning and late afternoon.
Winter Wisconsin Greenhouse Insulation
Foam goes on every surface that comes into contact with outside dirt or air, except the south glass and the gables.
We installed two inches of XPS rigid foam (R-10) outside the concrete walls. Steel covers the foam above grade. The roof has 4 inches of foam (R-20) with steel over that.
If you skip the foam on the cinder block, the block will still absorb heat, but a lot of that stored warmth will bleed out into the surrounding soil instead of back into the greenhouse air where you want it.
Thermal mass is what keeps the greenhouse’s interior temps from peaking and crashing every day. When the sun goes down, mass releases heat slowly. In our build, there are four main sources doing that work.
- The fully grouted cinder-block back wall. Filling the cores gave the wall far more mass than hollow block would. It gets direct sun from late morning through afternoon and then gives that heat back overnight.
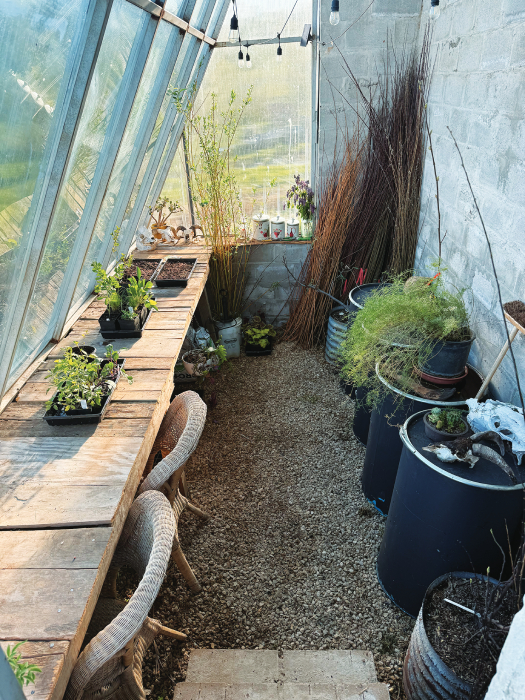
- Four 55-gallon drums against the back wall, painted dark and filled with water. The dark paint helps them work as solar collectors. Water holds about five times the heat per pound of concrete. Four drums add up to roughly 1,800 pounds of water that doesn’t change temperature much overnight.
- The gravel floor is 6 inches of 3/4-inch clean stone over landscape fabric, with a perforated drainpipe daylighted out the front. The gravel retains heat all day and stays dry, regardless of added water.
- The earth into which the greenhouse is set. That deep, the ground holds a constant temperature, which does a lot of the heavy lifting.
Teaching Rainwater Boundaries
An earth-sheltered greenhouse has two predictable water challenges: runoff headed downhill toward your back wall, and condensation that wants to drip, run, and puddle on the floor.
We handled runoff with a shallow swale uphill of the building that diverts water around both sides. For the floor, we laid a 4-inch perforated pipe under the gravel, pitched slightly toward the front, and daylighted it at grade. Condensation from the glass either evaporates or drains out. Both solutions for runoff are easy to do early – and far harder to retrofit once you’ve lived through a wet greenhouse.
Taming Temps, 1 Passive Trick at a Time
This greenhouse runs entirely passively: no electric heater, no propane, no rocket stove – just sun, soil, and a lot of thermal mass. On a clear January day with snow outside and the air at 15 degrees, the inside starts in the high 40s at sunrise and hits the 70s before noon. During cloudy winter stretches, the interior temperature drifts down, but we still run about 20 to 30 degrees warmer than outside, including at night. The interior rarely drops below freezing. Our coldest reading has been around 22 degrees, which should allow us to overwinter figs and other cold-tolerant potted trees.
In spring and fall, it stays at growing temperature with almost no babysitting beyond cracking the door. Summer is the tricky season. Most days, our current setup can dump enough heat – but not always. A passive-solar greenhouse needs venting equal to about 15 to 20 percent of the glazed area, split between a low intake and a high exhaust. That vertical separation creates self-cooling via the stack effect (hot air rises and escapes; cooler air gets pulled in below). Ideally, plan vents while you’re planning the roof. We didn’t, so for now, our system is opening and closing the door based on the weather.
Putting the Greenhouse to Work … Finally
The greenhouse is part season extender, part workshop. In winter, it’s warm enough for a laptop and a mug of coffee; in growing seasons, it’s the easiest place on the property to start seedlings and get your hands in the dirt.
Our plan (still in progress) is to grow cold-hardy greens year-round and keep a couple of fruit trees in pots. Figs are the sure bet; we’re also optimistic we can push into citrus with a little extra protection on the coldest nights. Fruit trees were a major motivator from the start – and they’re a lot more fun to look at in February than an empty bench.
Other uses so far: curing basket willow, starting native seed, escaping the dark season, and practicing new skills. It’s also a decent moon mirror at night, a pretty good place to zone out, and – if we’re honest – a statement piece that makes the neighbors wonder what we’re up to now.
What We’d Do Differently
We’d build it deeper. The footprint is 9 feet front to back, and once you add a bench along the south glass and tuck the water drums against the back wall, the usable floor shrinks fast. If we did it again, we’d make it 12 to 14 feet deep. The extra cost would mostly be more block and longer rafters – maybe $200 in materials – but the payoff would be real: a better workspace, room for a full flat of seedlings, breathing room around the drums, and more shaded area in summer. Otherwise, the design has held up.
We tried mixing our own mortar (Portland cement, sand, and hydrated lime), and it worked, but not how we wanted. We wasted material and spent more than we would’ve if we’d just bought bags of mortar mix. I also think we hurt ourselves by using manufactured sand (fine screenings) instead of round river sand; it didn’t trowel nicely, and the finish shows it. The wall is strong, though, which is more important than aesthetics.
Our next upgrade will be to add an automatic peak vent with a greenhouse-rated piston opener, balanced with an intake vent near the base of a gable to pull in cooler air.
Notes for Anyone Building One
Don’t be afraid of salvaged materials. The patio door somebody is throwing out today has been holding heat for decades – and it can do the same job on the south face of a greenhouse. Keep your eye out for free or cheap materials, and you’ll be surprised how often “trash” turns into the key piece you were missing.
The most useful advice we can offer is this: Have fun and stay curious. Everything is an experiment. We built this greenhouse to be an art project as much as a growing space, and it will keep evolving as our needs do. If you’re after commercial production, there are designs that make more sense – but for a home place, a little weirdness is a feature, not a bug. Start where you are with what you have; you can learn the next skill on the way.
Amanda Caldwell is a lifelong biology and ecology enthusiast who blends agrarian living with conservation work. She raises grass-fed registered Icelandic sheep on Woollyhorn Farm. Ben Caldwell is a lifelong tinkerer, mechanic, and self-taught engineer who can fix just about any motor. He also has a well-documented appreciation for anything with wheels and rocks he insists are “important.”
Originally published in the August/September 2026 issue of MOTHER EARTH NEWS and regularly vetted for accuracy.