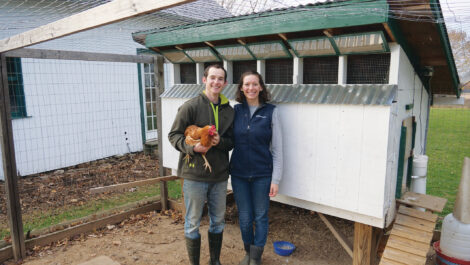
Build a budget-friendly DIY pallet chicken coop from upcycled materials to keep your birds in maximum creature comfort.
If you strolled through a big-box home improvement store during the past two summers, you probably noticed massive lumber price increases spurred by a series of events related to the pandemic. This was especially untimely for new chick owners like us, who had seven fluffy friends in the basement needing a permanent home in a few weeks.
Our finances didn’t allow for the purchase of a pre-manufactured, move-in-ready coop, and we discovered that many are designed more for aesthetics than for functionality. The used coop market didn’t look much better. My girlfriend, Elaina, and I decided to build the best pallet coop we could dream up on a budget. We’re both mechanical engineers by degree, so we began by doing our homework on which characteristics make up a top-notch coop, and then we jotted down some chicken scratches (pun intended).
Planning for Success
We ranked our design criteria in descending order, with chicken needs first, followed by chore functionality and accessibility and, finally, aesthetics. We ranked looks last, because we knew most designs could be jazzed up later.
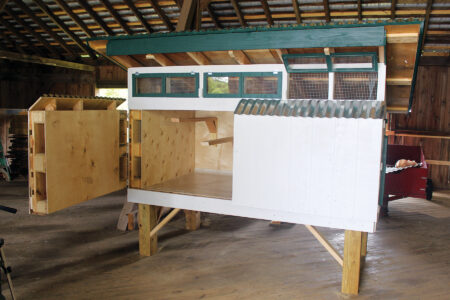
The first functionality detail we considered was floor height. Pre-made coops and many DIY builds place the floor just a foot or so above the ground. This sentences humans to a lifetime of walking in excrement to sweep up shavings and having to bend down to scoop them up. Instead, we designed our floor to be about kitchen-table height and the front wall of the coop to swing open via two pallet-sized doors. This enables us to roll a wheelbarrow up to the coop front and rake shavings directly in. We also liked the idea of a coop on legs to create space underneath where our birds can dust bathe, enjoy shade, and stay out of inclement weather.

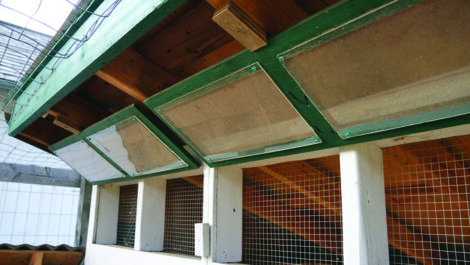
We sized our coop’s interior for 10 to 12 hens, although at the time we only had seven chicks. This gave the girls shoulder room while allowing us to grow the flock in the future. Ventilation is provided by open eaves and three operable windows on the high front wall. Placing ventilation high in the coop keeps the wind off the birds at night, as they’re perched on roosts about 18 inches below. On the back wall, we lined up three projecting nesting boxes that are accessible from outside a fenced run. This gives us access without entering the run, saving our slippers from the mud on pre-breakfast egg collections. The structure is topped by a simple shed roof covered in metal for longevity and heat reflection.

As for amenities, we hung a gutter on the back to collect rainwater into a barrel that feeds a gravity watering system and provides a nearby water source for our birds. Two 4-inch J-bend PVC tubes are stationed on the side wall and can hold about two weeks’ worth of feed for our flock. A gutter downspout connector at the end of each J-bend tube keeps food from spilling onto the ground and attracting rodents. My college roommate built us a low-budget automatic door opener using his 3D printer and an Arduino microprocessor. By far the most convenient feature of our coop, the opener manages the flock’s coop access based on the amount of daylight. The birds are safe inside at night, and we’ll never forget to open or shut the door again! Many commercial automatic doors on the market will serve the same purpose as our budget model.
Our coop design allows 3 to 4 square feet of interior floor space per bird, 1 square foot of ventilation per bird, and one 12-inch-cube nesting box per 4 to 5 birds. We positioned roosting bars 20 and 24 inches off the coop floor.
You can scale your own coop’s design to suit your flock’s needs.
Tools and Materials
This coop can be built with basic power and hand tools usually used for framing carpentry. These include circular and miter saws; a jigsaw; an air compressor; a pneumatic framing nailer and staple gun; a drill and bit set; an impact gun; a socket wrench and set; a tinsnips; and a paintbrush or a roller and tray.
We creatively sourced materials for our coop project. Nearly the entire build is made from upcycled pallets and shipping crates that a local manufacturing business typically pays to dispose of. Nine like-new EPAL block pallets (also known as “EUR” or “European” pallets) make up the floor, walls, and doors. We used 1/2-inch and 1/4-inch plywood cut from the sides of large shipping crates for exterior sheathing and internal paneling. The roof is made from three sections of a large crate that had 1×8 sides. The 6×6 legs, a bunch of 12-inch lag bolts, and a box of 2-1/2-inch framing nails were left over from previous projects on our farm, as was exterior paint and an old piece of acrylic sheeting that we used for makeshift windows. For smooth flooring, a co-worker gave us a roll of old linoleum.
For reference, here’s our list of purchased items, making our total cost only about $250. You may be able to further reduce the total by using upcycled or leftover materials.
- 2x4x8s (12): about 40 dollars
- 2x6x10s (4): about 38 dollars
- Metal roofing: about 95 dollars
- Roofing screws: about 12 dollars
- 1/2-inch staples for pneumatic stapler: about 4 dollars
- 2-by-5-foot rolls of 1/2-inch hardware cloth (3): about 25 dollars
- Window hinges (6): about 8 dollars
- Door hinges: about 28 dollars
Building the Coop Base

Our coop’s base is three pallets butted together on their long edges, reinforced by two full-length runners (approximately 4 by 3 inches, scavenged from a long pallet) inserted through the fork openings and nailed in place. A great feature about EPAL pallets is that three pallets arranged with long edges together are the same length as two pallets with their short sides together – important for creating walls and doors later.
The legs are simply four 6×6 posts cut 24 inches long. They’re connected to each corner block with a long lag bolt driven through the block and leg, plus a pair of 2×4 knee braces nailed on at an angle. The result is the largest and heaviest table we’ve ever built.
Building Coop Walls and Doors
Six more EPAL pallets make up the three fixed walls and two doors on an openable front wall. The side walls are a single pallet sitting on the base, with the outsides flush. This aligns the pallets in the side wall and base vertically, so lag bolts could be driven through each pair of blocks. To keep from buying lag bolts, you could make the connection by using toenails or other creative fastening techniques.
For the back wall, I nailed a 2×6 ledger board across both long sides of the base to give the wall and front doors something to rest on. This also improved aesthetics, because it blocked off the pallets’ fork pockets. I set the back-wall pallets on top of the ledger and temporarily clamped them to the side walls, drove lag bolts through the middle pallet blocks, and nailed a 2×4 across the inside to tie them together. I completed the connection with a single 2×6 top plate that laps onto the back wall.
The last stationary wall is a short 2×4 header wall that spans the front and rests on the side walls. The header making up the base of this wall is a pair of laminated 2x4s turned on edge. On top of the header are short 2×4 cripple studs with mitered tops to match the roof pitch, which we arbitrarily mocked up using a long straightedge. The front doors of the coop are made from one pallet each. They sit on a ledger much like the back wall does, but they’re connected to their respective side walls with three heavy-duty strap hinges screwed into the pallet blocks.

Finally, everything is closed in with 1/2-inch plywood sheathing on the exterior and 1/4 -inch on the interior. To simulate the look of tongue-and-groove paneling, I ran a V-groove router bit vertically on the door exteriors at regularly spaced intervals. Be diligent in blocking off gaps that will allow mice to sneak inside the coop – ask us how we know!
Roof Building
A simple shed-style pitched roof is easy to construct and an efficient use of material in today’s world of hyperinflated building products. (Metal roofing was the most expensive item we purchased for this project.)

The roof’s structure is seven 2×4 rafters spaced evenly across the top and toenailed to the front and back walls. The rafters are cut plumb on both ends, and they seat onto the top plate with a birdsmouth cut. You could use plywood for the roof decking; ours was in three sections constructed from 1x8s. After nailing the decking into the rafters, we trimmed the metal roofing to length, slid it into place, and fastened it with roofing screws, which have rubber washers to seal off leaks at the holes. We salvaged 1×4 fascia boards from a large crate and nailed them across the exposed rafter ends and side edges of the roof deck.
We covered the tops of the front wall’s pallet doors by making a tiny pitched roof with some scrap plywood and 2×4 cutoffs, capped by a piece of leftover metal roofing. This looks great and sheds water from what would otherwise be an exposed horizontal surface. We also covered the rear wall’s projecting nesting boxes with a hinged piece of plywood and leftover metal.
Finishing Up
Our original plan was to enclose the header wall above the front doors with removable plywood ventilation panels, but Elaina suggested making these operable windows – and this looks much better. I cut rectangular holes into the panels and screwed on a salvaged acrylic sheet to form a homemade window. Small hinges on the top allow the windows to swing upward, and basic wooden latches keep them open or closed. The windows are always open except in the dead of winter, when we close the panel above the roosts to guard against nighttime drafts. Chicken coop ventilation is important, even when it’s cold!
Because we live on a historic farm with several original outbuildings painted white with hunter-green trim, we felt it was only proper for the coop to match. We used leftover exterior paint to make the coop white and the fascia and windows green. Finally, we enclosed all interior openings with 1/2-inch hardware cloth and stapled salvaged linoleum to the floor. The linoleum makes cleaning the coop a breeze, since shavings don’t stick to it.
We also screwed a pair of 2×4 roosts on the flat to the back wall, installed 20 and 24 inches off the floor. On the side wall, a 12-by-12-inch vertical sliding door allows the birds to enter and exit.
As you might imagine, this structure is heavy; I estimate it weighs 1,000 pounds. I built the coop inside our barn, thinking my old Ford tractor with clamp-on pallet forks could move it. Wrong! Luckily, a gracious neighbor lent me his skid steer to get the job done.

Shortly after moving the chicks out of the basement and into their new abode, we built an enclosed run around the coop. Then, we added creature comforts, such as automatic feeders, a rain barrel watering system, a chicken swing, a dust bath, and the automatic opener built by my friend for the side-wall door. This coop project is explained in detailed construction videos on our “Raising Chickens” YouTube channel. Feel free to comment there with any questions.
Originally published as “Ultimate Pallet Coop” in the April/May 2022 issue of MOTHER EARTH NEWS magazine and regularly vetted for accuracy.
Alex Walsh and his girlfriend, Elaina Ripepi, have a hobby farm in Pennsylvania called Mason Dixon Acres. You can follow them on YouTube, Instagram and TikTok @MasonDixonAcres.


