

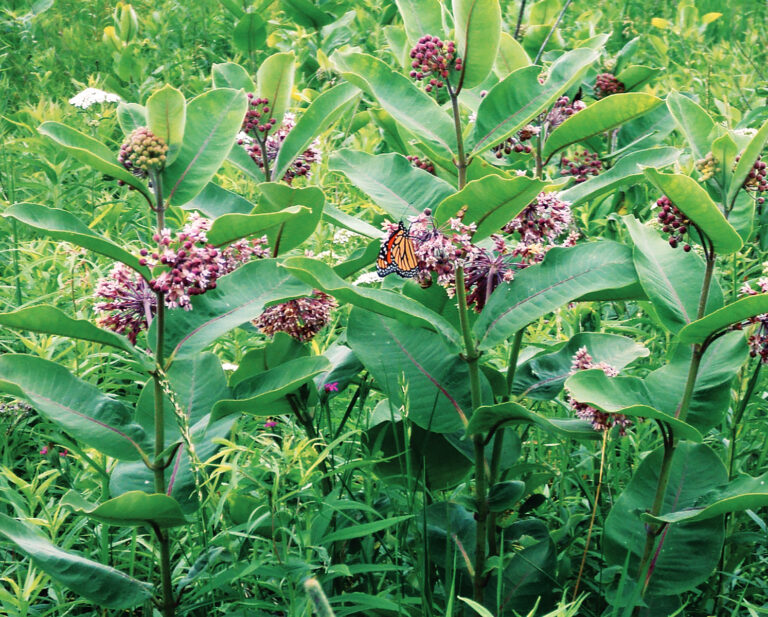
Asclepias is the genus of the milkweeds, plants that possess an interesting history. Their scientific name comes from their reputation as a medicinal herb, and the genus references the Greek god of medicine and healing, Asclepius (Asklepios). Once used to treat everything from bee stings, warts, and ringworm to fever, dysentery, and asthma, these days, because of the toxic cardiac glycosides Asclepias species contain, they should be used only with extreme caution – or not at all.
Milkweed Plant Facts
The common name “milkweed” refers to the milky-white, sticky latex that exudes from wounds to these plants, and that latex contains the cardiac glycosides. This combination physical-and-chemical defense system helps protect them from herbivorous pests, though not completely; mammals will eat them, especially young plants, when other food is scarce, and though most insects will steer clear, there are exceptions.
Milkweeds are some of the most diverse and widely distributed native wildflowers in North America. There are over 100 species, displaying flat-to-globe-shaped umbel flower heads in a variety of colors, including pink, purple, white, green, and orange. Some species love full sun, while others prefer partial shade. Some like to grow in wet ground, while others want dry land. With a species for every situation, you’re just as likely to find a milkweed in the desert Southwest as in the Florida Everglades.
Probably the most recognized member of the genus is A. syriaca, the common milkweed. It’s best known as the host plant of the monarch butterfly, which itself enjoys iconic status, in no small part because of its rather conspicuous 3,000-mile migration across the U.S. to Mexico in late summer. Symbolizing transformation, resilience, and freedom, the monarch is also an ecological indicator species. Its struggles due to habitat loss, pesticide misuse, and climate change are considered representative of the broader picture for what wildlife and ecosystems are facing. These misfortunes have prompted wide-scale public interest in conservation, and in the restoration of monarch habitats specifically. And that means more interest in milkweeds!
Milkweeds support more than monarchs. Many Asclepias are also host plants for caterpillars of queen and soldier butterflies and are also important to some moth species, including the dogbane tiger and the milkweed tussock. Being a host plant to Lepidoptera (the order that includes butterflies and moths) means that the larval-stage caterpillars of these insects feed on vegetative parts of the plants. These larvae are able to tolerate the milkweed’s cardiac glycosides. The plants’ flowers are a food source too, visited for their nectar and often their pollen as well by other moths and butterflies (including swallowtails and fritillaries), honeybees, native bees, wasps, flies, and hummingbirds. Milkweeds are frequently cited as valuable additions to prairie and wetland habitat restoration projects, filter strips for bodies of water, and ornamental plantings in general.
Though ecologically important and physically beautiful, the full milkweed story is a little more complicated thanks to the plant’s growth habits. Though milkweed pods (filled with seeds and fluffy pappi for dispersal) are a familiar sight in autumn, it’s the rhizomes, or underground, horizontal stems of the plants, that allow them to establish dense, clonal colonies and make them exceptionally hard to remove from where they’re not wanted, in both the annual and perennial timeline. Their cardiac glycosides make milkweed toxic to livestock, especially when eaten in large quantities, so they’re not usually a welcome sight in a pasture. Though hardy and resilient plants, unfortunately, this spreading nature led to them being considered noxious weeds in some places. However, expanding protections for monarchs have helped reverse this. In my home state of Michigan, for example, all native Asclepias species became protected in 2024 and are therefore excluded from classification as noxious weeds and not subject to mandatory eradication. This is a positive step if you care for monarchs. Although many yard owners and gardeners want to do their part for Mother Nature, that doesn’t change the hard-to-control nature of milkweed!
It helps to know your Asclepias, one from the other. Common milkweed grows aggressively by both the rhizomes, which produce the dense and stationary-yet-expanding milkweed “thickets,” and by the wind-borne seeds, which allow them to travel to new locations. Both swamp (A. incarnata) and showy (A. speciosa) milkweed are just as desirable to the monarch for egg-laying as common milkweed, and both are less aggressive spreaders and will remain in tighter, smaller clumps. Check their native ranges when you choose. Butterfly weed (A. tuberosa) is a possible host for monarch eggs-soon-to-be-caterpillars, but it’s not the first choice. However, it’s still just as valuable to all the mature insects visiting flowers for nectar and pollen (including adult monarchs), and it spreads by seed alone and therefore is nowhere near as aggressive as the other Asclepias (and, interestingly, its sap isn’t so thick and white, therefore not quite a “milkweed”). Finally, remember you can remove the seedpods from any of these plants prior to their bursting open and releasing seeds, thereby allowing them to offer their numerous benefits to the ecosystem but avoiding that particular means of reproduction.
A further point to remember about these attractive plants is that many hybrids have been developed to further enhance their aesthetics and improve their manageability. However, such hybrids are, of course, non-natives and often don’t fill the same ecological niches as their native relatives.
Lastly, tropical milkweed (A. curassavica), though a non-hybrid, is a non-native to the United States. It hosts a protozoan parasite that reduces monarch lifespan and mating and migration success. Because of its tropical origins, it doesn’t die back in winter in all temperate areas, and parasite levels can build up. That makes the tropical milkweed a highly detrimental Asclepias and one to avoid planting – if you care for monarchs.
Leah, Michigan
Money-Saving Tips for the Homestead

- Be wise when you buy. It’s easy to fall in love with acreage, outbuildings, and the idea of total self-sufficiency – but stretching your budget too thin can turn that dream into daily stress. Leave room in your finances so you can invest in what makes a homestead work: tools, animals, repairs, and time to build systems that save money in the long term. A wise purchase isn’t necessarily the biggest or prettiest property – it’s the one that lets you live comfortably and grow steadily and avoid becoming “house poor” in the process.
The land we call home is 3 acres of hardwood bush. It’s not as much land as we were hoping for, but it’s enough to do almost everything we want. It had a small home and a tiny guesthouse on it, making it easier to get a mortgage here in Canada. While the house is small, with the money we’re saving by sticking to the low end of our budget, we can afford more than just the land. - Learn DIY skills. From fixing fences and repairing equipment to replacing a broken window and preserving food, every skill you learn is one less expense you have to outsource. Instead of paying for convenience, you’re investing in knowledge that pays you back over time.
- Pay more for projects to be done right. The goal isn’t to do everything yourself – it’s to be smart about what you take on, so your efforts save money instead of costing more in the long run. Tackling simple repairs, maintenance, and everyday projects yourself can cut costs significantly – but pushing beyond your skill level or hiring someone with less experience just because it’s cheaper can lead to expensive mistakes. Jobs involving electrical work, structural work, or anything safety-related are often worth paying a professional to do.
We had a handyman do a little electrical job he said he was comfortable doing. Shortly after, we went through four months of winter when our water only ran some of the time. It turns out the electrical work was causing our well pump control box to short out. We spent over $1,000 more to fix the mess than we would’ve spent hiring the more expensive licensed electrician to do the original job. Learn from our mistake. - Homestead in layers, not all at once. It’s tempting to jump into gardens, animals, tools, and projects all in the first season – but that approach often leads to wasted money and burnout. Taking it slowly lets you learn what actually works for your land, your climate, and your lifestyle. Build one system at a time, use what you have, and grow into it. When we started, we took on only one major project or new skill per year. This kept it manageable, and it’s still the way we operate today.
- Only grow what you’ll eat. Don’t produce food you won’t eat or that’s cheap to purchase. I don’t grow eggplant because we don’t like it, and I typically don’t devote room in my garden to onions and potatoes because I can buy them in bulk every fall at the farmers market. They’re the same great quality, but it leaves more room in my garden for vegetables that are more expensive to buy.
- Process your own meat harvests. Processing fees at the abattoir can quickly eat away at your savings gained from hunting or raising an animal. Processing your own meat will also help you keep and make use of more of the animal. Some of the out-of-the-ordinary things we use from our deer include liver, kidneys, lungs, and bloodshot meat; these make dog treats. The bottom third of the legs are good dog chews. The large marrow bones make stock for us, and fat can be used for body-care products. The hide is useful for crafting, and a skull can be décor.
Once we’ve gotten everything off that we can, we let the chickens pick the rest of the bones clean to supplement their feed. - Get to know the benefits of your local plant life and the ways it can help you. Foraging has become one of our quiet little money-saving secrets. Instead of buying pricey greens, herbs, fruit, or over-the-counter medicine, we step outside and gather what’s already growing around us. A walk in the woods can mean free food, such as wild berries, mushrooms, teas, and medicinal plants. It takes a bit of learning and patience, but once you know what to look for and how to use it, it’s hard to beat the feeling of feeding your family straight from nature – and keeping a little extra cash in your pocket at the same time.
- Learn to preserve your harvests. Freezing, dehydrating, and canning all have their pros and cons, and what my family prefers may be different for your family. We tend to fill our freezers quickly each summer with proteins and fruit, so I try to stay away from freezing most veggies. I can vegetables instead, to keep that freezer space open. Food-preservation skills also let you take advantage of grocery store sales. Finally, I use the dehydrator for all of our herbs and medicinal plants.
- Connect with a local homesteading community for bartering. Instead of everything costing cash, we sometimes trade what we have for what we need – eggs for a lumber delivery because we don’t have a truck, baked goods for help with a project, or extra produce for a weekend of house-sitting. Every summer, a friend of mine gets a flat or two of peaches and we spend a day canning together, and in return for half, I bring her a gallon bag of the wild blueberries we forage. It stretches every dollar further and expands our resources. Plus, it builds real relationships, where people look out for each other instead of relying solely on stores and unstable systems that don’t care if we thrive or not.
- Rely less on expensive energy sources. Every year, we cut, split, haul, and stack our own firewood – and it’s one of the biggest ways we keep our energy costs down while still being on-grid. Instead of relying solely on expensive utilities, we turn time and effort into savings. By planning ahead and letting our wood properly season, we get longer, hotter burns that stretch every log further. Sourcing our own firewood isn’t easy work, but it keeps our home warm, our bills lower, and us active and in shape.
Shonna, St. Joseph Island, Ontario, Canada
Garlicky Collard Kraut Recipe
Though I also prepare the collard in its ubiquitous braised form, my love of fermented foods led me to a dish I began to crave before I had ever tasted it: collard kraut. A regional specialty of eastern North Carolina, collard kraut is a dish you don’t get to eat unless you live there or make it yourself. The recipe I’m sharing is the product of five years of experimentation. Yield: 2 quarts.

Ingredients
- Collard greens (2 bunches, about 16 ounces each)
- A head of garlic
- 2 jalapeño peppers, deseeded and diced
- Small white onion, diced
- Aleppo or bidan pepper, diced
- Salt (non-iodized)
- Roast the garlic. I used to add garlic raw but found it overpowering in tandem with the onion. Now, I add smoky low notes by smothering it in olive oil inside tinfoil and roasting at 200 F until the house smells like garlic. To begin fermentation and dissolution a day early, stir this roasted garlic paste into 6 cups of water in a bowl, and let the bowl sit out overnight so the mixture can off-gas.
- Prep the vegetables. Dice your jalapeños and onion and combine them in a bowl. Save a large collard leaf for covering the batch once you’ve loaded the crock. From the rest, remove the stems about three-quarters of the way up, leaving a pattern I think of as “angel’s wings.” I roll the greens into a log and slice them 1/4 inch thick. I also chop the stems into 1/4-inch pieces and add them to the onion-pepper medley.
- Load the crock. Add salt equal to 2 percent of total weight – usually a tablespoon per head of collards. Use non-iodized salt to support beneficial bacteria. Pour salt into your off-gassed garlic water and stir. Lay a third of the collards in the crock, followed by a third of the onion-pepper relish and a third of the aleppo or bidan pepper. Repeat until finished.
- Add the brine. Pour the brine and garlic water over the vegetables until they’re covered. Lay the intact leaf across the top and add fermentation weights. Make sure the vegetables are below the waterline.
- Wait. Fermentation takes 7 to 10 days most of the year, though I’ve waited 3 weeks in winter. I’m not shy about sampling to see if it’s ready. If not, return the batch under the leaf, weights, and waterline.
- Empty the crock. Once it’s ready, I use a colander to separate the brine from the ferment. Distribute the shredded leaf, onion, pepper, and stem pieces evenly into jars and then add brine, lid them, and shake to distribute flavor before refrigerating.
I’m told collard kraut keeps for months in the refrigerator. I wouldn’t know; I’ve never had a jar last that long. The raw fermented collard is toothy and bright and the onions and peppers work subtly together to produce warmth without breakthrough heat.
How do I eat it? Often raw with a grilled brat and sharp cheese. It also substitutes as both pickle and lettuce in about any sandwich you please. I also use it in soups, usually tossed in near the end so the leaves don’t lose their signature tang. It also adds something magical to tuna salad.
Rob, via email
Easy Sugar-Free Berry Jam Recipe
Blending your favorite fresh berries with chia seeds creates a delicious jam for breakfast, lunch, or dessert. This recipe is quick to prepare and just needs time to chill in the refrigerator before serving. My picky eaters love this jam and prefer it over the sweeter canned jams stocked in my cupboard. Yield: about 1 pint.
Ingredients
- 2 cups of your favorite fresh berries
- 1 to 2 tablespoons fresh lemon juice
- 2 tablespoons chia seeds
- 1 to 2 tablespoons maple syrup or other sweetener (optional)
First, blend or mash your berries. The blender gives a smoother texture, while mashing leaves more chunks. Next, add the lemon juice. I tend to use about 1 tablespoon, but some berries, such as blueberries, can take more. Combine the blended mixture with 2 tablespoons of chia seeds. Mix well and add maple syrup to taste. Sometimes I use honey or omit the sweetener. Lastly, put the jam into a glass jar with a lid and let it rest in the refrigerator for at least an hour or overnight. This recipe is flexible, and you can be creative by mixing berries and adding herbs or spices. If you have a lot of berries, the jam freezes well. Enjoy!
Rachel, Wisconsin
Make Art from Junk
Making cups from homemade paper is a fun and easy activity. First, I rip up the equivalent of three or four sheets of 8-by-10-inch paper. Pages from last year’s calendar, used envelopes, old magazines or newspapers, ads from grocery stores, etc. Simply tear them all into 3-to-4-inch pieces.
Then, drop them into a regular kitchen blender that’s set aside for crafts. Add enough water to cover the paper, about 2 cups. Since I like pulp with texture, I use the blender’s “pulse” button for a few seconds. For thinner paper, add more water and pulse a bit longer. Experiment with colored paper. You can save envelopes from different holidays.
Pour the pulp into a mesh strainer and use your fingers to press out any excess water. For a mold, I chose an individual custard dish because it had an outwardly flared rim. It seemed logical to prep the dish with a nonstick vegetable-oil cooking spray.
I worked the pulp into the dish, pressing it into place bit by bit. Along the way, I used the corner of a kitchen sponge to sop up any remaining moisture. If you have leftover pulp, you can seal it in plastic. It keeps in the fridge for up to a week, so you can use it for more projects.

The paper dries in 2 to 4 days, depending on its thickness. I gently slid the tip of a steak knife under the edge to loosen the paper from the mold. It popped right out. I painted the paper with a thin coat of Mod Podge, an all-in-one sealer that dries clearly and quickly. Gloss is my preferred finish. Sometimes I paint designs inside the cup itself.
Then, I decided to try a large, wide-mouthed coffee mug for a mold. I pressed black pulp into the bottom portion, not trying to keep the upper edge even. Next, I continued up the inside of the mug with white pulp. It was easy to make a seam between the two colors with my fingers.
What should I put in my cups? Vegetable seeds? Dried herbs or flower petals? I decided to bake lemon peel. Simply place fresh peels on a cookie sheet lined with parchment and bake at 170 degrees F until the peels are dry. It takes 20 to 30 minutes and smells wonderful.
Sherry, California
Small-Engine Maintenance

When it comes to properly maintaining your small engines around the homestead, reminders are worthwhile. I use automotive service decals of the type used by garages and dealerships, which are available inexpensively from online sources. In place of mileage, simply record the manufacturer’s recommended hourly service interval. Also note the required oil for that particular engine. These decals are perfect for use on tractors, mowers, tillers, wood chippers, and other equipment to ensure timely maintenance and increased machine longevity.
Dennis, Missouri
We Pay for Top Tips
Do you have handy home, farm, or garden advice? We’ll pay you $25 for each tip we publish, plus another $25 if we use your photos. So, send your niftiest tips to us at Letters@MotherEarthNews.com.





