Learn to sow wildflowers in a milk jug greenhouse, repurpose wool sweaters, dye fiber with natural mordant, cook up Slovakian winter comfort food, and bear-proof your honeybee hives.
Buying native seedlings, or “plugs,” is expensive, but starting wildflower seeds on your own can be tricky. If you live in an area that undergoes a hard freeze over winter, chances are your local native plants have seeds that require vernalization (cold exposure) in order to germinate. This means they require a whole new set of gardening skills if you want to spend your hard-earned $4 on a seed packet instead of on a single plant.
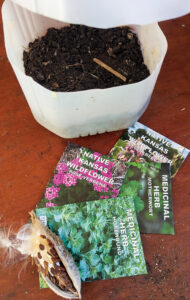
The backs of most seed packets list instructions for how to vernalize seeds in your freezer or for when to direct-seed outside ahead of the cold season. However, the freezer requires micromanagement, and direct-sown seeds are readily gobbled up by winter scavengers before they have a chance to sprout in spring. But fear not! There’s a third option for starting wildflower seeds outside in a controlled environment: milk jug micro-greenhouses.
Simply take an empty milk jug (or equivalent recycled vessel with a hole on top), discard the cap, and poke a few drainage holes in the bottom with an awl. A few inches from the top of the jug, cut three-quarters of the way around the jug, leaving a flap that connects the top to the bottom. Then, open and fill your new recycled planters with 4 to 6 inches of damp potting soil, lightly tamped down, and plant your seeds to the depth directed on the packet. I plant wildflowers thickly to compensate for lower germination rates.
I sow one type of seed per jug and label each container with a permanent marker. When all of my jugs are planted, I tape them up and place them in a bed of leaves in my garden. I check them periodically throughout winter and open them up to water them if they start to get dry. It’s best to start them when you know there will be at least four additional weeks of cold weather. I like an excuse to get my hands in some dirt in January (Zone 6b), but you can start as early as the previous fall.
Left to their own devices, your seeds will begin to germinate when spring comes and the conditions are right. Don’t be alarmed if all of your jugs don’t come up at once; each flower is waiting for its own best time. I like to scoop out individual seedlings with a spoon when they have two true leaves and pot them up with compost like any other seedling. When they’re big and strong, I transplant them into pesticide-free (for me, that even means no Bacillus thuringiensis, diatomaceous earth, or neem) garden beds for my local pollinators.
I’ve tried this method with milkweed, kitchen and medicinal herbs, and wild-harvested native flowers, all with great success!
If you’re having a tough time sourcing native wildflowers in your area, consider joining a local foraging or restoration group to build up your plant-identification skills. Head out during the growing season with flags to mark your desired flowers while they’re in bloom, for seed collection later on. Make sure to leave some of the seeds on each plant. You can also reach out to your nearest extension office for native-plant resources and recommendations.
Alyssa, Kansas
Keep Your Kale Cozy
To extend the garden season, many of us use simple hoop houses or cold frames. They’re cheap and easy to build but not as well-insulated as fancy greenhouses. I’ve discovered a trick to help my delicate fall-planted leafy greens survive even bitter-cold nights under that single sheet of plastic. With luck, my family will enjoy my famous kale pie all through the cold months!
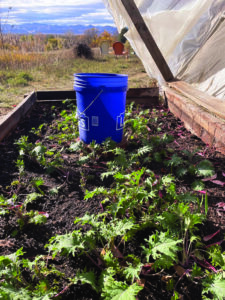
When very low temps are forecast, I fill a 5-gallon bucket with hot water from the kitchen tap and place it inside the hoop house, tucked in between the plants. The heat radiates all night and keeps my plants cozy even when temps are in the teens. The next day, when the air warms up and the water has cooled, I decant water from the bucket out into the bed, an easy way to keep the plants moist when the hoses are disconnected for the winter.
Toting full 5-gallon buckets is the classic “farmer carry” exercise – they weigh over 40 pounds! Many people pay good money to mimic this chore by lugging dumbbells around stuffy gyms, while we gardeners do it for free out in the fresh air. But if I’m not in the mood for a workout, I just leave the bucket in the hoop house, and next time the mercury plummets, I top it off with boiling water from the much-lighter electric kettle.
John, Colorado
Cheap Warm Woolens

Have you ever shrunk your favorite wool sweater? Or perhaps you’ve been dreaming about a cozy wool sweater for your young child to wear in winter? Boiled wool is a staple for my household during the frigid Wisconsin winters. For many years, my children have worn adult sweaters I’ve either purposely or accidentally shrunk in the washer. Most 100% wool sweaters, and even some made from wool blends, will shrink amazingly well when washed in hot water in your washing machine. The suds from your washing detergent of choice will help the process. If you want to make it even smaller, you can use the dryer too. I always check the sweater to see how much it has shrunk before putting it in the dryer. They can get too small! Also, if you skip using the dryer, you can pull and shape the sweater when it’s wet to get a little extra length and a nicer shape. After shaping, lay it on the counter with a towel underneath and let it air-dry.
There are many uses for these sweaters. Some of my favorites include trimming the sleeves short for a child’s sweater, cutting off both sleeves to make leg warmers, and using the bottom torso section to make a hat or neck warmer. A shrunken sweater is your DIY dream come true! The edges won’t unravel much, similar to polyester fleece, and you can use a sewing machine or hand-stitch the seams. Embellishments for your new garment are truly limitless.
Rachel, Wisconsin
January Tomatoes

Are you running low on produce from your pantry or root cellar? Make room in your 2026 garden to raise some of these vegetable cultivars that excel at maintaining their quality for prolonged storage periods: ‘Rolanka’ carrot, ‘Ruby Perfection’ red cabbage, ‘Red Maria’ potato, ‘Long Pie’ pumpkin, ‘Beauty Heart’ (otherwise known as ‘Watermelon’) radish, ‘Golden Treasure’ tomato, and ‘Anna Swartz Hubbard’ winter squash.
Leah, Missouri
Tend Your Tools
Keeping your garden tools free of dirt, mud, and muck is a necessary task, and an inexpensive ice scraper is perfect for this. You can use an ice scraper for easily removing dirt from grimy shovels and spades; plus, it’ll work well for clearing dirt clods from a garden tiller and de-gunking caked-on grass clippings from a mower deck. And, unlike using tools with metal blades (such as a putty knife), a plastic ice scraper has no sharp edges, so its safer for you.
Dennis, Missouri
Rusty Nails for Natural Dyes
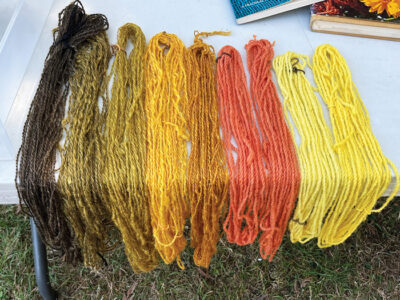
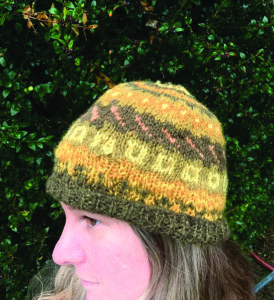
Dyeing my hand-spun wool with local plants is both fun and rewarding, but older dye recipes often call for chemical mordants that are toxic or hard to source. However, using a mordant is often essential to set the dye, so I’ve been using homemade iron and copper mordants for years with excellent results. For an iron liquor, I simply gather rusty nails and other bits of iron in a glass jar and fill it with vinegar. The copper liquor is the same process with copper pipe and vinegar. One hundred milliliters of mordant is usually plenty for 120 grams of wool. You can soak your wool in the mordant either before or after your plant dye bath to get an interesting range of colors! To pre-mordant wool, fill a nonreactive pot, such as enamel or stainless steel, with enough water to cover the fiber. Then, heat it to a gentle simmer and add both the measured mordant and pre-scoured wool. Simmer gently (but don’t boil) for 45 minutes. Then, gently squeeze out excess water and proceed to the dyebath. For an after-dip, follow the same mordanting process after the dyebath until the desired shade is achieved. These colors are all from one coreopsis flower dye bath, and this is the hat I knit using those samples.
Lydia, Vancouver Island, Canada
Keep Your Chickens Safe
Raccoons are surprisingly strong and smart. And, given enough time and a convenient weakness, they can often find a way into your chicken run or coop. Your goal should be to limit their opportunity. I’ve had luck with limiting attractants. Always collect your eggs each day, pick up any food your flock hasn’t eaten during the day, place grain in locking bins, and keep any compost you make in enclosed, predator-proof composters.
If your coop is aging and was put together with nails, it may become easier over time for boards to be pulled off by determined animals. Always keep an eye on the state of your coop. If you notice cracks and other vulnerabilities, patch or replace them quickly. It is, in some cases, a good idea to use screws, as they’re much harder to budge.
Hope, via email
Store Small Stuff
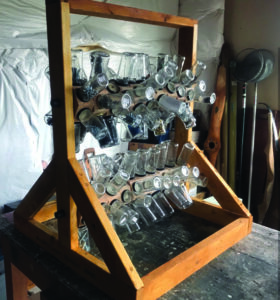
I like to make stuff. I also like to save things. If I purchase 50 screws and use only 40 of them, I’ll save the remaining 10. For that endeavor, my wife calls me a packrat. I also have a tendency to forget where I put stuff down. A friend says that’s typical of old age. Well, to keep track of everything and maintain the sense that I’m a better-than-average craftsman, I’ve created this easy-to-make 120-bottle rotating rack, which seems to solve the above issues. I store bolts, washers, nuts, grommets, and all sorts of other small items. I used empty olive bottles plus six-sided (hexagonal) pieces of wood that I cut from a 6-inch-wide board that was 8 feet long and 3 inches thick. I used 1/2-inch black iron pipe through the hexagons to support the containers; they can get quite heavy when filled. Don’t attempt to match what I did exactly. Create your own perfect storage solution!
Daniel, New York
Slovakian Winter Comfort Food
Our grandparents were first-generation immigrants from Slovakia who lived in New York City. After our parents were married, they ran a store in Manhattan where they sold fruits, vegetables, grocery staples, and deli food, such as homemade potato salad and sandwiches, during the lunch hour. Despite all the cooking in the deli, we often had homemade Slovakian staples for dinner. Here are recipes for two of my sister’s and my favorite dishes.
Grandma’s Mushroom Soup is perfect for a cold winter day. Gather in a stockpot: 2 pounds of sliced white button mushrooms (or any good mixture you like), three or four chopped carrots, three or four stalks of chopped celery, 1 diced parsnip, a whole peeled onion, several cloves of peeled garlic (to taste), and a bunch of parsley tied with string to be discarded after cooking. Cover all of this with water and simmer for 45 minutes. In another pan, make a roux with 1 stick of butter and 4 tablespoons of flour. Stir continuously until it darkens. Don’t burn it; just darken it. Put the roux into the soup and mix it up. Put some broth back into the pan to get out all the roux and then pour this into your soup. Cook the soup an additional 5 minutes. Add salt and pepper to taste and serve with cooked barley or thick slices of bread.
Zelje was traditionally served on Christmas Eve. I still make it for the holiday but also enjoy making it all winter long. It never fails to bring out family stories from the past.
To make this dish, you’ll need two bags of sauerkraut (1-1/2 ounces each) with the juice, or an equivalent amount of homemade kraut, 2 pounds of klobásy or any other smoked pork (our mother used to use smoked pork shoulder because it was inexpensive), 1 cup of dried mushrooms, and 1 cup of water. Next, brown about 3 tablespoons of flour in 1/2 stick of butter. While it’s browning, add 1 teaspoon of caraway seeds, a smashed and chopped clove of garlic, and a diced onion. Add this to the sauerkraut, meat, and mushrooms and cook about 30 minutes on medium heat.
Caroline, Vermont, and George, Wisconsin
Prevent Hive Destruction
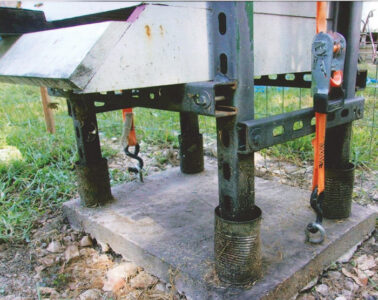
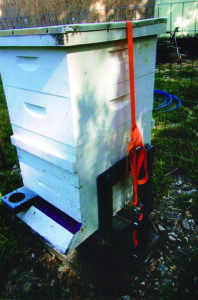
Several years ago, a passing black bear found our honeybee hive in the night and turned it upside down. Being the third- generation carpenter that he is, my dad pulled out his form boards, leveled them, and poured concrete. Once the concrete dried enough for them to stand up on their own, we sank in 1⁄2-inch-by-5-inch eyebolts. After the concrete dried, he set his hive stand (which is handmade from U-channel post) and the beehive on it. Last of all, he hooked a ratchet strap onto the eyes and cranked it down. We never had another hive turned over.
Danielle, Arkansas
Originally published in the February/March 2026 issue of MOTHER EARTH NEWS and regularly vetted for accuracy.


