Whether you are wondering how to make a luffa sponge or how to dry green loofah, these tips will help you easily grow non-toxic, compostable skin exfoliators. These loofahs, often referred to as “sponge gourd,” are not only useful but also a member of the gourd family, making them a fascinating plant to grow.
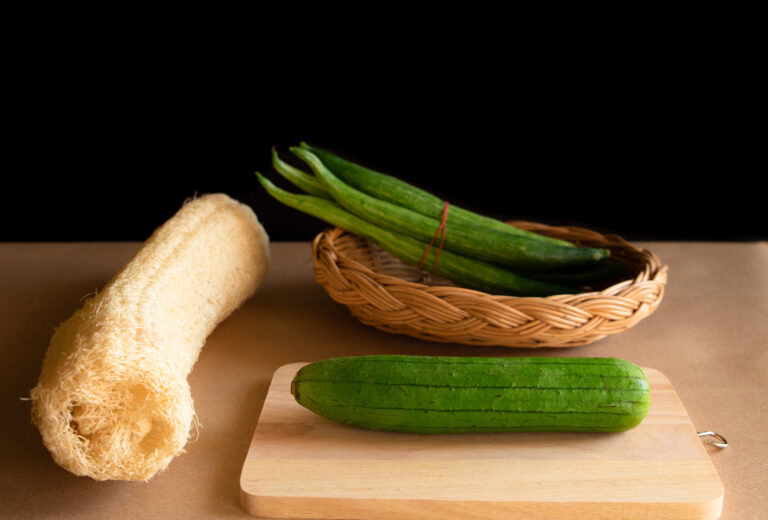
You may recognize luffa sponges (Luffa aegyptiaca, synonym L. cylindrica) from health-food stores, where they’re sold as exfoliators and displayed next to soaps, shampoos, and other bathing supplies. It’s easy to assume that a luffa is a sea sponge; however, it’s actually a gourd that you can grow in your backyard and process at home.

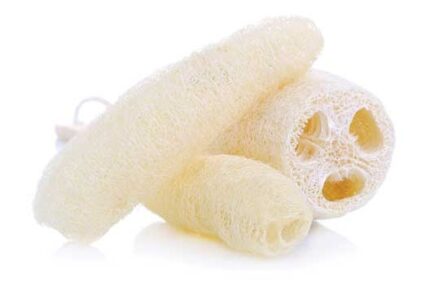
An annual, subtropical vine in the Cucurbitaceae family, luffa is a lush plant with large leaves, buttery yellow flowers, and fruit that looks like giant, 2-foot-long cucumbers. The young, edible fruits — which taste like a cross between a cucumber and a zucchini — can be harvested when only a few inches long for stir-fries, chutneys, and soups. These tender fruits are commonly used in Asian cuisines as a green vegetable. When left to mature and dry on the vine, the fruit becomes quite large and the edible flesh transforms into a fibrous skeleton with brown skin and rattling seeds. This textured skeleton is what we use as a sponge.
You can enjoy luffa sponges in place of a washcloth, or use them to scrub dishes, scour surfaces, clean your car, add an exfoliating layer to homemade soaps, make a DIY back scratcher, or to apply textured patterns to a freshly painted wall. Their role as a cleaning sponge has expanded in recent years due to the rise in demand for eco-friendly sponges that reduce dependency on manmade materials.
Gardeners can also use luffa fibers in water to hold a rooting plant, or mix them into potting soil as a sustainable peat moss replacement. There are a number of fun and creative ways to use luffa, and because it’s such a productive plant you’ll have many sponges left to give as gifts, too!

How to Grow Luffa
Because luffa gourds are left to mature and dry on the vine, they need a long growing season (nearly 200 frost-free days in a row). Gardeners north of Zone 8 can achieve this by starting luffa seeds indoors 6 to 8 weeks before their average last spring frost. (If you’re not sure when your average last spring frost is, then use the Almanac “frost date calculator.”)
You can increase your luffa seed germination rate by scratching the seeds on sandpaper to weaken the seed coating — this is called “scarification” — or by soaking them in warm water for about 48 hours before planting. Plant two or three seeds per container, about 1/2- to 3/4-inch-deep. Luffa seeds are slow to sprout, so practice patience while maintaining a moist, well-drained soil medium and providing plenty of light.
After the seeds sprout, thin them to one seedling per container. Transplant the seedlings to larger containers to prevent them from becoming root-bound. After luffas begin to develop their first set of true leaves, you’ll see that they look almost exactly like cucumber seedlings. Make sure to label your seedlings well, or you may confuse them with other cucurbits.
Luffas are not at all frost tolerant, so wait until frost is safely behind you before transplanting the seedlings to the garden. Before transplanting, spend about a week slowly hardening off your seedlings. To do this, carry them outside and place them in a shady location for a few hours daily, gradually working up to more hours every day.
Place seedlings in a shady location, otherwise the sun could scald their sensitive leaves. Choose a sheltered spot where a light breeze can tease and strengthen their stems but protect them from any strong blasts of wind which could snap their fragile bases.
When all danger of frost has passed, transplant your hardened-off luffa seedlings to a well-drained spot with full sun. Space your seedlings (or seeds, for gardeners in warmer climates) about 3 to 4 feet apart, and make sure they receive an inch or two of water per week.
I mulch my luffa plants with a layer of cardboard topped with 2 or 3 inches of straw, which makes weeding between the vines easier and helps the plants retain moisture. Keep in mind that female flowers will appear later in the season and are essential for fruit production, so ensure the plant receives enough sunlight and nutrients for flowering.
Tip 1:
Slightly Acidic Soil: Luffa prefers soil that drains well and is slightly acidic. Avoid planting where other cucurbits were previously grown to reduce disease risk.
Luffa vines can reach more than 20 feet long, so plant the seedlings along a trellis or sturdy fence to keep them under control. In my Zone 6a garden, I recently grew luffas next to a 3-foot tall hog panel, which was near a 5-foot tall fence, on the other side of which 7-foot tall marshmallow plants were growing. Before the summer was over, the luffas had climbed over both fences and spread their tendrils all over the giant marshmallow, dropping their fruit among the marshmallow’s tall stems.
Trellises are particularly important when growing luffa because they also help ensure straight fruits, which are easier to peel and create more attractive and uniform sponges. Because luffa vines and flowers are so pretty (but also need a lot of space), gardeners could consider growing the beautiful vines on a trellis along one side of the house or near a porch to provide shade.
Some resources recommend removing the first flowers of the luffa to produce stronger sponges and more vigorous production; however, I’ve never done this step and I’ve always been happy with my yield. Try experimenting from year to year to see what works best for you.
How to Harvest and Process Luffa Sponges
In the desert Southwest and subtropical growing climates, gardeners should have enough frost-free days to let their luffas mature on the vine. The skins will turn brown or brownish-yellow, the fruits will lose almost all of their water weight, and you’ll be able to hear the seeds rattling around inside of the gourds if you shake them. When your luffas reach this stage, it’s time to pick and process them.
For gardeners in colder climates, harvest all of your luffa gourds immediately after your first hard frost regardless of their maturity level. If you leave the fruits on the vine after a frost, they’ll start to rot rather than continue maturing. Many of them will still be green and heavy with water — this is OK.
You’ll simply process them a little differently and let them dry a little longer than luffas that dried on the vine. All of the luffa sponges in my household are from green and immature fruits, and I don’t have any complaints about their quality. You may notice differences in color between early-harvested and vine-dried sponges, but all are functional.
Tip 2:
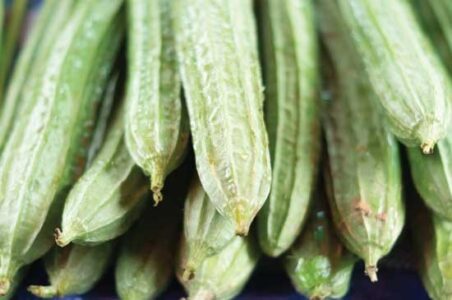
Picking luffas for eating: The versitile Luffa can be picked for eating when they’re still young and tender, usually around 4 to 6 inches long. At this stage, the skin is soft and the inner flesh hasn’t become fibrous, making them ideal for cooking. If the skin starts to harden or the ridges become more defined, the gourd is too mature for eating. Check them daily during peak growth, as they can become tough quickly. These edible gourd luffas can be used in stir-fries, soups, and many other dishes.
Processing mature, brown luffas:
For mature luffas with brown skin, pick them from the vine and let them sit in an out-of-the-way, shady location for a few days to finish drying completely. Break off the end of the luffa where it was attached to the vine; this should come off rather easily, and a number of seeds will come pouring out. Bravo! You lucky Southern gardeners won’t have to work as hard as Northern gardeners to remove the numerous luffa seeds, which can be saved and planted next year.
Start banging your gourd against a tabletop or throw it on the ground to loosen and crack the hard outer skin. (If there are small children in your life, invite them to join the fun.) After the skin is loose, you’ll be able to easily crack open the gourd and peel off the skin. Luffas have a number of vertical seams, so if you find one seam and run your thumb along it, you’ll be able to easily separate the skin from the sponge at this line. If the skin doesn’t come off easily, then soak the entire sponge in warm water for a few hours. After that, peeling the luffa should be easier.
Once your sponge is completely peeled, rinse the intact gourd to remove any remaining seeds (some people go so far as spraying them with a power washer), and then cut the gourd into sponge-sized pieces. You can also cut them into small discs if you plan to put them into soap molds. Let the cut sponges dry in a well-ventilated, sunny spot for a week or two, rotating them every few days. Make sure your luffas are completely dry before storing them, otherwise mold and mildew may develop.
Processing immature, green luffas:
In my experience, it’s best to process immature luffas immediately after harvesting, otherwise the green squash will have more time to develop mildew and will begin to rot. Start by banging your luffa gourds on a table or by throwing them on the ground to loosen the skin and separate it from the fruit. Use your thumb to push into the gourd until the skin cracks and you’re able to start peeling it away.
Luffas have fibrous strings that run vertically up and down the seams of the fruits; try pulling these cords to “unzip” the sponge from its skin. If you begin peeling an immature luffa and the inside looks more like a mushy banana than a fibrous skeleton, then toss it into your compost pile; it’s not mature enough to use.

It’s more difficult to remove the seeds from immature luffas, so be prepared to spend about five minutes per gourd poking out seeds with a chopstick and rinsing the gourd under water. While rinsing, you’ll notice that the luffa releases a slimy, soap-like substance. This is the sap, and you’ll want to rinse as much of it off as possible.
Cut the gourd into sponge-sized pieces (or small discs if you plan to put them into soap molds), and then lay them in a well-ventilated and sunny spot to dry thoroughly for 3 to 4 weeks. Rotate them often, and wait to store them until they’re completely dried. These loofah sponge gourds work well as kitchen sponges, especially once dried thoroughly and cut to size.
By growing 5 to 10 luffa plants, you can easily provide your household with a year’s supply of organic, nontoxic, compostable sponges. The luffa an eco-friendly sponge, helps reduce waste caused by disposable plastic sponges, for sustainablity they are great for cleaning sponges and bath sponges. When your friends and family hear about your latest endeavor, they’ll be sure to request sponges for themselves, too.
Luffa or Loofa?
There are a number of different spellings for luffa. We use “luffa” throughout this article because it’s the specific genus name (Luffa aegyptiaca). If you research luffas online or look for them in seed catalogs, however, then know that you may also encounter these spellings: luffah, loofah, loofa, and loufa.
To Bleach, or Not to Bleach?
Many gardeners will soak their newly processed luffa sponges in a mixture of diluted bleach to achieve a uniform white color and kill any possible bacteria. I skip this step because I don’t want to use bleach on a product that I’ll be rubbing on my skin. I’ve read that vinegar and possibly even Four Thieves essential oil blends could also help sanitize the sponges, so I encourage you all to try experimenting with various options and then let us know what works best for you!
Luffa Gourd FAQ
- What is a luffa gourd?
Luffa is a fast-growing vine in the cucumber family. When mature and dried, its fibrous interior is used as a natural cleaning sponge. Young luffas are edible and used like summer squash in Asian cuisines. - How do you grow luffa gourds?
Luffas need 150-200 warm, frost-free days. Start indoors in cooler areas, then transplant after the last frost. They grow best with full sun, fertile soil, and a trellis. Soaking seeds in warm water before planting can speed germination. - When do you harvest luffa gourds?
Harvest young ones for eating. For loofah sponge use, wait until they turn brown and dry on the vine. Then peel, clean out the seeds, and rinse the interior. You may notice differences in color depending on when and how the fruit matured. - How do you make a sponge from luffa?
Once dry, peel the gourd, remove seeds, rinse the fibrous skeleton, and let it dry fully. Optional: soak in a light bleach solution to whiten, but as mentioned above this isnt recommended. Finished eco-friendly sponges can replace disposable plastic sponges in kitchens and bathrooms alike.
Some luffa seed sources include: Fedco Seeds, Rare Seeds and Strictly Medicinal Seeds
Hannah and her husband sell natural luffa soaps infused with their homegrown herbs at Meadowroot.


