
Chickens rock. There’s just no getting around it: they’re great animals to have around the homestead for food, garden management, compost and entertainment. Seriously, watching Chicken TV is a great way to spend a little down time.
One way to make the chicken experience even more rewarding is to build your own coop. Creating the thing
that gives your birds shelter and protection is incredibly satisfying. You can build a coop that’s superior to many pre-fab units. You can do it for cheap. And it’s easy.
Of course, you’d never know it was easy from my experience: it took me over a year to build the current coop.
The coop was started on a whim when I already had a unit in place; continued in spurts and starts; got put aside for a Winter; went through a redesign after reading more about chickens; went through another redesign after the first chickens got killed by a weasel in the old coop; was further postponed to construct temporary housing for the new chicks; went into high gear as the chicks outgrew that temporary housing; was delayed by inevitable weather events; required a mulligan on the roof; but was finally and quite anti-climatically finished this Fall.
The chickens and I are both happy to have it done. Finally.
This post is not a set of step-by-step instructions with exact measurements for how to build a coop like mine. That’s because this coop is an evolutionary convergence of ideas in the head and materials at hand. Plans and measurements were drawn out, then redrawn, and finally tweaked at the moment all the pieces were put together. Repurposed and reclaimed materials aren’t always plumb, square, straight or uniform; there was a lot of jiggering that had to happen with this coop.
Instead, this post is a description of the finished product: features built, materials used, and concepts that drove the process. It’s meant to provide equal parts education and entertainment as you work on your own coop.
My new coop is a basic shed. The design came straight from Lloyd Khan’s book, Shelter. This book is a great resource for anyone building any sort of structure. It became my go-to resource for all basic elements of the coop.
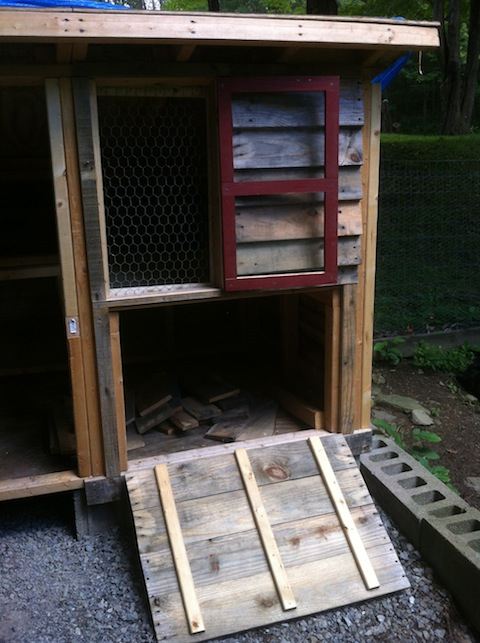
The coop has a 4 ft x 6 ft footprint. It’s framed out with 2x3s and has a 3/8 inch plywood base for the floors and roof. The front wall height is 4 ½ feet, the back wall is 3 ½ feet. Nothing fancy about the framing. The coop is oriented with the front door and majority of openings to the South; weather blows in primarily from the North and West in my area, and it will also be good to have the sun shining in during the Winter.
The coop is set on a raised foundation of three rows of cinder blocks. This required leveling and grading the spot where the coop would be situated.
I built a small wall with cinder blocks at the lower end of the area. Then I leveled the area by filling in, repositioning and grading the earth. I did this over the course of a week in which rain was predicted for several days. Earth always settles, far more than you can achieve just by tamping it down. You want to be sure the settling happens before you start building; the rain and time facilitated the settling process. I repeatedly graded the area and checked level with a 24-inch level mounted on a 4-foot 2×3 throughout the process; I checked from front-to-back, side-to-side, and diagonally across the area. When the earth was looking good, I added gravel to continue the leveling process. Then I put down the cinder blocks rows.
The ext
erior of the coop is clapboard siding made from old cedar planks and pallet slats. Shelter provides good basic information about putting up clapboard siding. The triangular peaks on the side walls are covered with board-and-batten siding using the same materials. There are end boards at the corners of the coop to cover the gaps made by the layered clapboards.
The front door is a bit inspired. Slapping together a door for the coop would have been easy enough. But while I was looking for simple designs, I happened to open Eric Sloane’s A Reverence for Wood. In it he talks about how during pioneer times young men thoughtfully “planned doors for the houses they would someday build… the door was considered something special”; he provided illustrations of the kind of designs that might be used. The coop door became an opportunity to experiment before starting on the doors I’m scheming to build for my own house.

The door stiles and rails are 2x3s, connected with lap joints; there’s a mid-point rail and crossbucks in the lower half of the door for structural support. The exterior of the lower half is covered with vertical lap-jointed boards. The upper half is screened in with chicken wire and has an exterior panel that can be opened and closed. The panel is made of lap-jointed boards held together by rails and crossbucks.
There’s a small ramp at the base of the coop for the chickens to get in and out. Very basic construction: lap-jointed exterior boards held together by three battens on the inside. This is also the access point for taking care of food and water.
There’s a third side door made of plywood that accordion-opens to the inside. It’s currently covered with plywood but will ultimately lead to a chicken moat around the garden area.
The doors lock closed with a strap and carabiner that goes through the strap loop.
There are two windows on the coop, one front (South) and one side (East). They’re built from 1 ½ inch pine furring strips and panes of acrylic, cut to size. The windows are constructed from lap-jointed stiles and rails. However, each piece has a groove dadoed up the middle of the interior edge so the acrylic pane can be slid into place before stiles and rails are finally connected. The front window is hinged to open; the side window slides. Both are screened.
The coop is topped with a green roof. The design came from Johan van Lengen’s The Barefoot Architect, another invaluable resource for the self-reliant builder. The roof box is framed in with old 5 ½ inch wide pine planks. A 6 mil sheet of plastic is laid down on the inside as a water barrier; the plastic wraps up and over the edge of the roof box. Chicken wire is secured over the plastic to hold the soil in place. A drainage pipe along the lower edge of the roof is made from 1 inch PVC with holes drilled at 4-inch intervals on opposite sides; the pipe is covered with gravel before adding the soil to keep it from clogging.
A word of caution about building a green roof: you absolutely must give thought to the underlying structure that supports it all. Your standard roof is meant to have water run off; a green roof is meant to hold water. One cubic foot of water weighs roughly 60 pounds. Which means – depending on the scale of your project – you’re adding hundreds of extra pounds to the roof. Don’t assume that a standard structural design can accommodate this weight. Figure out exactly the sort of structure you’ll need to support the load your project will produce.
Inside the coop, there are a couple of roosts made from 2x3s.
There’s also a loft with a row of nesting boxes built from old 2x4s. Shelter has useful advice on how to add beams and rafters to support something like a loft.
I painted the exterior with red barn paint. Cheap, easy and will protect the wood from the weather.
And that’s it. That’s the chicken coop.
There’s no electricity or external heat in the coop. No need, not even during the cold, wet Winters in New York. As long as you keep your chickens well-fed and watered, dry and draft-free, they’ll do just fine.
Regardless of what design and materials you use for your coop, there are some universal concepts you should keep in mind.
VentilationYear-round ventilation is critical for chicken health. This is true for both cold, snowy winters when the birds can be stuck in the coop for weeks at a time; as well as hot, humid summers when the temperatures rise and the chickens can’t take off their down coats.
My coop has the door panel and windows that can be opened. There’s also a row of soffits along the front roof line, gaps made where the rafters meet the front wall frame. They’re screened and always open; they let damp, warm air escape. Most of the ventilation on my coop is South-facing so that it can be kept open in almost all conditions. When the weather does come in from the South, the windows and door panel can be closed; the soffits are protected by the roof overhang. The East-facing window can be opened as needed to improve ventilation.
Draft-Free The flip side to all this ventilation is making sure your chickens are kept draft-free. Moisture and draft produce sick chickens through chill and frostbite. It can kill your birds. Think about providing ample ventilation without creating a cross breeze or drafts in the coop. Also, make sure you put up siding correctly so there won’t be any gaps allowing drafts.
Ease of Access Make it as easy as possible for yourself to get to all corners of the coop, especially when cleaning and gathering eggs. This is why I built a front door that is person-sized.
Predator-SecureMake it as hard as possible for predators to get in the coop. When the door is shut, those chickens should be secure and you shouldn’t need to worry about it. All of the openings on my coop are screened with either chicken wire or ¼ inch wire mesh; the bottom of the coop is covered with chicken wire to prevent predators from scratching or chewing a hole to get in. Opening the door or ramp requires opposable thumbs to unclip the carabiners; raccoons have been known to open hook-and-eye latches. Above all: make sure you close the doors and ramps at night when the chickens are in. Don’t get lazy.
Building with WoodWood swells and shrinks in width, never noticeably in length. This is especially important to remember when putting up siding and constructing the door. Planks that originally fit together nicely side-by-side can shrink and cause gaps; this will let drafts and possibly even unwanted critters get in. Also, a door that swings open nicely when first hung can swell and rub against the frame.
Use lap joints when joining wood together. This keeps gaps from appearing between boards used for siding. When building frames, lap joints allow the wood to connect flush, making planning dimensions easier. More importantly, lap joints add way more strength than simply putting two pieces next to each other and screwing them together; wood rests
on wood, bearing weight and force instead of just the screw taking the load. Obviously, cutting lap joints adds some time to the process but it’s completely worth it. You can use a router or a table saw with a dado blade. The old-fashioned way is to cut a series of kerfs and chisel out the wood. I go hybrid: table saw the kerfs and then chisel.
Use screws for everything. With the advent of the cordless drill, there’s absolutely no reason not to. Screws make it easy to take apart and reuse materials. Or to back up and fix a mistake.
If you have any questions, thoughts, or comments about building a rock-solid coop for your chickens, feel free to contact me. Always happy to talk.


