
Learn about homemade chicken coops through a reader sharing how his family built a new coop using salvaged materials and traditional techniques.
My wife, Monika, and I were recently surprised to find 18 chicks huddled in a cardboard box under a lamp in our Washington state garage. Our granddaughter, Kati, and her husband, Niko, had bought us the chicks; they knew that we had tended chickens as children, and they guessed we’d welcome fresh eggs. Niko suggested he could build a lean-to against the garage for the chicks. Because space was no consideration, the idea of a lean-to changed to a free-standing chicken coop. Kati sketched her idea of walls based on those familiar to her from her childhood. The chicken coop plans morphed into an Austrian mountain hut measuring 10 by 10 feet. The idea was to build from the land as much as possible, as a homesteader might’ve done 140 years ago. Niko and Kati wanted the structure to have a small energy footprint and only rely on a 500-watt light bulb for winter heat. Here are the steps they took to build that structure.
Laying Foundations
Along our old fence line, we have piles of stones gleaned from fields by my dad, my grandfather, and my great-grandfather. Niko and Kati used these stones to build the foundation. Many of the rock piles are at the opposite end of our farm, so it took Kati and Niko a week to move the 3 tons of stone to the building site. Then, Kati and Niko dug out a 3-foot-deep, 18-inch-wide foundation trench. This depth is required to prevent frost heaving from disturbing the foundation, and it amounted to moving 2 cubic yards (about 8,000 pounds) of dirt.
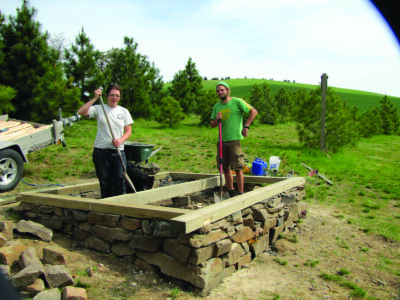
We purchased 1 cubic yard of crushed basalt gravel from a local building supply company and used it to create a 3-inch-deep bedding in the trench. We then began dry-laying the courses for the foundation. We placed treated 4-by-6-inch timbers on top of the stone foundation to act as the sill plates.
Homemade Chicken Coops: German Influence
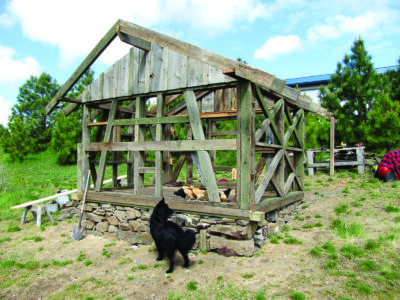
In order to create the coop using authentic half-timber construction (Fachwerk in German), Niko salvaged beams from a barn, originally built in the 1880s, that had collapsed under heavy loads of snow. To form the walls, we connected the timbers with 20-penny nails salvaged from the old barn, and then erected the walls with human power. Niko and Kati cut and put the rafters in place, and then attached the locally milled 1-by-8-inch fir roof sheathing with galvanized 10-penny nails.
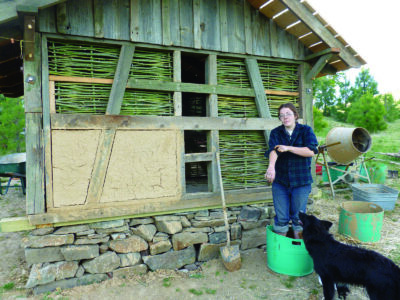
The next step was to fill the frames with wattle and daub. We found a stand of yellow willows in a ditch along a county road. Three truckloads of limbs provided more than 5,000 feet of willow branches. Niko hand-bored 1-inch-diameter holes spaced about 1 foot apart into the horizontal beams to hold the vertical branches (called “standers”) that would act as the framework for weaving the 1⁄2-inch “whips” through. Once the wattle was finished, Niko and Kati placed conduit into the wall for electricity. For daub, they used a tractor to dig clay from our road cut, and then they mixed in wheat straw from last year’s crop. The walls of the chicken coop are 6 inches thick, so Niko and Kati needed about 4 cubic yards of clay for the project. To incorporate the straw into the clay to create the daub, they placed two 10-pound rocks and the clay into a cement mixer, and then added water and straw slowly to prevent the mud from gelling in the drum. They applied the daub to both sides of the wattle, pushing it into the willow latticework. We then smoothed the walls with a wooden hand trowel and cleaned the timbers.
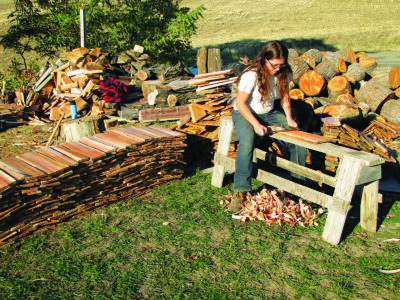
Kati and Niko insisted on hand-splitting cedar shakes. Luckily, they found a long-abandoned log-loading area only 20 miles from home that contained an assortment of 2- to 3-foot-long cedar rounds cut from the ends of logs. Each side of the coop roof is 12 by 14 feet, so Kati and Niko took multiple pickup loads of the rounds home to make into shake shingles. They used my great-grandfather’s froe and a 3-by-3-inch oak sledge to cleave the shakes. Then, they dressed each shake with my grandfather’s drawknife. After much thought, we decided to lay the shakes over tar paper.

After letting the walls dry for six weeks, Niko and Kati plastered the daub and painted the plaster. They sealed the seams between the plaster and timbers with modern caulk. They used red fir for the door and window frames, and installed salvaged door hinges and window glass.
The chickens watched the entire construction and readily accepted their new home.
Originally published as “Build a Timber Frame Chicken Coop” in the December 2018/January 2019 issue of MOTHER EARTH NEWS magazine and regularly vetted for accuracy.


