Parts List
Hull
1 Hull: 1 by 3-1/16 by 7-1/2, Pine
1 Back Post: 3/16 diameter peg, 3/4 long with 5/16 diameter head, Birch
Cabins
1 Deck Cabin: 3/4 by 1-3/8 by 3-3/4, Pine
1 Pilot’s Cabin: 3/4 by 1-3/8 by 1-5/8, Pine
1 Cabin Roof: 1/4 by 1-5/8 by 1-3/4, Birch
1 Smokestack: 3/4 diameter dowel by 1-5/8 long, Birch
1 Main Mast: 1/4 diameter peg, 2-1/2 long with 5/8 diameter head, Birch
1 Short Mast: 1/4 diameter peg, 1-1/4 long with 3/8 diameter head, Birch
Parts Preparation
Hull
I use hardwood for most of my toys, but to improve buoyancy for the tug boat I recommend pine for the hull and cabin. After all, we’re making a boat — not a submarine.
1. To make the hull, start with an oversized blank that’s slightly wider and about 2 inches longer than the finished dimensions. This extra material leaves room for attaching the routing template for cutting the recessed area into the deck, as shown in the photo. To rout the recess, I nailed a 1/4 inch thick masonite template to the workpiece and used a 1/4 inch diameter straight bit with a guide collar.
2. Cut the perimeter of the hull to shape on the bandsaw, with the table tilted to a 10-degree angle. Drill the 3/16 inch diameter hole for the back post.
3. Sand the hull and apply two coats of an oil-based sanding sealer, sanding lightly between coats. Leave some unfinished wood in the recessed area for gluing in the deck cabin and pilot’s cabin later. Mask off the top of the hull and spray the sides and bottom with at least two coats of your favorite color paint.
4. Remove the masking tape and round off the top edge of the hull with a 3/16 inch roundover bit in a table-mounted router. Finish the top of the hull and the border of the recessed area with two coats of an oil-based high-gloss urethane.
Cabins
1. Cut the blanks for the deck cabin and the pilot’s cabin and glue them together with epoxy. (Don’t use water-based glue or water-based finishes on toys that will get a lot of exposure to water.)
2. Drill the 1/2 inch diameter portholes, and then round off the front of the cabin assembly.
3. Apply sanding sealer and two coats of high-gloss urethane to the cabin assembly, leaving the top and bottom unfinished for later glue-up.
4. Cut the cabin roof to shape, round the front end and finish with sanding sealer and paint, leaving a section of the underside unfinished for gluing to the cabin.
Assembly
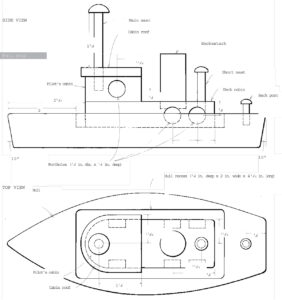
Refer to the illustration for correct orientation of the parts.
1. Glue the cabin roof onto the cabin assembly with epoxy.
2. Locate and drill the holes for the smokestack and masts.
3. Epoxy the main deck to the hull, and glue the masts, smokestack and back post into place. For the smaller post and masts, it’s safer to use commercial pegs with large rounded heads rather than cut-off dowels.
4. Finish the remaining parts with two coats of urethane.
Check this toy from time to time to see if water exposure has caused any of the parts to come loose.
Read more from Making Heirloom Toys
Reprinted with permission from Making Heirloom Toys by Jim Makowicki and published by The Taunton Press, 1996.


