
The following excerpt on making warded locks was taken from Making Working Wooden Locks (Linden Publishing, 2000) by Tim Detweiler. This guide to creating fully functional, working locks from multiple types of wood includes step-by-step instructions, color photos, measured drawings, and advice on tools, and finishing. Included are techniques for creating five different locks, including a combination lock.
Warded Lock with Key
The first thing to do is to select the kind of wood that you are going to use to make your lock. The easiest wood to work with if you do not have power tools is white pine or possibly poplar. Walnut, cherry, ash, and many other hardwoods are stronger and more colorful, but are more difficult to work by hand. Five or six different kinds of wood make a beautiful lock.
Step 1
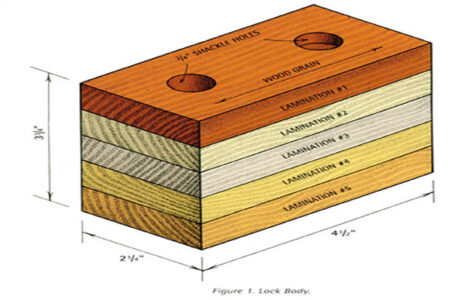
Cut out five pieces of wood 3/4″ thick, 2-1/4″ wide, and 4-1/2″ long. These will be stacked to make the lock body. When all five pieces are cut to size, number them one through five and mark the top of each piece, as in Figure 1.
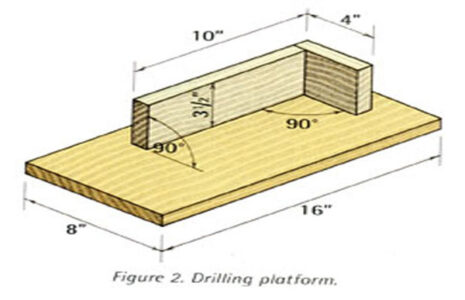
If you have a drill press I suggest that you make a platform (Figure 2) with stops along one side and a positioning stop at one end. Clamp the platform on the drill-press base so you can move it to the proper location for drilling. Make the length to fit your own drill press.
Step 2
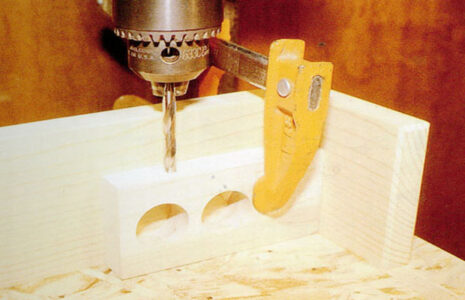
Position the platform so the 3/4″ hole at one end of lamination #1 is exactly in the right location. Use a piece of scrap wood the same size as a lock lamination to check hole location. Once centered, you can drill all holes at either end of all five laminations without moving your setup. Be careful to use the right drill size for each hole.
Step 3
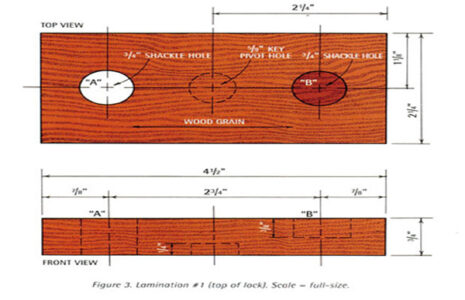
All holes must be drilled straight into the wood. Lay out all holes on the top and bottom of lamination #1 as shown in Figure 3.
Step 4
Drill the 3/4″ shackle hole “A” all the way through lamination #1.
Step 5
Turn the lamination around in the jig and drill the 3/4″ shackle hole “B” 3/8″ deep.
Step 6
Use a 5/8″ bit to drill the key pivot hole 1/4″ deep in the exact center of the bottom of lamination #1.
Step 7
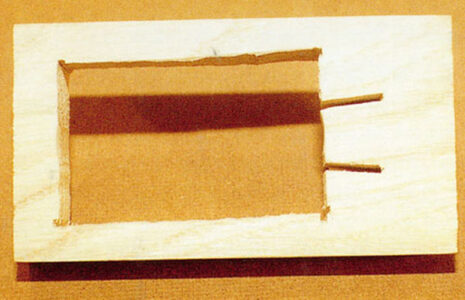
Lay out the shaded area and the two angled cuts for mounting the springs on lamination #2 (Figure 4).
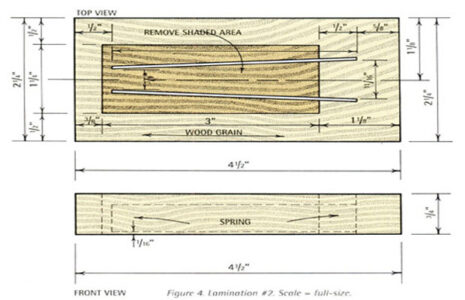
Step 8
Drill a 1/2″ hole in the shaded are for the saw blade. Cut out the shaded area in Figure 4 with a saber saw or jigsaw. This cutout is not critical, but do not make the hole too big or too small.
Step 9
I use a saber saw to make the two cuts that hold the wood springs. You can use a handsaw but be very careful in either case to get the angle of cut right. This angle is what puts tension on the springs so that the springs snap into the locking notches in the shackle when the lock is closed. Please note in Figure 4 that the springs are 3/8″ apart at the free end on the left. As I stated before, these cuts are critical. If there is not enough of an angle, the lock may not lock; if too much of an angle, the lock will not operate easily or, worse yet, the springs may break when the key is turned.
Step 10
To make the springs, select a piece of ash or hickory. These woods have very straight grain. I use a table saw with a 40- or 50-tooth blade to saw my springs, but you can use other tools to make yours. You must end up with two pieces that are 1/16″ thick, 1/2″ wide, and 3 3/8″ long. Now test-fit the springs into the slots in lamination #2 to be sure that they have the proper angle. Glue them into place, making sure that they are 1/16″ above the bottom of lamination #2 (Figure 4, front view). This clearance will prevent the springs from rubbing on lamination #3 when the key is turned.

Step 11
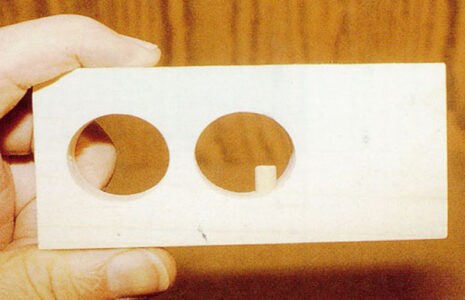
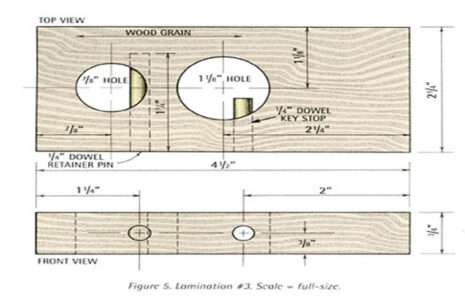
As before, lay out and mark the location of all holes before beginning to drill. I recommend that you drill the 1/4″ holes in the side before drilling the 7/8″ shackle hole. This will prevent the drill from deflecting when it hits the shackle hole. The shackle hole is drilled out next with a 7/8″ wood bit all the way through the block. This hole is oversized to prevent the shackle from binding when it is moved either up and down or turned around when the lock is unlocked and open. Drill the 1 1/8″ keyway hole all the way through the block. Glue the 1/4″ x 15/16″ key stop dowel (Figure 5) into place, making sure some glue gets into the hole with the dowel. Do not drive the dowel in too far or it will block the keyway, making it difficult or impossible to insert the key into the lock (Figure 5, top view).
Note that if you have a 1/4″ plug cutter, you may want to recess this dowel 1/4″ to make room for a wood plug made of the same wood as lamination #3. If you recess the keyway dowel, you will also want to recess the shackle retainer dowel, so make more than one plug for the 1/4″ holes. The retainer dowel will be installed later, just before the lock is ready for finish.
Step 12
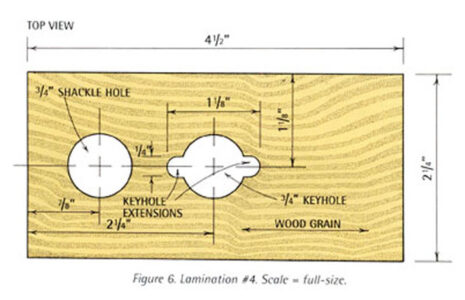
Only the top of lamination #4 is shown in Figure 6 because all the holes go all the way through the workpiece. This lamination is the one that prevents the key from turning unless it is inserted all the way into the lock.
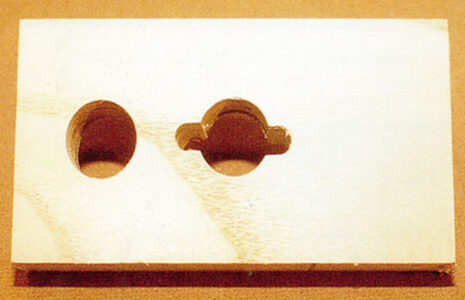
If you have not moved the drilling platform, drill the 3/4″ shackle hole. If the platform has been moved, repeat step #2.
Step 13
As before, find the exact center of the lamination. Lay out the keyhole location, and drill a 3/4″ hole all the way through.
Step 14
After you have drilled the two 3/4″ holes at their proper locations, cut the two keyhole extensions to the right and left of the keyway hole. If you like, you can use a drill or a small pointed saw. These notches should be very close to 1/4″ wide and make the keyhole 1 1/8″ total width. If these notches are bigger, the key may be very loose and sloppy in the keyway. If the notches are too small, you will possibly have to shave or sand the key down to make it fit. Once you make this keyway hole, the key, which will make a little later, will have to be made to fit.
Step 15
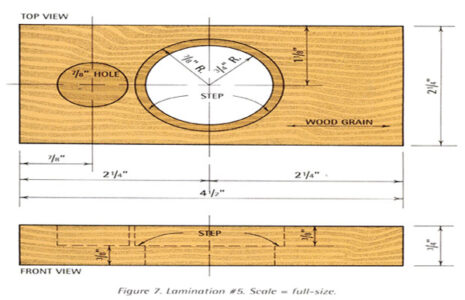
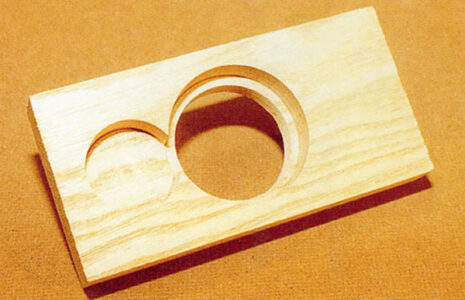
Drill the 7/8″ shackle hole exact 3/8″ deep from the top of lamination #5. Lay out the exact center of the lamination. Then drill the 1 3/4″ keyway hole exactly 3/8″ deep, making sure it is in the exact center of the piece. Now turn the piece over and drill the 1 1/2″ hole 3/8″ deep through to the 1 1/2″ hole (Figure 7, front). It is very important that the hole is centered and has the step all the way around. This is where the key slot insert will turn with the key.
Step 16
We will now make the key insert.
Please note in Figure 8 that dimensions are the finish size. Pieces should be made a little oversized so they can be worked down to fit the insert hole in lamination #5.

Start with 3/8″ thick wood to make the two respective pieces. The largest piece on the insert goes on the inside of the lock. It can be made of pine or another wood that is easy to cut and sand to shape. The smaller piece goes to the outside or bottom of the lock. Make this piece with whatever wood you like for appearance. Both of these pieces should be sanded down in size so that they turn freely with a little room to spare in case the wood expands or shrinks. The wood grain of the exterior piece should run in the same direction as the keyhole. When the two pieces are glued together run the grains at 90° to each other to give strength to the insert. Now glue the two pieces together.
When the glue is dry on the key insert, carefully lay out the keyhole. Drill a 1/4″ hole at each end of the key slot and two or three holes in between. Keep the holes in a straight line. I use a 3/8″ chisel to carefully cut out and trim the rest of the slot. You may want to use a rasp or file to smooth out the keyhole.
Slip the insert in the recess in lamination #5 for a final fitting. Work down both the inside and the outside so that they are recessed just a little below the surface. Allow enough room for a little play (1/16″) on the inside and enough on the outside so that when sanding down the lock body after gluing, you will not hit the insert.

Step 17
Select a piece of straight-grained hardwood for the key blank. I prefer ash or oak, but other hardwoods will work. Make a pattern from Figure 9 by tracing it onto a piece of paper. Try to be very accurate-check all measurements.
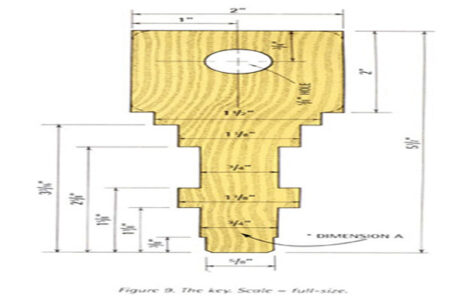
After cutting the blank 1/4″ thick, 2″ wide, and 5 1/2″ long, lay carbon paper on the blank and transfer the pattern to the wood. Be very careful not to move the tracing while doing this. Cut out the key very carefully along the lines. The entire key is a little oversized at this time. Start out by sanding the flat sides so that the key will go into the key insert (Figure 8). Work carefully to round over all the edges until the key goes all the way into the insert. Dimension A in Figure 9 is the working part of the key. Do not cut this part of the key down very far. It will be finished after the lock body is glued together, which is the next step.
Step 18
Stack all five laminations together in order (#1 is at the top). Don’t forget the key insert in lamination #5. Line up all the pieces carefully and clamp them together so that you can try the key in the keyway. Pick up the lock and insert the key. While looking into the shackle hole in the top of the lock, slowly turn the key clockwise. The key should start to turn but don’t force it. You’ll see the locking springs start to move farther apart. Start to file or shave a little wood of the key at dimension A in Figure 9. Take the same amount off each side of the key. Keep working this area down until the key is turned crossways to the stop, about 90°, and the springs are opened beyond the shackle hole. You can wait to do the final fitting until after the pieces of the lock body are glued together.
Step 19
A small bead of glue just inside the edge will work best. You do not want glue running into the lock. Take special care gluing lamination #5 so that no glue gets into the recess around the key insert. If you get glue on the insert, your lock will not work. Hand-press the pieces together and let the glue set a couple of minutes, then clamp securely, making sure the laminations stayed in place and did not shift when pressure was applied. A bench vise is the best way to clamp the pieces together.
The lock body should look like the one pictured in Figure 1.
Step 20
The shackle is probably the most difficult part of the lock to make. Select a piece of straight-grained wood that is 3/4″ thick, 3 1/2″ wide, and approximately 10″ long. White pine is the easiest to work with but is not very strong. I recommend a good hardwood for the shackle, but it will be somewhat harder to work with. Remember to proceed carefully, as the shackle hole is exactly 3/4″ in diameter. The final shackle will be approximately 1/16″ smaller than the hole. It must move up and down as well as turn 360° freely.
Very carefully lay out the shackle outline on the wood to make a pattern. The notching will be done after the shackle is rounded and fitted into the lock. The final width of the shackle must be just a little less than the distance across the shackle holes in lamination #1 (probably a total width of 3 7/16″).
The height of the shackle can be varied if you like. This will only affect how the lock looks, not how it works. May I suggest that you make the shackle ends 2″ or 3″ longer than you want the finished shackle? The reason for this is that you can leave the extra length square so that you will be able to clamp it down, making it easier to hold while rounding over.
Step 21
After cutting out the shackle, sand off the saw marks, and sand all surfaces so that the 3/4″ thickness is now 1/32″ undersized. This will help when the final fitting is done. If you have a router and a 3/8″ roundover bit, rounding over will be much easier. Be very careful and take two or three passes to round over the shackle. Then remove the extra length from the shackle. This will allow you to finish both rounding over and sanding to fit the shackle holes. When you get to this point, you will need to have fitted the key to the lock so that you can spread the locking springs, allowing the shackle to enter the lock. Make sure both ends of the shackle hit the bottom of their holes.
Step 22
When you are finished sanding the shackle, lay out the shackle retainer dowel groove–it goes all the way around the shackle 5/8″ from the bottom (Figure 10). This notch can be made square instead of round if you prefer. Cut or carve this groove approximately 3/16″ deep and 5/16″ wide. Find a 1/4″ x 3″ dowel that will just slip into the retainer dowel hole in the lock body. You may have to sand down the dowel a little.
Now insert the shackle partway until the dowel goes into the hole all the way. If the dowel hits the shackle or rubs on it when the shackle is turned, remove more from the groove until it rotates freely.


Step 23
Lay out the shackle retainer dowel notch just above the groove. This notch is cut out to the same depth as the groove. If the shackle moves freely up and down and rotate 360° without binding, mark and cut the two locking notches on the sides of the shackle.
You have now come the place where you have put quite a few hours into this project. At this point, you probably know that the lock works, but assemble it anyway and insert the dowel retainer pin temporarily–work the lock over and over, making sure it works to your satisfaction. If the lock does not snap and lock when closed, you probably need to cut just a little more out of the bottom of the two locking notches (see the note in Figure 10). Do one notch at a time until there is a little extra play up and down when locked.
Remove the shackle, and lay it aside. If you have not yet sanded down the lock body, do so now.

Step 24
It’s easiest to sand the lock body with a belt sander, but you can also do it by hand. Start with coarse sandpaper and proceed to 220 grit for the final sanding. I use a router and a 5/16″ roundover bit to round all the corners of the lock body. If you’re using a router, take two or three passes to eliminate grain tear-out. Also be careful not to run the bearing race of the router bit into the keyhole, or you will make a notch in the lock.
If you are rounding the corners by hand, use a hand plane or rasp and file followed by sanding.
Step 25
Insert the shackle and cut the retainer dowel pin to length (1/4″ below the surface if you are going to use a wood plug in the hole). Put a bead of glue on the end of the dowel and insert it all the way into the hole. Glue the plugs into the holes, letting them stick up a little above the surface. When dry, cut or sand them off flush with the surface. Check all surfaces and sand all marks and scratches in preparation for applying the finish. This is the most important step in making a “showpiece” and not just a wooden lock. The time you spend on sanding now will pay off when you put the finish on.
As I stated earlier, I prefer polyurethane finish applied with a 2″ foam brush. I prefer satin finish over gloss because it does not show imperfections as easily.
Step 26
Clean the lock and key carefully with a vacuum and wipe them off with a tack cloth. Find a piece of wood about 3/16″ thick by 1″ by 8″ to use as a holder. Unlock the lock and insert the holder in the keyway. Apply the finish to the shackle first, then to the lock body. Be careful not leave runs in the finish. In addition, avoid getting finish in the space around the key insert in the bottom of the lock. I like to hang the lock on a nail until the finish is dry. If the key insert is sticky when the finish dries, use the holder to carefully break it free.
Step 27
When dry, sand lightly along the grain using 400-grit or finer paper to remove any roughness or raised grain. Vacuum the surface and wipe it again with a tack cloth. Apply a second light coat of finish, covering all surfaces and not leaving any runs.
Step 28
Put some paraffin or other wax on the part of the key that comes in contact with the locking spring (Figure 9, dimension A). Insert the key and turn it several times. The lock will work easily and smoothly.

I hope that you enjoyed making this wooden lock, and that you will proceed to make the other locks in this book. May I suggest that you sign and date the lock, so that it may become a family keepsake or a valued gift?
Reprinted with permission from Making Working Wooden Locks: Complete Plans for 5 Working Wooden Locks by Tim Detweiler and published by Linden Publishing, 2000.


