Find the best foods to dehydrate for snacks, including a zucchini chips recipe, a raw fruit leather dehydrator recipe, or make your own seasoning for soup season.
It’s the season of abundant gardens and countertops full of produce to eat and process. Roadside stands and farmstands offer deals on boxes of peaches or bags full of sweet corn, and local orchards might have bushels of seconds for a reduced price. Farmers markets overflow with the best of summer and fall crops, and chances are the community garden will have extra zucchini. It’s the perfect time of year to take advantage of the abundance and stock up now for the cold months ahead.
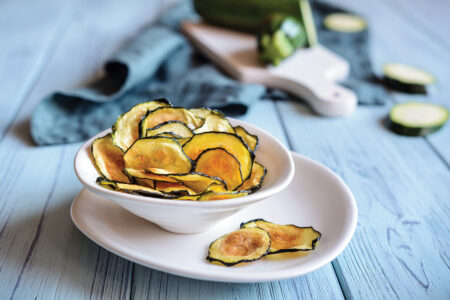
Zucchini Chips Recipe
Dehydrating young zucchini removes water, letting the natural sweetness shine. Light oils help spices stick and enhance flavors, though I’ll often just slice zucchini and then sprinkle them with spices. Zucchini placed in a dehydrator around bedtime is ready by morning. Immediately pack chips in airtight containers to preserve crispness.
- Pick young zucchini. Wash and dry it thoroughly.
Raw Fruit Leather Dehydrator Recipe
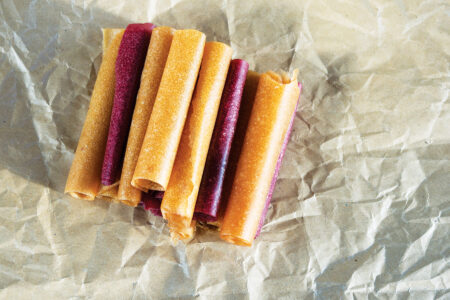
Leathers are a fun way to preserve and enjoy any of your favorite fruits. Blend multiple types of fruit, add sweeteners or spices, and make your own custom flavors. Imagine an apple-cinnamon, strawberry-rhubarb, or pineapple-mango fruit leather. And the technique is basically the same regardless of the ingredients you choose. To fill a couple of trays in your food dehydrator, you’ll need 6 to 8 cups of puréed fruit. If you’re working with a recipe that might benefit from a sweetener, add about 1/4 cup honey for that much fruit.

- 6 to 8 cups puréed fruit
- 1/4 cup honey (optional)
- 2 to 3 teaspoons cinnamon or other spices (a little cinnamon or nutmeg is great with apples, pears, etc.)
- Combine all ingredients in a food processor and blend until smooth. Work in batches, depending on the size of your food processor. Once puréed, simmer fruit in a large pot over medium heat for 10 to 15 minutes, stirring frequently.
- Line dehydrator trays with parchment paper, and then pour fruit mixture into trays. Spread fruit evenly to a thickness of about 1⁄4 inch. If you can, set the temperature of the machine to 145 F and run for 6 to 7 hours. Speed up the drying process by removing the parchment paper after a couple of hours when the fruit has begun to dry and is easier to work with.
- When the fruit is ready, remove the sheets from the machine, roll each sheet tightly, and cut into portion sizes.
The fruit leathers can be wrapped in a clean cloth and stored in airtight glass jars (or wrapped again in cling wrap), where they’ll keep for several weeks. Vacuum-seal for long-term storage.
– Bevin Cohen, from The Heritage Pantry
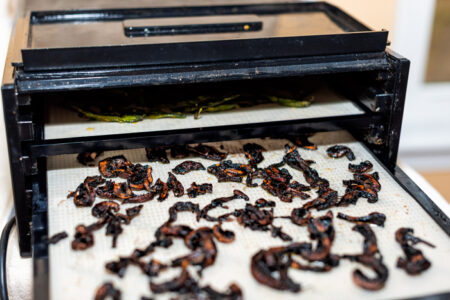
Soup Seasoning
By combining herbs, vegetables, and mushrooms, you can make a flavorful seasoning blend in a food dehydrator. This seasoning blend adds a deep umami flavor to soups, stews, and casseroles. It’s simple to make, and the dried blend can be powdered, making it easy to add a tablespoon or two to whatever you’re cooking. Cut all the ingredients into similar-sized pieces to help everything dry at the same speed.
- 1 small tomato (something meaty, such as a Roma)
- 6 to 8 mushroom caps (I use shiitake)
- Small white onion
- 1/2 green bell pepper
- 1 cayenne pepper or 1/4 teaspoon dried (optional)
- Small bundle fresh thyme (enough to make 1 tablespoon dried)
- Small bundle fresh parsley (enough to make 1 tablespoon dried)
- 2 teaspoons salt
- 1 teaspoon black pepper
- Thinly slice the tomato and arrange slices in a single layer on dehydrator racks. Set temperature to 140 F and run for about 6 hours.
- Meanwhile, slice mushroom caps and onion into 1/4-inch pieces and slice peppers into thin strips, and set aside. Once the tomatoes have dried for 6 hours, lower the dehydrator temperature to 125 F and add the sliced vegetables and mushrooms. Continue drying for another 5 to 8 hours until the mushrooms are brittle enough to break. Remove from the dehydrator and add the fresh herbs (mats in the trays will prevent them from blowing around as they dry), and let them dry for 2 to 3 hours or until they’re crunchy. If you can bend the leaves, they still hold too much moisture.
- Transfer everything into a food processor and add remaining ingredients. Grind into a powder. If the mixture is sticking together, that means it’s not dry enough. Spread on a baking sheet and place in the oven set to its lowest setting. Leave the oven door cracked open and let seasoning blend finish drying for 5 to 10 minutes. Remove from oven, let cool, and store in an airtight glass container.
— Bevin Cohen, from The Heritage Pantry
For the Freezer Dryer
During peak harvest season, we have the freeze dryer going full-time. It’s the perfect way to put up a bumper crop because the food will last for 20-plus years. Did your tomatoes have a stellar season? Freeze-dry enough to last a couple of years. Too many green beans to eat or pressure can? You’ll enjoy them freeze-dried even if you take three years to finish them, and the excess can get you through other years when you might have a crop failure. The freeze dryer is a great tool because it’s easy to use. After a long day in the garden, getting the pressure canner ready to go can feel like a lot of work. But slicing up a basket of tomatoes, putting them on the trays, and pushing “Start” is simple and takes less than 20 minutes. Freeze-drying is also a great way to save money on snacks or convenience foods. Those expensive bags of freeze-dried fruit are easy to replicate at home at a fraction of the cost. It’s hard to pick just a few favorites for the freeze dryer, but here are some you’ll want to try.
Heirloom tomatoes: Cut into similar-sized pieces. While plum-style tomatoes, with their lower water content, are great for canning, the freeze dryer handles the juicier heirloom tomatoes perfectly. They rehydrate wonderfully in tomato soup, chili, meat stews, and mixed vegetable soups. We also like to grind some into a powder (a food processor works for this), and with a little water, they’ll turn into a perfect sauce for pizza or spaghetti.
Fruit: Thin slices of apple, peach, honeydew, or cantaloupe are delicious and much healthier than ultra-processed snacks. Aim for similar-sized, thinner pieces for consistent drying. We’ve yet to make enough of these to keep them in stock past December. They’re perfect in school lunches or on a snack plate.

Dinner sides: Dinner prep will be quicker, and you’ll be able to eat from the garden year-round with bags or jars of several dinner side dishes ready to go. Some of our favorites are:
- Sweet corn. Blanch the cobs and then cut the kernels off and freeze-dry them. Rehydrate corn in a bowl of water and then finish cooking it with some herbs.
- Winter squash. Roast it in the oven, mash or blend it, and freeze-dry it. When you reheat, add a little butter and water to reach your desired consistency.
- Green beans. Slice and then blanch the beans before freeze drying. Rehydrate the beans in a bowl of water and then finish cooking, either by boiling or in a sauté.
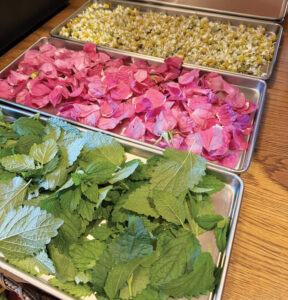
Herbs: Dry a load of your favorites for either culinary use or for tea. Sage and thyme blends are favorites for cooking, and chamomile and lemon balm are perfect for hot tea. The smell and flavor of freeze-dried herbs are intense and full and can’t be matched by what you’d buy at the store.
Find more ideas and recipes for abundant garden bounty!
Frequently Asked Questions
What foods are worth dehydrating?
Foods from prolific seasonal crops are great for dehydration. Vegetables like zucchini or kale, which can be difficult to can or store long-term, make great chips. Fruit leathers and powdered soup stocks are also easy homemade dehydrator recipes that can be made in large batches using whatever you have growing abundantly, now.
What can you do with too much zucchini?
Zucchini chips are a great way to use up over-producing zucchini. They take up less space than other preservation options, are easy to eat, and are a healthy snack full of fiber and vitamins.
Does fruit leather need to be cooked?
Fruit leather benefits from being made with a cooked fruit puree. Cooking helps to intensify the flavors of any added spices (cinnamon in apple fruit leather, for example) and reduce the liquid in the puree to make dehydrating faster and more manageable.
Can you dry your own seasonings?
You can make your own powdered seasonings, teas, or even soup stocks by using a dehydrator of freeze dryer. Take care when dehydrating leafy herbs, such as parsley; if the leaves can be bent, they’re not quite dry.


