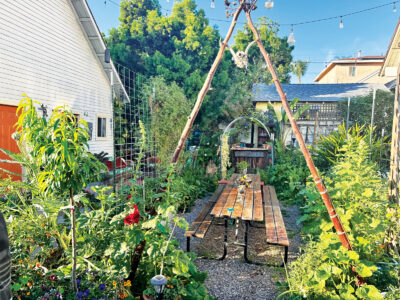
Homesteading doesn’t have to mean 10 acres and a tractor. In today’s world, where buying land can feel out of reach and digital life is louder than ever, turning your city space into a tiny homestead isn’t only possible, it’s powerful. Whether you’re working with a backyard, a balcony, or a community garden, urban homesteading helps you reconnect with what matters: your food, your neighbors, and the natural rhythm of things. It’s nourishing, grounding, and doable, even in the city. Here’s how to get started:
- Grow food anywhere. From raised beds and planter boxes to windowsills and rooftops, there’s always room to grow something. Leafy greens, herbs, tomatoes, and even dwarf fruit trees can thrive in containers. Don’t underestimate the productivity of a well-planned small space – one cherry tomato plant on a balcony can yield pounds of fruit over a season.
- Think beyond gardening. Homesteading is about self-reliance. Learn to bake bread, ferment veggies, make cleaners, or teach yourself to repair things. These everyday skills build confidence and reduce dependence on store-bought goods. Even something as simple as making your own broth from kitchen scraps will help close the loop and stretch your groceries further.
- Use your space wisely. Got a patch of grass? Plant veggies. A shady corner? Grow mushrooms. A sunny wall? Go vertical. Urban spaces often inspire the most creative growing methods. Install a rain barrel and reuse greywater on your beds. Be sure to save seeds. These choices will help you conserve resources and make the most of your space, no matter how small.
- Preserve the harvest. Canning, pickling, fermenting, and freezing will help you stretch food through the seasons. Market produce becomes more valuable when you know how to preserve it. Start simple with refrigerator pickles or frozen herbs, and expand as your confidence grows.
Jordan, California
Grow Your Own Flax
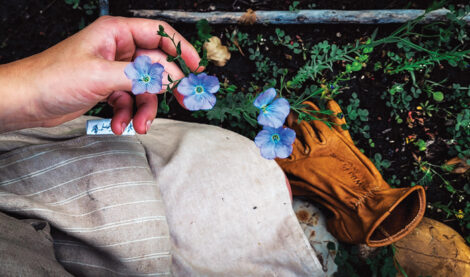
Flax is a wonderful floral addition to the garden. When planted en masse, the delicate, small blooms add a touch of whimsy to any garden space, serving as a beautiful filler between rows and attracting pollinators and other beneficial insects. Once blooming is complete, small but densely packed seed heads appear.
Once the seed heads have dried, they’re ready to be collected from the plants and saved for next year’s garden. Save the full seed heads in a jar or a paper bag instead of winnowing the seeds, saving you precious time.
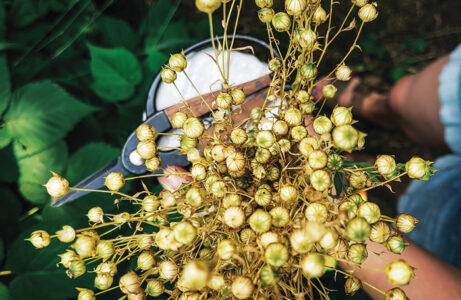
The following year, when it’s time to plant, crush the heads and densely sprinkle the seeds over your prepared area. Lightly rough the seeds into the soil, add some compost on top followed by a light mulch layer (straw works great), and then wait for the blooms to come so you can enjoy their beauty once again!
Lisa, Alberta, Canada
Mending My Overalls with Sashiko
My favorite pair of vintage overalls have seen better days. I knew they’d already lived a full life when I bought them. The lovely faded blue fabric was part of their charm. Through the years, they’ve expanded with my belly during pregnancy, spent countless hours gardening and doing yard work, and, for a while, became a favorite in my teenager’s wardrobe. The overalls have been gathering dust for the past year; I’ve been reluctant to part with them. They have giant holes in both knees, and the fabric feels so thin along the thigh area. I still love them and decided I could mend them in a way that felt beautiful to me.
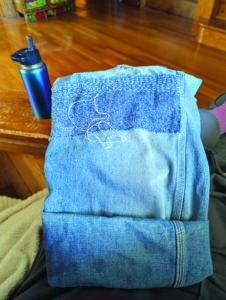
Visible mending is a movement that drew me in immediately. People mend their clothing in a way that others can see where the flaw once was. The style I’m aiming for, called sashiko, is a visible mending style originating from Japan. It’s both decorative and functional. Cut a patch of fabric that’s larger than the hole and is of a similar weight to what you’re mending. I’m attaching my denim patch using the most basic form of running stitches. I’ll work back and forth until the patch is covered in these stitches. I plan to use recycled denim to make a patchwork of patches on each knee of my overalls. I’m excited every time I pick up the work, and I’m hopeful these overalls will live on through the next generation of my family.
Rachel, Wisconsin
Summer Garden Tostada Recipe
This vegetable tostada recipe is a fast and easy favorite. The ingredients listed here are those we’re most likely to use when making it. However, other vegetables you might have available, such as fresh corn, tomatoes, yellow squash, tender green beans, jalapeños, and garlic, can be added to the mix.
When you use the vegetables you have on hand, you can create your own favorite flavor combinations.
We’ve found that fresh vegetables combined with olive oil impart a delicious flavor that doesn’t need the addition of salt or pepper, although feel free to use them if you wish.
We prepare this recipe using a well-seasoned cast-iron griddle and skillet. They aren’t required, but are helpful. Yield: about 4 servings.
- 8 corn tortillas, 5-1/2-inch size
- Olive oil
- 2 scrubbed, unpeeled zucchini, chopped into 1-to-2-inch pieces
- 1 yellow onion, peeled and chopped into 1-to-2-inch pieces
- 1 bell pepper, scrubbed and chopped into 1-to-2-inch pieces
- About 4 cups warm refried beans
- 8 ounces cheddar cheese, shredded
- Sour cream, if desired

- To warm tortillas: Warm a griddle on medium heat. Lay a tortilla or two on the griddle for 30 seconds to a minute, then flip to warm the other side. Remove from the griddle and stack on a plate. Repeat until all tortillas are warmed. Set aside.
- Generously cover the bottom of a skillet with olive oil. Add vegetables and stir-fry over high heat. If needed, reduce heat to medium-high after a couple of minutes of cooking.
- If vegetables begin to stick to the pan, add a little more olive oil. Stir-fry until vegetables are tender and cooked through, about 5 to 10 minutes. Remove from heat.
- Spread refried beans onto warmed tortillas. Top with stir-fried vegetables and shredded cheddar cheese. Add a dollop of sour cream, if desired.
Note: For an Italian-style version of this recipe, use plenty of olive oil to stir-fry the vegetables along with 1 to 2 teaspoons each of basil and oregano. Serve over spaghetti and top with fresh Parmesan cheese.
Audra, Arkansas
Naked Salad Niçoise Recipe
Yield: 4 servings.
- 1/2 pound little red or multicolored potatoes, halved
- 1-1/2 tablespoons extra-virgin olive oil or avocado oil
- 1/2 teaspoon dried oregano
- 1/2 teaspoon garlic powder
- 1/2 teaspoon sea salt, plus more to taste
- 1/2 teaspoon freshly ground black pepper
- 1 bunch asparagus, woody ends trimmed
- 8 romaine lettuce leaves
- 8 radicchio leaves (or use more romaine if you can’t find radicchio)
- 1-1/2 cups cherry tomatoes, halved
- 1 cup jarred marinated artichoke hearts
- 1 (15-ounce) can of chickpeas, drained and rinsed
- 1/4 cup jarred green or black olives, pitted and halved
- 2 tablespoons capers
- Sprigs of parsley, mint, basil, or fennel, for garnish
- Preheat the oven to 375 F.
- In a bowl, toss the potatoes with 1 tablespoon of the oil, and then sprinkle on the oregano, garlic powder, salt, and pepper. Spread them evenly in a 9-by-13-inch baking dish and then roast until the potatoes are fork-tender, from 30 to 35 minutes.
- Toss the asparagus in the remaining 1⁄2 tablespoon oil, spread it on a baking sheet, and roast it at the same time as the potatoes, until fork-tender, about 20 minutes. (Alternatively, toss the asparagus in the oil and grill it.)
- Place the romaine and radicchio leaves on plates. Top with the roasted potatoes, asparagus, tomatoes, artichoke hearts, chickpeas, olives, and capers.
- Drizzle the dressing (below) over the salads. Garnish with fresh herbs.
Niçoise Dressing
- 1/4 cup red wine vinegar
- 2-1/2 tablespoons minced shallot or red onion
- 1 large garlic clove, minced and mashed
- 1 tablespoon Dijon mustard
- 1 tablespoon pure maple syrup
- 1 teaspoon dried thyme
- 1/2 teaspoon sea salt, or more to taste
- 1/3 cup extra-virgin olive oil
- In a screw-top jar, combine all ingredients and shake until emulsified. Alternatively, in a bowl, whisk together all ingredients except the oil.
- Slowly pour in the oil and continue whisking as you add it, until the mixture is emulsified and creamy. Store in the jar in the refrigerator for up to 1 week.
– Jenné Claiborne; excerpted from Sweet Potato Soul Vegan Vibes (copyright 2025, Rodale Books, an imprint of Random House, a division of Penguin Random House LLC, New York). All rights reserved. No part of this excerpt may be reproduced or reprinted without permission in writing from the publisher.
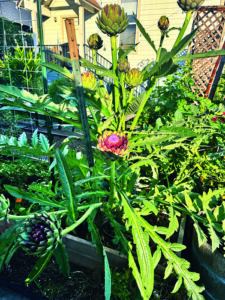
Artichokes Ready to Go
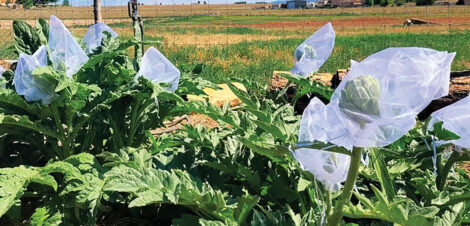
Recycled organza party-favor bags can keep your artichoke heads bug-free without the use of sprays or powders. Slip the 8-by-12-inch bag over the newly sprouted artichoke head and pull the drawstring firmly around the stem, but not too tightly, as it will need to expand as your plant grows. I’ve found this is a great chemical-free way to keep pests out while letting sunshine and airflow in. Not to mention, you’ll have a built-in to-go bag when it’s time to harvest!
Britney, Arizona
Planting Peanuts for Mulch
I plant four tomato plants per 4-by-4-foot raised bed every year. I tried using mulch to keep weeds down and conserve water, but I noticed it also attracted unwanted bugs.
Last year, instead of using mulch, I planted peanuts around the tomatoes. It worked perfectly! I planted them every 6 square inches (four per square foot – we use the square-foot gardening method). The plants grew thick, creating a living mulch that shaded the soil, kept out weeds, and helped retain moisture.
Since peanuts are legumes, they added nitrogen to the soil, which helps keep the tomatoes from depleting it.
Danielle, Arkansas
Discarded Vegetable Boxes for Planters
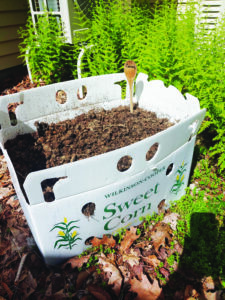
I’m not able to put a garden in the ground, so I’ve turned to containers. Large plastic vegetable boxes discarded by a local grocery store make good planters. The seams aren’t tight or sealed, which allows for natural drainage. I’ve found they hold up even through New England winters and into the next growing season.
Old or unused wooden kitchen spoons make nice markers for your vegetables.
Sara, New Hampshire
Barn Organization
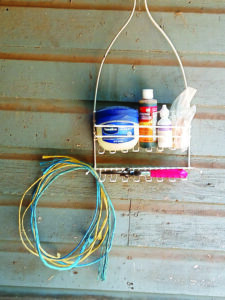
I prefer to keep things organized and close at hand, which can be difficult in a barn. I’ve found that using a shower organizer works well. It holds bottles and clippers and even has a place for baling twine. I got mine at a yard sale for $1. It’s been worthwhile for all the steps I’ve saved.
Marilyn, Oregon
Saved from the Landfill
I saved a kiddie pool from the landfill and use it for my early onions and other veggies. The best part is that it was free and it’s easy to maintain.
Doug, North Carolina
Organic Cutworm Control
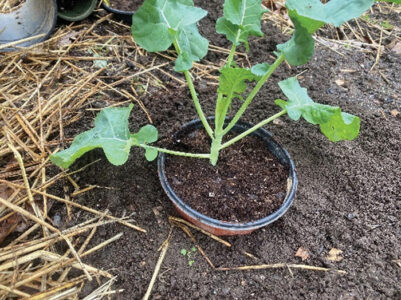
You planted broccoli from seed indoors and carefully nurtured the plants until they were ready to go outside, then planted them in the garden. Three days later, four of your plants have been cut off at the base! If the tops were eaten, the culprit likely has fur. If not, you may have cutworms in your soil. Since cutworms stay close to the soil surface and don’t climb vertically, a simple control method uses 6-inch plastic nursery pots.
- Use scissors to completely remove the bottom of the pot.
- Dig a hole large enough to hold the bottomless pot in the soil, with the upper rim approximately 1 inch above the soil surface. Fill the bottom half of the pot with potting soil, then plant, finishing with an additional layer of potting soil. Note the height of the pot rim above the soil surface as shown. Leave the pot in the ground until harvest.
Alan, Pennsylvania
Backup Paintbrush
When touching up paint or painting a small project, cut a piece of sponge material for the brush and use a clothespin for the handle. It doesn’t do much to save the planet, but it does save a purchase and reuses the sponge.
Mark, Wisconsin
Taming Hoses
I supplement water in areas that need more moisture than my irrigation system provides, so I’m always dragging hoses around. I’ve had trouble with many of the hose guides I’ve tried. The metal spikes kink the hose, the plastic ones fall apart, and I can’t afford the heavy-duty ones. I started installing clay pipes at the corners of the planting beds. I bury them halfway down and plant a succulent in them; sometimes, other plants sprout as well. They look good next to brick or clay pots. I have clay soil, but if you have sandy soil, you may need longer pipes or a rebar stake inside.
John, via email
We Pay for Top Tips
Do you have handy home, farm, or garden advice? We’ll pay you $25 for each tip we publish, plus another $25 if we use your photos. So, send your niftiest tips to us at Letters@MotherEarthNews.com.
Originally published in the August/September 2025 issue of MOTHER EARTH NEWS and regularly vetted for accuracy.


