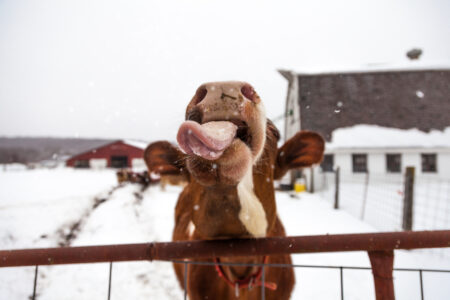
I enjoy operating my small dairy year-round, though I have to admit spring and fall are my favorite times of year, because I’m not a fan of weather extremes. Here are some tips I’ve learned while managing my small herd during Vermont’s long winters.
Good lighting. In winter, it’s dark when I wake up, and dark when I do my evening chores. The floodlight outside my barn has a motion detector, so it lights up the barnyard when the cows or I go outside in the dark. I recommend installing lighting inside your sheds and outbuildings where you work in winter, but don’t feel the need to do everything at once. Every fall, I make one or two minor improvements to my dairy to prepare for the upcoming season.
Snow prep. Also in fall, I make sure the areas where I’ll be pushing snow are open and clear of machinery and other obstacles, and I stack the firewood. I take down temporary fencing next to the road and driveways. Plowing snow is unproductive, so I make sure to eliminate any obstacles or further complications that could damage my tractor and other equipment.
Downsizing the herd. The thought of coming winter can be daunting, especially if you operate your small dairy alone. Back when my wife, kids, and I milked 70 Jersey cows, chore time was a family affair. But I decided to lighten my load when it was just me, trudging up to the barn in the snow and cold every morning and night. Recently, I sold two of my four cows, keeping one bred heifer and a milking cow. That essentially cut my chore time in half, and reduced the hay and grain to feed out during winter by 50 percent.
Milking cows twice a day can get tiresome, especially when you also work off the farm. Having a small dairy allows you to take a break for a season or two. If you have a larger herd, you can sell your milkers but keep your calves and heifers, and get back into dairying slowly when they begin to come into milk.
Work smarter, not harder. Prepare a list of small annoyances from the previous winter, and then create solutions. Selling two cows and putting lights in the shed adjacent to my barn made a huge difference for me.
Steve Judge
Royalton, Vermont
Full of Beans
I serendipitously discovered this cooking tip one night, when I accidentally soaked twice the amount of dry beans I needed for making a pot of soup the next day.
Realizing my mistake the following morning, I cooked half the beans and decided on a whim to freeze the rest.
The next time I made soup, I poured the frozen pre-soaked beans straight into the pot. Voila! I had a perfect creamy soup in just two hours. Now, I keep a stockpile of several types of pre-soaked dry beans in the freezer, and I’m ready to cook up bean dishes at any time!
Robert A. Wenom
Asheville, North Carolina
A Clear Solution
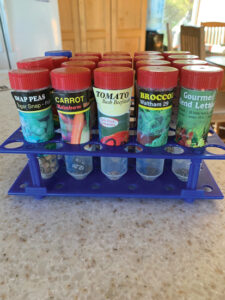
Now, I store seeds for my garden inside inexpensive centrifuge tubes with capped tops and pointed bottoms. The tubes come with racks and store vertically. Because the tubes are clear, I can easily see the number and condition of seeds inside. I tape the paper seed packet onto the outside of the tube so I know what I’m planting, and I use the pointed part of the tube to indent the soil during planting. The tubes and racks are easy to store, and keep the seeds dry and organized for next year’s planting.
Kathy Johnson
Homer, Alaska
Plants for Art’s Sake
My art already revolves around nature, but I experimented with plants even more during the pandemic and started making my own ink to paint with. Different plants will yield different results depending on whether they’re fresh or dried, the processing time, and the presence of additives. The season in which you harvest the plants can also affect the resulting color. I prefer to work this way, always surprised by the colors Mother Nature gives me.
First, gather 1 to 2 cups of fresh or dried plant material. You can use leaves, flowers, stems, berries, bark, and even roots.
Fill a stainless steel pot with water, bring it to a boil, and add the plant material. I usually start with about 4 cups of water and end up with 1 to 2 ounces of ink. I use water straight from the tap, but you could use spring or distilled water.
Keep an eye on the mixture while it’s boiling. I pull the plants out of the pot after all the color has been extracted; the color will actually disappear from many plants. Make sure the pot doesn’t boil dry.
I like to test the color at different times during the boil by dipping strips of paper into the pot. I tear off pieces of heavyweight paper, such as cardstock or watercolor paper, for this purpose. Stop the boil whenever you’re happy with the color. I like to make notes on the test strips for future reference.
Strain your ink through a mesh sieve into a sterilized glass bottle. At this stage, I like to add wintergreen or clove essential oil as a preservative. Some people recommend adding a whole clove bud to preserve the ink color, but the ink color changes after a few weeks when I use a whole bud, so I add clove essential oil instead.
To shift the ink color, you can try adding salt, baking soda, cream of tartar, citric acid, or a rusty nail. Gum arabic will thicken the ink, but a little goes a long way, and gum arabic will also decrease the ink’s fluidity. I personally don’t use gum arabic in my ink for that reason, but it would be perfect for calligraphy.
Experiment and have fun with the process! It’s a great way to learn more about local plants, and could be a fun project for kids or artists wanting a more sustainable art practice.
Sarah Hart Morgan
Front Royal, Virginia
Cooking with ‘Bombs’
We make “kale bombs” at my house. Although we use kale fresh from our garden, you could use store-bought kale in your household.
First, tear the kale into pieces. Blanch the kale for about 2 minutes in a steamer, and then chill it in cold water. Dry the pieces with a salad spinner or by rolling them in a clean kitchen towel.
Then, take up a large handful of kale pieces and squeeze out as much water as you can. Place the squeezed handfuls onto a cookie sheet, separated by an inch or so, and freeze them for a couple of hours. Place the frozen “bombs” in a storage container and return them to the freezer. Whenever you want to add some kale to soups, sauces, or other recipes, just remove one (or more) from the freezer and drop it into the dish while it’s cooking.
Sue Hadden
Califon, New Jersey
Free Fire Starters
I was the first lucky person to respond to a Craigslist post offering hundreds of paper egg cartons for free. After sharing with a friend who has chickens, I keep the leftovers next to my clothes dryer. Whenever I clean out the trap, I fill an egg carton with the lint. I’ve found that lint-filled paper cartons make great fire starters. I place one on top of my grate and add twigs, branches, and logs, and then a little wadded paper under the grate. Works every time!
Jeanie Snider
Bloomfield, Kentucky
Warms You Twice
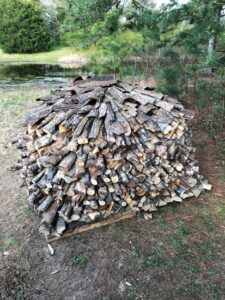
For two years after I built and moved into a 1,700-square-foot home with a soapstone woodstove, I told everyone I’d cut up and haul off their downed trees. I spent many weekends loading 100- to 200-pound logs onto the back of a borrowed trailer. After a big storm, I’d drive around town and leave notes in the mailboxes of properties with downed limbs, offering my service in exchange for the wood.
I hit the jackpot in 2018, when a 5-foot-diameter oak tree fell on some rental property, and the owners needed to get rid of it fast. I spent three weekends hauling that wood home and splitting it alone. Lacking a drying barn, I researched different stacking methods in Mother Earth News and online. I settled on the method of stacking firewood in the round, with bark shingles on top, and unstackable cuts thrown into the center (see “Holzhaufen: A Guide to Stacking Wood in a Woodpile,” November/December 1986). I ended up with three stacks of 2 to 3 cords each.
Two years later, I cracked open the first stack to find beautifully dry, light logs. I store what I need on the porch, and then cover the stack again with the bark shingles. I’ll never bother with covered storage again. My fires start within seconds thanks to the abundance of bone-dry kindling and heartwood.
Sylvia Brophy
Rome, Georgia
New Heights in Water Savings
I live in a tall second-story apartment, and the water heater is in the basement. Whenever I do anything that requires hot water, I have to let the faucet run long enough for the heated water to reach the apartment. This has always bothered me, as we don’t have a garden or houseplants to share the water with; instead, it goes to waste down the drain.
Because our washer and dryer are on the same floor as our apartment, I tried an experiment: I started planning my hot water use to coincide with loads of laundry. I found that letting my washer fill up on the mixed-water setting, and then switching it over to cold water mid-wash, conveniently pulled the hot water up to our floor. Using this method means I rarely need to waste water while waiting for hot water.
Arthur Filkins
Pittsfield, Massachusetts
Put Your Freezer on Ice
Whenever I remove food from my freezer in fall and winter, I fill the emptied space with water-filled plastic milk jugs. Once the jug is frozen, the freezer doesn’t have to work hard to keep it cold; this reduces energy usage. And the frozen jugs help keep the remaining food frozen during power outages.
In summer, when I start filling the freezer again with food, I gradually remove the ice jugs to make room, thaw them, and use the water on my houseplants.
Christine Stark
Byron, Illinois
On the (DIY) Hook
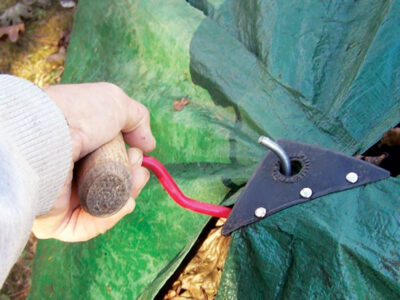
I’ve found an easier way to drag a tarp loaded with fallen leaves than just grabbing the four corners with my hands. Instead, I thread a homemade hay hook through the tarp’s corner eyelets.
To make the hook, I cut a 6-inch length off a discarded rake handle, drilled a 1⁄4-inch hole in the middle, and threaded an extra utility screw hook I had on hand into that hole.
Ronald Olansen
Lyme, Connecticut
A Matter of Thyme
I enjoy growing and drying herbs to use year-round from my garden. But removing the short, dried stems from dainty thyme sprigs is time-consuming and irritating.
The task became much easier after I discovered I could thoroughly dry the cuttings — either in the dehydrator, or by hanging them for a couple of weeks — and then place them inside a clean open-weave basket on top of a cookie sheet. I gently rub the sprigs between my hands to remove the leaves, while being careful not to break up the stems. Next, I shake the basket up and down so the leaves fall through the basket’s openings and onto the cookie sheet, while the stems remain in the basket. You could also place the basket inside a large paper bag and shake it; the leaves would fall into the bottom of the bag.
Deb McNally
Leominster, Massachusetts
Liquid Honey
An easy way to fix crystallized honey is to set the jar on your driveway or sidewalk on a hot, sunny day. I’ve found that the contents will liquefy in no time at all.
Richard Botamer
Solon, Ohio
Quick Compost Fix
After we relocated our compost pile, the zucchini we planted at the site of the old pile grew four times bigger than the other zucchini plants in our garden. Although this was no surprise, it did give me an idea. Instead of maintaining a large, permanent compost pile, I now make smaller, quicker batches of compost in different places around the garden. When one batch is finished, I move the wire-mesh enclosure (3 feet tall and about 1 foot in diameter) to a new location.
I’m making compost more frequently by managing these small batches, and I’m also improving the depleted soil below each pile. (We’re living in an ex-rental house, and the property is in bad shape.)
Karen Dawson
Santa Rosa, California
Dogged Recycling
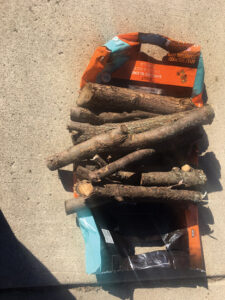
I created a nice carrier for firewood by opening up the sides of a plastic dog food bag, and cutting handholds into the top and bottom. I reinforced the handhold holes with packing tape. For added support, you could slide wooden dowels into the hemmed ends of the bag.
My firewood carrier has held up well. These plastic dog food bags aren’t recyclable in my area, but at least I get some extra use out of them.
Gerald Raley
Bloomington, Minnesota
We Pay for Top Tips
Do you have handy home, farm, or garden advice? We’ll pay you $25 for each tip we publish, plus another $25 if we use your photos. So, send your niftiest tips to us at Letters@MotherEarthNews.com.


