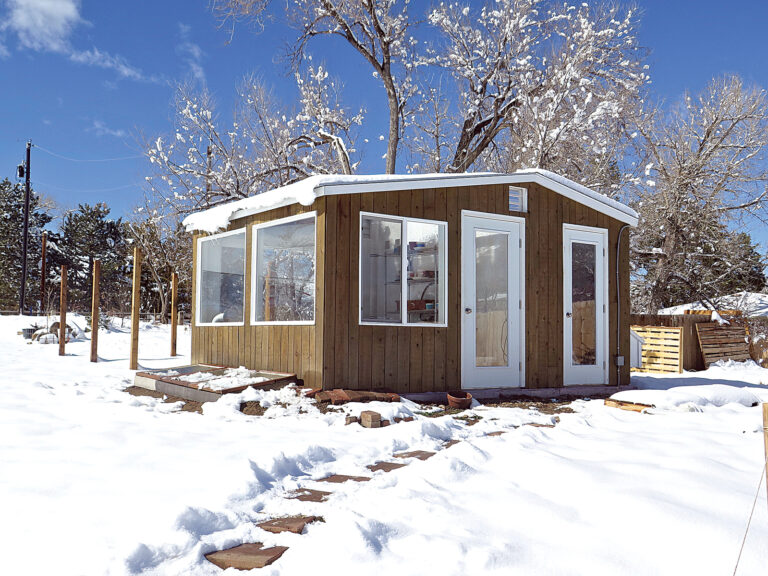
Our innovative DIY small-greenhouse plans take solar gain to the nth degree, with a design that’s optimized for winter growing.
Almost anyone can build an affordable greenhouse to start seedlings in spring or extend the growing season by a month or two in fall. But building a greenhouse designed for harvesting cool-season crops all winter long is quite another matter. Happily, that’s just what our winter greenhouse plans offer, and any handy gardener can tackle this project with basic tools, a good helper and a couple of free weekends.
Lately, loads of products promising that you can “grow food indoors” during winter using artificial lights are hitting the market. Don’t be fooled — replacing free sunlight with expensive and far less intense electric lighting is not a sustainable choice. These small-greenhouse plans feature a south-facing glazed wall that’s angled to capture the maximum amount of winter sunlight and heat. The north wall, side walls and roof are insulated to retain as much solar-generated warmth as possible on cold nights. In many regions, these strategic design elements will allow the greenhouse to stay warm enough to support cool-season crops through the coldest, snowiest months without the need for any supplemental heat or light. (For top winter crop choices, see Winter Gardening Tips: Best Winter Crops and Cold-Hardy Varieties.)
Consider These Options for Your Homemade Greenhouse
Our design will produce a solar-heated, 8-by-8-foot structure, but you can easily modify these small-greenhouse plans to suit your needs and site. You can purchase new materials from a home improvement center, or you can recycle components from another structure, the local Habitat for Humanity ReStore or your stockpile. Make sure you select the doors before you begin building because their dimensions will affect the stud spacing. Also, check with local authorities about building codes and permits. Some municipalities exempt small structures; others require a permit. You’ll also need to consider the following options before you build.
- Timber base. We used three rows of landscape timbers to create this greenhouse’s knee wall, but you can add extra rows to help level a hilly site, or to provide more headroom above or planting room below. We chose timber because it’s relatively inexpensive and is easy to work with, but you may prefer to build a knee wall from 2-by-6s so you can insulate between them.
- Wall angle. The southern wall is glazed with ribbed polycarbonate and set at a 60-degree angle for optimum heat intake from the sun (aka “solar gain”) in winter. The farther north you live, the lower the sun will be in winter. Lindsey Schiller of Ceres Greenhouse Solutions in Boulder, Colorado, says an angle equal to your latitude plus 20 degrees will yield the maximum transmission, but you can actually deviate from this angle by as much as 30 degrees and only lose about 5 to 8 percent of potential transmitted light. So, the 60-degree angle of our south wall works well for most U.S. locations. A conventional vertical wall would perform similarly if outfitted with a glazed roof.
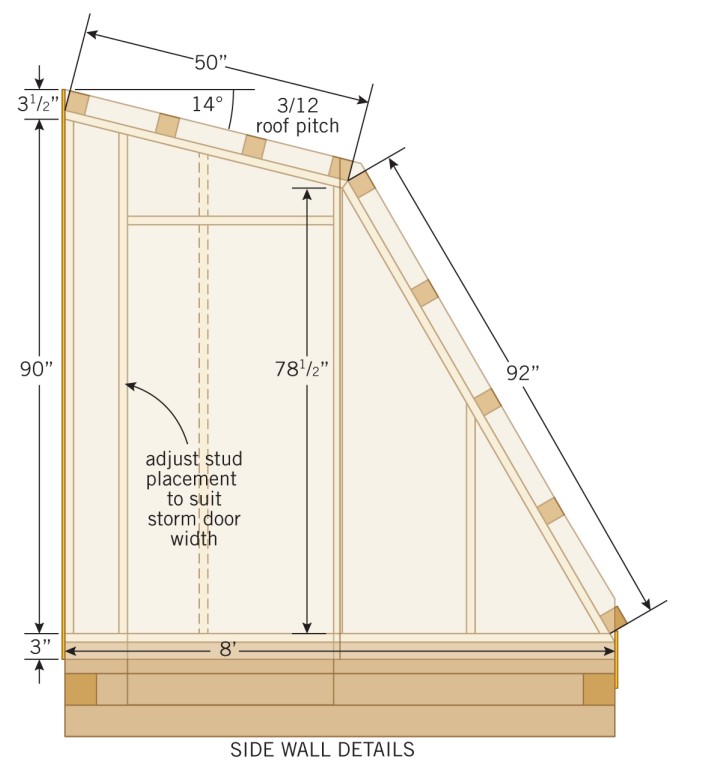
- Roof pitch. We settled on a metal roof with a pitch ratio of 3/12 (about 14 degrees) for good runoff. You can make yours steeper or flatter depending on your site and needs. The interior of the roof is sheathed with polystyrene to make up for metal’s poor insulating qualities. To build your own A-Frame roof check out this plan.
- If you choose to build a homemade greenhouse with a vertical south-facing wall (as on the Ceres greenhouse, pictured opposite) instead of our angled version, you should definitely glaze the roof with polycarbonate to let in more light while still offering good insulating qualities. Schiller recommends using a twin- or triple-wall polycarbonate.
- Doors. You must be able to vent your greenhouse, because sunny days — even in winter — can raise its interior temperature enough to damage your plants. Our design features two combination storm doors set into the side walls. A standard storm door will give you access to the greenhouse interior, provide good ventilation for plants (because you can raise or lower the doors’ windows as needed, which you’ll have to do manually on a daily basis in most climates), and offer easy installation at an affordable price. Most storm doors are either 32 or 36 inches wide. Buy or scrounge your doors before you frame the side walls so you can adjust the stud spacing accordingly.
- Glazing and roofing. These greenhouse building plans call for clear, ribbed polycarbonate panels (Pro-Sky brand) for the south wall, and compatible metal panels and trim pieces (Pro-Rib) for the roof. But you have choices galore. Glass transmits light well, but it’s heavy, breaks easily, and doesn’t insulate as well as multilayer plastic. Polycarbonate is sold as single wall, twin-wall, triple-wall and even five-layer. Polycarbonate can be cut with a box knife or a circular saw, but the material is expensive. If you’re planning to recycle used plastic glazing for your greenhouse, keep in mind that plastic degrades over time; most polycarbonate has a 10-year warranty. (See Choosing a Greenhouse for a discussion of greenhouse glazing options.)
- Free-standing vs. attached. This design is for a free-standing greenhouse with the glazed wall facing south, and insulated walls on the east, west and north. With modifications, however, you can attach it to the south wall of a barn, outbuilding, garage or house. You could even create an opening between the two structures, which would allow the greenhouse to release heat into the structure it’s attached to, and vice versa. An existing wall can help support and insulate the back wall of the greenhouse, and you may be able to eliminate the back wall entirely. However, check your local building codes before you get too excited about the idea of joining a movable structure to an immovable one. Buildings such as houses are on footings that don’t move, or aren’t supposed to, whereas our greenhouse is designed to “float.”
How to Build a Greenhouse

For your foundation, dig a trench that’s 16 inches wide and 8 inches deep, with an outside footprint of approximately 8-1/2 feet by 8-1/2 feet. Fill this area with gravel. Use a 4-foot level taped to a long 2-by-4 to level the gravel.
You’ll want to produce an 8-by-8-foot perimeter for the knee wall. Begin by installing and leveling the first row of treated 6-by-6 timbers. Nail the corners to one another, and measure diagonals to ensure the base is square. Add the next two rows of timbers, overlapping the corners as shown in this illustration. Secure them with 12-inch timber screws as you go.
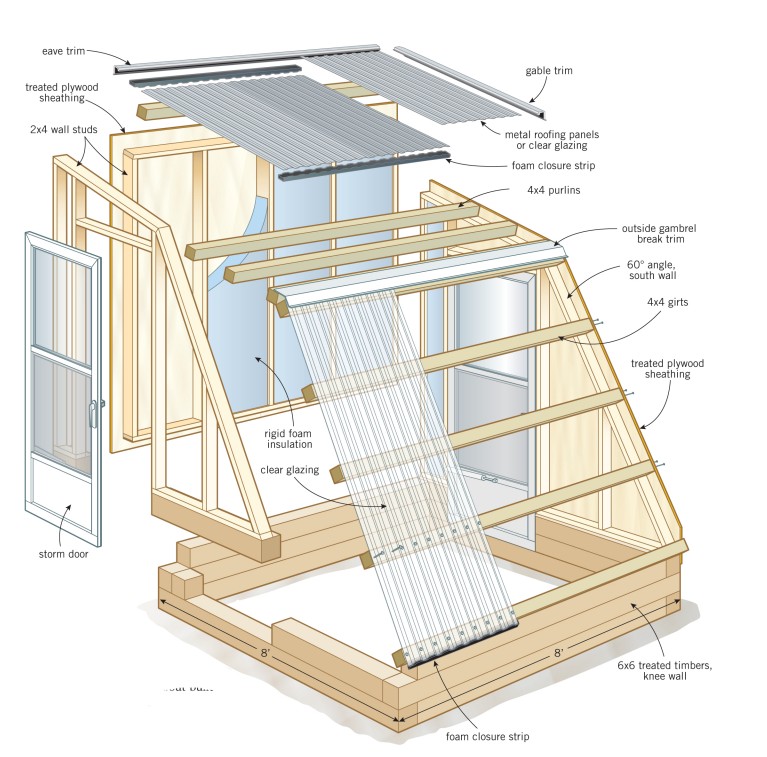
Next, find a separate, flat space to build the 2-by-4 side walls as shown in the illustration, spacing the studs to accommodate the size of your storm doors. The ends of most framing members will be angled, so be sure to adjust your saw accordingly.
Raise the side walls on the outer edge of the timber base and temporarily brace them with a couple of 2-by-4s, checking that they’re plumb in both directions. Mark the timbers directly below the door opening, and use a reciprocating saw or handsaw to remove sections of one or two of the timbers (depending on the height of the storm door you’ll be installing). Or, because you already know the exact size and position of your door, you can create this opening in the timbers as you build.
Knock together the back (north) wall with 2-by-4s; choose 2-by-6s if you want to include space for additional insulation. You can construct the wall in place, but it will be easier to build if it’s lying on a flat surface, and then you can stand and position it. Nail the corners together. Install a temporary cross brace on the inside of the back wall to hold it plumb while you sheathe the walls.
Keep in mind that greenhouses are very humid environments and experience condensation regularly. Your least expensive option for sheathing the walls is probably exterior-grade plywood, but it may degrade in just a few years. Schiller recommends water-resistant siding materials, such as fiber cement wallboard, engineered wood products, and plastic or metal sheet paneling.
Sheathe the back wall, and then check the three walls one more time to make sure they’re plumb before you sheathe the side walls. Make sure the sheathing extends about 3 inches downward beside the top timber to help tie the walls and base together. Also, your sheathing should extend 3-1/2 inches beyond the top roof plate and the slanted front wall, as shown in the illustration. The extra 3-1/2 inches will create a solid surface for securing the 4-by-4 roof purlins and slant wall girts.
Girts, Purlins and Panels
Cut your 4-by-4 wall girts to length (in our case, 8 feet), and position them about every 2 feet along the top of the slant wall. Secure them by driving 4-inch timber screws through the 2-by-4 top plate and into the girts, and 16d nails through the sheathing into the ends of the girts. Follow the same procedure for the roof purlins.
Install the front glazing, following the manufacturer’s installation procedures and using the recommended fasteners (we used screws with neoprene washers). Orient the corrugations or ribs vertically so the glazing will slough off snow and rain. Insert foam closure strips on the ends and gable trim on the side edges of your greenhouse’s glazed wall to minimize air and moisture infiltration.
Fix a length of outside gambrel break trim at the top of the wall glazing and install the roof panels, making sure they extend at least 2 inches beyond the front wall glazing.
Seal the joints with L-shaped eave trim where the roof meets the back wall, and with gable trim where the roof meets the side walls. (If you plan to add siding to your homemade greenhouse, remember to space the eave trim such that you’ll be able to slip the siding underneath.) Keep out the elements by adding closure strips where needed.
Finishing Touches to Your DIY Small Greenhouse
Secure your storm doors using flat-head screws, and then install the handles and closer-piston hardware. Cut panels of extruded polystyrene insulation to fit between the back wall studs, side wall studs and roof purlins. Fill any remaining cracks and gaps with caulk, insulation and expanding foam. You can also insulate the interior of the timber knee wall with extruded polystyrene.

Most growers want a path inside their greenhouse. You can lay stepping stones, pavers, treated wood or other materials that will support your weight and handle some moisture. Homesteader Harvey Ussery suggests installing worm bins beneath plywood lids that serve as a path (learn more at Chooks and Worms in the Greenhouse).
No matter how you customize this structure, it’s sure to lead to plentiful harvests during what used to be your off-season.
Materials List for DIY Small-Greenhouse Plans
- 12 treated 6-by-6 timbers, 8′ long
- 20 (approx.) treated 2-by-4s, 8′ long
- 9 treated 4-by-4 timbers, 8′ long
- 2 storm doors, 32″ or 36″ width
- 3 ribbed polycarbonate panels, 38″ x 9′
- 3 ribbed steel roof panels, 38″ x 8′
- 3 pieces of steel gable trim, 10′
- 1 piece of eave trim flashing, 10′
- 1 piece of outside gambrel break trim, 10′
- Water-resistant sheathing for side and back walls
Other construction materials required for these greenhouse building plans include foam closure strips, 8d and 16d galvanized nails, 4″ and 12″ timber screws, flat-head screws, neoprene washer screws, extruded foam insulation, and caulk.
Simple Ways to Boost Your DIY Small Greenhouse’s Effectiveness for Winter Growing
Cold, cloudy weather can hinder your winter growing efforts. So, how do you build a greenhouse that can overcome darkness? Try the following simple additions.
- Insulation. In many growing zones, the temperature inside this greenhouse will not stay above freezing all winter. By increasing the insulation, however, you can avoid freezing temperatures and grow more than just cold-hardy greens, brassicas and other winter crops. To do so, line the foundation with polystyrene insulation, or bury foam board insulation all around the perimeter to prevent the cold from infiltrating your interior sun-warmed dirt floor. For several ways to insulate greenhouse foundations and create a warmer growing environment, see Solar Greenhouse Basics: Insulating Your Foundation.
- Thermal mass. A material’s ability to store heat is known as its “thermal mass.” You can add thermal mass to your greenhouse by finding some large containers — inexpensive plastic barrels work well — and painting them black. Place the containers in a sunny location inside your greenhouse, and fill them with water. The containers will absorb and retain the sun’s heat during the day, and slowly release that stored energy into the greenhouse at night.
- Additional layers. On especially frigid nights, an effective way to shelter plants inside an unheated greenhouse is to add an extra layer of protection in the form of a row cover. Think of this as a greenhouse within a greenhouse. Lightweight row covers will retain a few extra degrees of warmth around your plants, while extra-heavy row covers will boost frost protection by as much as 8 degrees Fahrenheit.
- Reflective material. If a lack of sunlight is your problem, you can paint the greenhouse’s interior white, or line the walls with reflective material to intensify the light the structure does receive. The foil-backed insulation sold in rolls at home improvement centers will do the trick.
- Automated ventilation. Our design requires that you open and close the storm-door windows daily to prevent the greenhouse from overheating. If you’d rather not bother with manual venting, you can look into automated, solar-powered vents before you begin building.
Resources for Optimal Solar Gain in Homemade Greenhouses
- Build an Earth-Sheltered, Energy-Efficient Greenhouse: MOTHER EARTH NEWS
- DIY Principles for a Passive Solar Greenhouse: GRIT magazine
- How to Design a Year-Round Solar Greenhouse: MOTHER EARTH NEWS
- 3 Free Methods for Heating Greenhouses: MOTHER EARTH NEWS
- Cold-Climate Greenhouse: A Guidebook for Designing and Buildling a Cold-Climate Greenhouse: University of Minnesota Extension
- Solar Greenhouses: ATTRA
- Sunspaces and Solar Greenhouses: Build It Solar
- The Earth-Sheltered Solar Greenhouse Book by Mike Oehler
For more ideas and tips on Greenhouse Construction check out this article: Low-Cost, Multipurpose, DIY Greenhouses
Spike Carlsen is an author and carpenter extraordinaire who swings a hammer at 45 degrees north latitude (Minnesota). For more of his handy plans for the garden, see. The Backyard Homestead Book of Building Projects.