Looking to create a unique, rustic style without breaking the bank? In DIY Wood Pallet Projects, author Karah Bunde presents 35 creative ideas for upcycling wood pallets into beautiful projects that will help fill your home and yard with plenty of personality. This excerpt, which provides instructions on creating a wooden flag from wood pallets, is from Chapter 4, “Holidays and Entertaining.”
Buy this book from the MOTHER EARTH NEWS store: DIY Wood Pallet Projects.
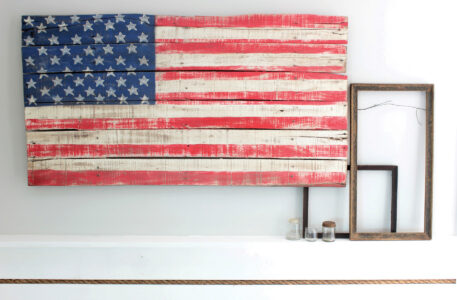
I love the look of a rustic, wooden flag. We have had a few cloth flags over the years that have gotten tattered and torn after years of blowing in the wind, and I thought that instead of investing in another one it was time to make one out of wood that would prove to be more durable. This project turned out to be the perfect example of how things don’t always go right the first time around. Something about math and division and fifty stars in one little blue box gave my brain a run for its money. But, all’s well that ends well, even if I did have to buy more paint to compensate for my shaky math skills.
How to Make Your Own Flag
Investment: A little patriotism and an afternoon; if you don’t have craft paint on hand, that will be your only cost.
Supplies
• 6 pallet slats, about 44 inches long
• 1 pallet support board, cut into 2 pieces 22 inches long
• 24 (1-1/8-inch) screws
• red, white, and blue paint
• medium-grit sandpaper
• potato
• paper towel
• dark wax (optional)
Tools
• tape measure
• miter or handsaw
• cordless drill
• craft paint brushes
• 4-foot straightedge
• palm sander (optional)
• knife (to cut the potato)
• natural-fiber brush (optional– to apply the wax)
Instructions

1. Use your miter or handsaw to cut your pallet slats and support boards to size. The support boards should be slightly shorter than the height of your pallet slats when laid side by side. You can find many resources for the exact dimensions of the American flag online. As a guide, a traditional American flag is almost twice as wide as it is high. For this project, I am using a loose interpretation of those dimensions. They are close enough that anyone looking at the flag will know it is pretty darn close, but I definitely wouldn’t want to be judged for accuracy.
2. Lay the pallet slats side by side horizontally over the 2 support boards that are laid vertically and use your cordless drill to attach with 1-1/8-inch screws; use 2 screws per slat per support board.
3. Next, we’re going to measure the blue box on the flag. A basic guide is that the width of the blue box is about 3/4 of the measurement of the total height of the flag. So, since my flag is just over 23 inches high, I measured 18 inches across the top (18 is about 3/4 of 23). The height of the blue box is just over half of the total height of the whole flag. Since my flag is 6 pallet slats tall, I made the blue box slightly bigger than 3 slats tall.

4. Paint the area for the blue box and then paint the remainder of the flag white. Let dry.

5. Measure 13 equal horizontal stripes, and mark them with the 4-foot straightedge. Paint the top stripe and every other stripe red. You will end up with 7 red stripes and 6 white stripes.
6. Sand the entire piece with medium-grit sandpaper to give it a distressed look.

7. Now we’ll make a stamp out of that potato. Carve a star shape out of the potato with your knife. (If you have a star stencil or rubber stamp, you could use that instead.) Coat the star with white paint. Stamp stars in the blue box, alternating between rows of 6 stars and rows of 5, ending up with 50 total. Use a paper towel to wipe excess paint off the potato as you go. Now, if you happen to line up your stars wrong, not leaving yourself enough room for all 50 stars, you may need to reapply blue paint and start the potato stamping over. Not that I would know.

8. To kick up the distressed look of this make-your-own-flag project a few notches, use a natural-fiber brush to apply a dark wax if desired. A little tip about the wax: a little goes a very long way, especially with dark wax. Start with a little bit and work into it, adding more to produce a more distressed look. Also, you may have noticed how bright the red paint looked when I was painting. If you do plan to finish with a dark wax, start with brighter paint than you think you want–the wax will tone it down and give it an entirely different look when you are done.

Tip!
You may need to play around with the layout of your pallet slats before you finalize their placement. Some lay more closely lined-up with certain slats than others. And this is a great make-your-own-flag project to use slats that have splits and cracks in them if you like the rustic look; the slight variations add to the rustic nature of the art piece.
Want to find more creative uses for wood pallets? Try these other ideas:
• DIY Shutters
• Adirondack Chair Plans
This excerpt has been reprinted with permission from DIY Wood Pallet Projects, written by Karah Bunde and published by Adams Media, 2014. Buy this book from our store: DIY Wood Pallet Projects.


