Beginner builders can learn how to build an outdoor pizza oven step by step for less than $300 and a few days’ work.
Natural building techniques bring us into closer connection with the raw materials on our lands and at our feet. The project I most often recommend to beginner earth builders is a cob pizza oven. Building one isn’t so big a feat as to feel overwhelming, nor so small you’re tempted to hurry through mindlessly – and working with cob employs several common skills that you can transfer to other projects.
This pizza oven design is the one I teach in workshops. It results in a large, well-insulated, versatile, and high-performance oven that’ll last for years and can easily meet the needs of a pizza party or a day of serious baking. After you have the materials on hand, you can build the oven in a couple of weekends with the help of a friend or two.

Materials and Costs
Expect to spend a few hundred dollars on this project, but total costs can be next to nothing depending on how you source your materials and what tools you already have access to. Cob is a mixture of clay, sand, and straw, so you’ll need to find about a half-yard of each. Clay soils are common, but if you don’t have clay on-site, you can often dig some up to truck to your site. The same is true for sand. We live in the high desert, so a short trip onto public lands with a pickup truck and shovel gets us all we need. Before you head for the hills, check what kind of permits and fees are required in your area for procuring clay and sand from public lands (and be clear you’re sourcing for a non-commercial use).
You can instead source bagged clay powder, called “mortar” or “fire clay,” from a masonry company for $15 and up for a 50-pound bag. Because a half-yard of dry clay is about 1,100 pounds, you’ll need 22 bags. You can find plaster or masonry sand at a supply yard for anywhere between $30 and $60 per yard. You’ll also need 20 firebricks that are 3 inches thick for the hearth, and they sell for between $3 and $8 each. For insulation, one straw bale is plenty. If you use perlite instead of bottles for the hearth insulation (explained below), expect to spend about $20 for a couple of 8-quart bags.
The takeaway is that it pays to find free materials, or at least to shop around to keep costs under $400.
Outdoor Pizza Oven Site
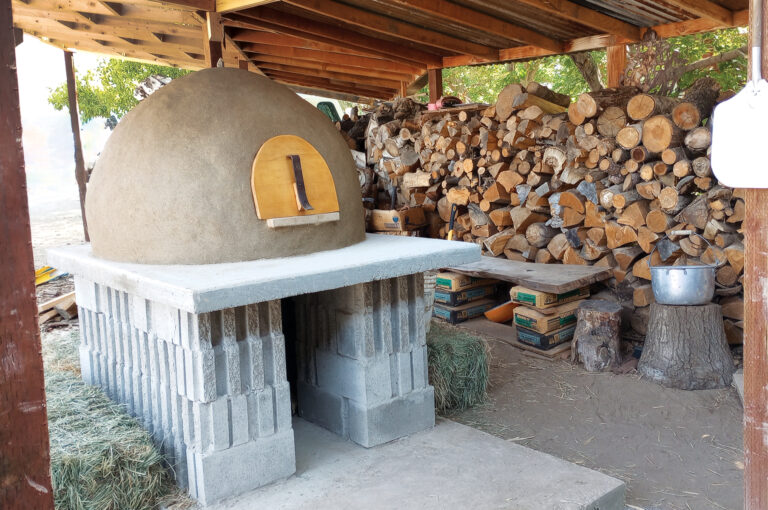
Thanks to their size, beauty, and originality, earthen ovens really anchor an outdoor space. A spot not too far from your indoor kitchen will be ideal for shuttling cooking implements back and forth. The oven’s constructed dimensions are about 5 feet tall and 4 feet wide. Ours sits at one corner of a large deck where we throw parties and potlucks throughout the warm months. A row of trees, a lilac bush, and a fence serve as windbreaks.
You’ll want to add plenty of counter space surrounding your oven for prepping pizzas and queuing them up before they go in. Make room for a bench and a couple of chairs right in front where folks can sit to have a drink and salivate while watching their pizzas cook.
How to Build an Outdoor Pizza Oven Step by Step
Build a Base
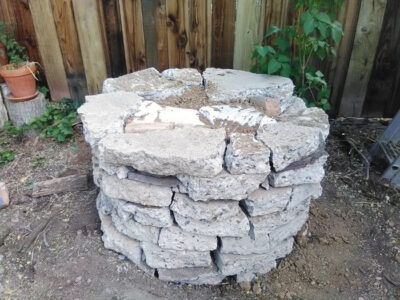
Stone, brick, urbanite (salvaged concrete chunks), earthbags, or even a burly wooden frame will work well to form a base. Build the base on top of 6 inches of gravel, so everything settles evenly as you build upward with heavy materials. My standard oven base is 4 feet wide by about 3 feet high – but yours can scale taller or shorter depending on your height. The point is to ensure easy operation.
Make Cob
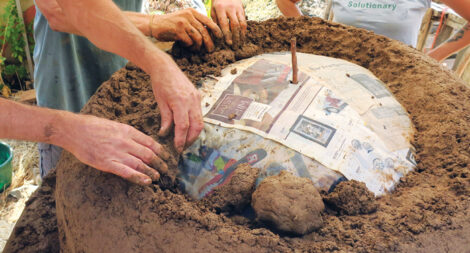
Cob is a Welsh word that means “loaf” or “lump” and refers to a mixture of clay-rich soil, sand, and straw. When these ingredients are mixed together with water, they make a mud that hardens to hold its shape – perfect for building and sculpting everything from ovens to garden walls and houses. Adobe blocks, which more people are familiar with, are just cob made into bricks using a form.

The best ratio for a good cob mix depends on the qualities of your soils and sand. When we use local materials, we always make several test batches to get cob that’s just right, which means it dries solid without cracking but is still easy to work with when wet. For example, my soils have a higher clay content, so we mix about 2 parts sand with 1 part soil and then add some straw. Our friend’s soil, by comparison, has less clay in it, so we make cob at his place with 1-1/2 parts soil and 1 part sand. Even if you buy clay and sand, you’ll still want to make test batches to find out what works best.
Insulate
“Thermal mass” is the ability of a material to absorb, store, and release heat. A well-built oven makes use of a lot of mass – including firebricks to form the cooking surface (or hearth) and a 5-inch-thick dome of cob – as well as a lot of insulation. You’ll burn a fire for about 90 minutes to get the oven up to cooking temperature and heat the mass sufficiently to cook pizzas one after another for about an hour. Don’t skimp on insulation. You’ll save a lot of wood and have longer cooking times with a well-insulated oven.
Incorporate insulation from the ground up: Build it into the base below the firebricks, usually in the form of a 3-to-4-inch layer of perlite (or other puffy rock) or a layer of empty beer bottles enveloped by sand. (The air trapped in the bottles prevents the easy movement of heat.)
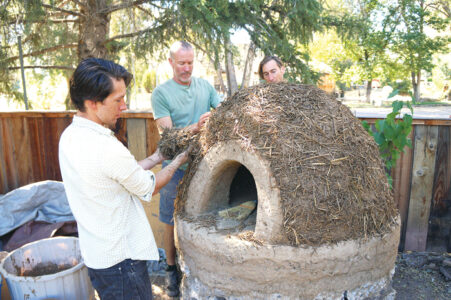
Next, build the oven’s dome shape, which is a thermal cob layer built on top of a big dome of sand that you’ve carefully piled on top of the firebricks. The sand dome serves as a placeholder mold; you’ll eventually remove the sand through the door as the cob layer dries. Aim for a shape that will result in an interior oven space that has a 28-inch circle at the bottom and is 18 inches high in the center. Surround the thermal cob dome with a 5-inch layer of slipstraw, which is simply straw dipped in a clayey water (or “slip”). Pile the slipstraw and shape it on top of the dome. It’ll act like a big blanket that keeps heat in.
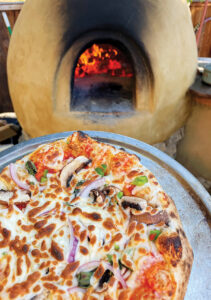
When you get to cooking, the dome shape will cause the heat and smoke to circulate – and even undergo secondary combustion – increasing the temperature of the mass before the smoke exits through the opening.
Plaster the Exterior
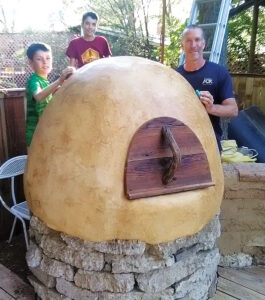
We normally apply three successive coats of plaster to finish the oven and make it look pretty. The first is a base coat full of chopped straw, which covers the shaggy slipstraw insulation layer. Next is a finer layer of only clay soil and sand called a “brown” or “scratch” coat. Last is a much finer finish plaster made of screened sand, clay powder (usually purchased), finely chopped and screened straw (optional), and iron oxide pigments if you want to give your oven a specific color.
Door, Roof, and Chimney
When cooking pizzas, you’ll keep the oven open the entire time, so having a door won’t even be necessary. However, cob ovens are also great for baking, and a solid door will keep heat in. Adding a chimney makes for a slightly more complicated build but is nice for routing smoke away from the chef.
Cob and earthen plasters can take on some moisture and be just fine, but prolonged rain or snow will eventually “melt” an oven, so plan to install a roof. There are many ways to make a roof, such as inserting boards right into the cob or spanning an entire outdoor kitchen area. If you live in the desert like we do, you can get by with a plastic tarp or pond liner during the rainier season.
Bake!
Start by making a small fire in the center of the hearth, and add wood a bit at a time. After about an hour and a half, the temperature should be up to 900 degrees Fahrenheit. Let the fire die down to mostly embers with just a bit of flame. Push the embers to the sides and back of the oven. Slide in the first pizza, which will cook in about 1 minute. After the first few pizzas, the cooking time will increase, giving the cook a chance to sample some slices and wash them down with a cold beverage.
You can cook about 15 pizzas in an hour and a half with some management. As the firebricks cool down, pull the embers forward into the center of the hearth to reheat the bricks. Add small pieces of wood or some kindling to generate a quick flame that’ll bring the temperature up again.
Some pizza-cooking tools will make the experience more enjoyable. The first is a wooden pizza peel no wider than the oven opening for sliding the pizzas in and out. We also use a smaller turning peel for rotating pizzas while they’re cooking. A metal hoe is good for pushing and pulling the embers around and also to wrap with a wet rag to clean ash from the bricks. I like having a pizza rocker or wheel, a few wooden cutting boards (on which to prep pizzas), and a laser thermometer – which, I admit, we mainly use to wow our friends and their kids.
When you’re ready to build a pizza oven of your own, I recommend referring to my step-by-step book Build it with Earth: The Cob Pizza Oven. I hope your project leads to many great pizzas and further exploration into the world of natural building.
Kyle Chandler-Isacksen is a tinkerer, natural builder, and community organizer in Reno, Nevada. He and his family run the Be the Change Project, a fossil-fuel-, car-, and electricity-free urban homestead and learning space dedicated to service and simplicity and inspired by the principles of Gandhian Integral Nonviolence. They were honored as one of MOTHER’s Homesteaders of the Year in 2013. Read all of his MOTHER EARTH NEWS posts here.


