We’re ready to prove, once again, that energy-efficient housing doesn’t have to be expensive.
You probably didn’t have to read between the lines on MOTHER EARTH NEWS’ Passive Solar Eco-Village to figure out that we were pretty excited to announce the latest project at the Eco-Village. The Low-Cost Homestead is the most ambitious single effort yet tackled at our 622-acre center for research into lifestyle alternatives, and the combination of an inexpensive and energy-efficient home with perennial agricultural techniques and renewable energy sources will — we hope — allow that integrated one-acre project to become entirely self-sufficient.
But, because permaculture techniques (which involve the creation of sustainable agricultural systems) require years to establish and perfect, at this time there’s no way we can report on the success (or failure) of our schemes for raising plants and animals. (You can read about what we have in mind in Self-Sufficiency on a Low-Cost Homestead.)

Furthermore, as a result of our crew’s busy summer schedule (while the Eco-Village is open to the public), the 12-volt micro hydropower system isn’t yet fully debugged. However, the earth-sheltered home that’s the core of the project is, for all intents and purposes, completed.
How Low Can We Go?
Our goal in designing this house was to produce as inexpensive a structure as possible (one that could accommodate a three- or four-member family) while still attaining reasonable energy efficiency . . . all without skimping on the structure’s long-term durability. We felt certain that this could be accomplished at a cost of less than $10 per square foot in materials (exclusive of land, excavation, septic, water-supply, and energy system costs), and decided to shoot for $6.00 per square foot.

Impossible, you say? Well, we’ll agree that a conventional home probably can’t be built for less than $10 per square foot, no matter how shabbily it’s finished. Indeed, because of a standard “box” design’s inherently inefficient use of materials — which contractors happily balance against a reduction in labor — our crew knew that an ordinary plan was out of the question. Ingenuity and sweat were going to have to take the place of a semi loaded with 2 X 4’s.
Think Again
Other building projects (such as “My MOTHER EARTH NEWS House“, which has appeared in several issues, beginning with No. 70) have convinced us that earth sheltering can provide energy efficiency without requiring that the builder resort to incorporating tremendous thicknesses of insulation. Now we’re perfectly willing to spend money on R-value . . . unless we can get the earth to do the job gratis. And, in our comparatively ,temperate North Carolina climate, a little bit of dirt can go a long way.
Yes, some degree of berming seemed to be destined for our rock-bottom-dollar home. Unfortunately, the walls of typical earth shelters must be quite stout to withstand both the weight of the earth and hydrostatic pressure. And, as we learned in building My MOTHER EARTH NEWS House, that sort of construction can get pretty expensive. On the other hand, it’s well known that a convexly curved wall (or ceiling) is better able to withstand stress than is a flat one, so MOTHER EARTH NEWS’ Eco-Village crew came up with the idea of building a round house. Not only would this approach save on structural materials (since it wouldn’t require the heavy walls demanded by a “square” home), but the shape would provide more floor space (with fewer useless corners) per dollar invested than would a square building.
The floor plan that we settled upon is based on a 36′-diameter circle but isn’t actually completely round. To accommodate a greenhouse, a section of the southeast portion of the circle was brought out to a point (forming what looks much like a teardrop from above), so that the flat greenhouse glazing could be faced south. Because of our building’s location, however, accomplishing this — while maintaining adequate bering — did involve some compromise.

You see, the main topographic feature in the hollow chosen as our building site is a west facing slope that tapers toward a creek (with a mean flow of about 30 gallons per minute) draining south to the Eco-Village lake. On the other side of the small watercourse, a hillside rises away steeply . . . and late on summer afternoons its cover of deciduous trees shades the little valley extensively. Consequently, we realized that the building would have to be dug in far enough up the slope to avoid winter shading, and the south line would have to run parallel to the hillside’s contours.
Because the westerly direction of the hillside didn’t cooperate completely with a perfect solar orientation, our designers decided to extend the south-pointing wall in a gentle arc, letting it serve as a retaining wall. Then, to provide as much berming as possible, they cut down into the roughly 15 percent slope to the point where the uphill wall would be buried to its top. Thus, the lower side of the 36′-diameter circle is still about three feet below grade. In addition, material removed for the excavation was later used to increase these depths. As a result, the building is bermed to at least four feet in depth around most of its circumference.
New Kid on the Block
Conventional 8″-deep, 16″-wide footings were dug for the building, but the technique used for preparing the trenches was a bit unusual. After the major excavation had been dug with the backhoe on our tractor, staffers David Landreth and Jim Hall turned the earth within the 36′-diameter circle with a Troy-Bilt rototiller, and then dug out the ditch with shovels. (This method might save an owner-builder money on machine operation. More important, it would be difficult to prepare a smoothly rounded trench with heavy equipment.)
Two rings of No. 4 reinforcing rod were supported in the trench, about three inches off its floor. Then 36″ No. 4 starter bars (to tie the walls to the footings) were set vertically every 32 inches along the curved wall and every 16 inches on the flat portion (two more bars were set where the pilasters would be located) . . . and nine yards of concrete were poured into the ditch.

As the footings cured, our crew discovered the first problem: A spring surfaced that was large enough to produce a pool of standing water on the earth within the ring. At that point, it became obvious that the planned rammed earth floor probably wasn’t going to work. The only practical solution appeared to be to provide generous drainage, put in a vapor barrier, and pour a slab.
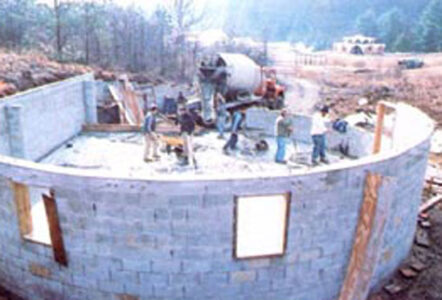
So two courses of 8″ concrete block (including the reinforced and tied-in pilasters) were laid up on the footings, a 12″ layer of 3/4″ stone was poured inside, a 6-mil polyethylene moisture barrier was carefully sealed and lapped up the foundation walls, plumbing was roughed in, and a slab of 3 1/2″ average thickness was poured to the top of the foundation and screeded from that level.

From there on, the process of laying up the walls was more straightforward than our masons had dared to hope. As it turned out, the curve of the wall was gentle, and the larger exterior gaps between the 8″ blocks therefore could easily be plugged with mortar. After the twelfth course had been laid, the top of the wall was formed up with scrap plywood, enabling the crew to pour a bond beam around the ring. No. 4 steel bar was then dropped to meet the starter bars, and, in turn, the rods were wired to two rings of No. 4 steel running horizontally around the beam. Before the concrete truck arrived, those block cores without rebar were plugged (to avoid filling them with the pricey mix), so only five yards were required to ring the top of the wall and fill the reinforcing cores.
With 1,050 concrete blocks in the walls . . . 27 yards of concrete poured for the footings, slab, and reinforcement . . . and 800 feet of No. 4 rod intertwining the structure, we’re already almost $2,500 into our total budget of $6,000 to $10,000. Therefore, the steps we’ll relate in the next issue of MOTHER EARTH NEWS — which will include the framing, rafters, and roofing — will obviously have to involve more imaginative money-saving features. So polish up your sliding T-bevel (or, better yet, your Squangle) and get ready for a lesson in cutting compound angles!


