Learn how to cook on a cookstove and find out what woodburning cookstoves have to offer the modern chef.
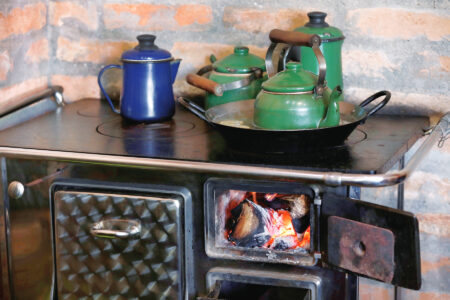
A woodburning cookstove is part of the fabric of the 19th-century frontier, something that historical reenactors might fire up for a demonstration, or something we remember as the stubborn kitchen fixture of an Appalachian great-grandmother. But in my off-grid home, it’s as normal a feature as a kitchen sink or a dining-room table. Starting a fire in the woodbox and cooking three meals a day has become a normal, delightful pattern in my personal life, proving (to me, at least) that this old-fashioned way of preparing food is just as relevant in 2026 as it was in 1826.
A Traditional Tool for the Modern Age
When fast food can appear at your front door minutes after tapping an app, using wood to cook a meal might seem pretty regressive at first. But a woodburning cookstove gives me autonomy like nothing else can. Since I cook three meals a day for my family every day of the year, I needed a tool that functioned totally independent of the grid and that ran on fuel that we could harvest directly from our land.
A woodburning cookstove is certainly an investment, but for me, installing one was a huge step toward self-reliance. As someone who has personally killed not one but three electric ovens (they didn’t like being used for three meals a day, every day!), I relish the fact that my woodburning cookstove can’t short-circuit or break down. It also gives my off-grid home supplemental winter heat and hot water, turns storm-fallen wood into fuel for making meals, and is a superb dehydrator.
Each style of stove has its own nuances, but overall, the actual mechanics of using a woodburning cookstove are pretty basic: Open the damper, make a fire in the firebox, close the damper, heat the oven, and cook food. To increase the intensity of the flame, open the damper and add more fuel; to lessen the heat, close the damper and move the cooking vessel to a cooler area of the stove. Though you’ll need a knack for starting and maintaining fires, anything you cook or bake with a conventional gas-fired or electric stove can be made on a woodburning cookstove.
That said, using wood fuel to fix your vittles takes practice to master, and it can be confounded by both the quality of fuel and your attentiveness. Wood-cooking is active cooking. Fail to close the damper, and you’ll have an inferno that chars your pancakes. Forget to keep adding fuel, and you’ll end up with a cold oven and a half-cooked loaf of bread. Use slightly damp or poor-quality wood, and you’ll be suppressing curses while fruitlessly pumping the bellows over wan embers. But everyone goes through growing pains while learning anything new. I’ve certainly made my fair share of poor fires and burned food!
Tips to Get You Started
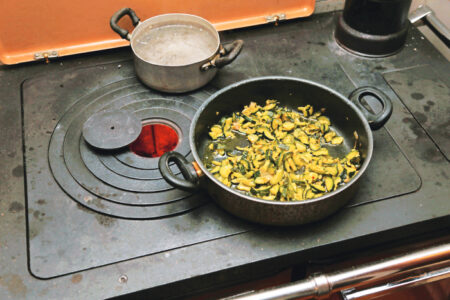
- Use lids! Liquids will come to a boil much faster when they’re covered, which means it’ll take less fuel to get the job done.
- Consider the merits of steaming: Cook dumplings, vegetables, and more with little fuel usage.
- Always plan out your meals the night before.
- Keep some insulated thermoses on hand. Fill them with boiling water so you can have hot water on demand when the fire is out.
- Plan for warm-weather cooking! We have an outdoor kitchen that we use during our blazing Ozark summers, but you can also use a grill, an open firepit, or even a solar-reflector oven as alternative means of making a meal.
- Forget about “30 minutes until cooked.” Because of inevitable temperature fluctuations, the food is done when it’s done, which means you’ll have to be more attentive to the cooking process.
Fuel for the Fire
My cookstove’s user manual recommends kiln-dried aspen wood for optimal performance. This makes me laugh – I’ve never used a stick of “kiln-dried aspen” in my life. We could debate the merits of different types of wood for days, but anyone who depends on wood for their fuel knows that the best fuel for your woodstove is whatever you’ve got piled outside the front door.
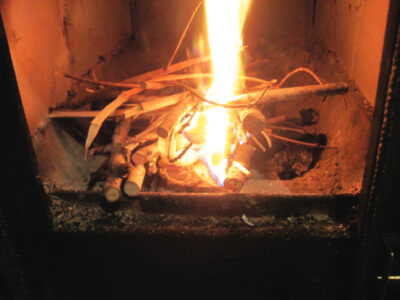
Gathering and stockpiling fuel becomes of the utmost importance when your dinner depends on it. I’ve burned a lot of different woods that I’ve scavenged, collected, or harvested, including:
- Random-shaped cast-offs from a local lumber mill.
- Slabwood.
- Half-rotten, punky wood scavenged from the forest.
- Twigs and branches from storm-felled trees.
- Old, unpainted, and untreated wooden fence boards.
- Dried tree prunings from the fruit and nut trees in my orchard.
- Untreated pallet wood with any metal removed.
- Untreated cordwood.
- Bits and pieces of untreated lumber from my husband’s workshop.
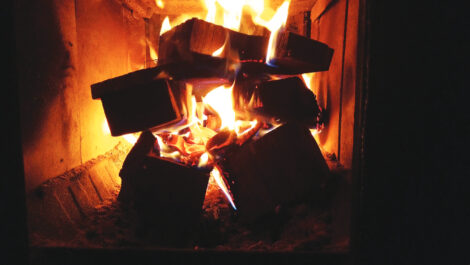
Each type of wood burns with different results. Dry pallet wood is like jet fuel, burning hot and fast for searing stir-fries. Well-seasoned cordwood is dependable and easy to use. Random cast-offs from the lumber mill can be plentiful but are wild cards in terms of how seasoned they are (or aren’t). Punky, half-rotten wood will never burn hot and will make it nearly impossible to use the oven. Thus, I make fuel smorgasbords, mixing good wood with not-so-good wood to end up with a pretty decent fire at the end. I do, however, save my “best” wood for baking bread, as there’s nothing quite as uniquely frustrating as watching the thermometer stall at 200 degrees F when you’re trying to finish a big loaf of sourdough bread (sigh). As with most endeavors, the more you cook with wood, the more you’ll understand it.
Note: Burn only untreated wood for cooking. Chemically treated wood can sometimes be identified by its greenish color, a chemical smell when drilled into, or any particular markings or stamps, such as “AWPA” (American Wood Protection Association) or “Wolmanized.”
Practice Makes Perfect
You can cook anything you want with a woodburning cookstove, but the newness and active nature of it all may be frustrating to the wood-fired novice, especially in the beginning. The recipes I share here for whole-wheat pancakes and red-lentil daal were some of the first that I was able to master again once I made the switch to cooking with wood fuel, so I offer them to you, whether you’re cooking with gas or electricity, or valiantly attempting to make dinner on your own wood-fired cookstove for the first time. Though it takes a lot more work and time, cooking with fire is satisfying, empowering, and worth the effort.
Whole-Wheat Pancake Recipe
Honestly, who can fire up a woodburning cookstove and not make pancakes? This was the first tentative meal I made with my stove, and it’s a great, no-fuss way for anyone to start a relationship with their own. The secret to great pancakes, by the way, is to use an ungreased yet well-seasoned cast-iron skillet. If your skillet isn’t yet well-used, a light coating of oil may be necessary. Yield: 4 to 6 servings.
- 2 cups whole-wheat flour
- 1 tablespoon tapioca starch
- 1/3 teaspoon salt
- 1 teaspoon baking soda
- 2 tablespoons butter, melted
- 1 teaspoon vanilla
- 1/2 cup plain yogurt or buttermilk
- 2 eggs, beaten
- Maple syrup or fruit compote, to serve
- Combine dry ingredients and wet ingredients in separate bowls, then combine them together.
- Add water as needed to achieve a “pancake” consistency, and then allow the mixture to rest for 10 minutes.
- Put a dry cast-iron skillet on the stove to heat until a drop of water sizzles on its surface.
- Add more water to the batter to re-achieve a “pancake” consistency.
- Drop batter onto the skillet, 2 tablespoons per pancake for fun-sized pancakes.
- Once bubbles appear on the pancake, flip and cook the other side.
- Serve with maple syrup or fruit. compote.
Wren Everett and her husband live off-grid in the Ozarks in a home they built with their own hands. They try to grow as much of their own food as possible and rediscover the old skills of self-sufficiency.


