Add these delicious and easy-to-grow wine caps mushroom to the list of food you produce yourself!
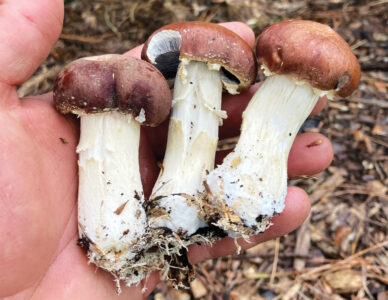
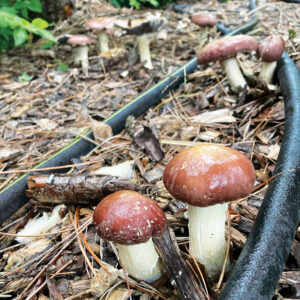
Wine cap mushrooms are arguably a gardener’s ultimate mushroom. With their striking dark-rosy caps and impressive size, they easily fit into garden beds, landscapes, or along pathways. Once established, these mushrooms often produce several harvests each season for 2 to 4 years. By replenishing the wood-chip bed every year or two, you could potentially extend their production for decades.
Wine caps have a potato-like flavor, and a single mushroom can be enough to cook a meal. They’re a wonderful companion crop alongside herbs and vegetables, giving you the ability to harvest well-rounded feasts from your garden throughout the year. As an added bonus, they break down organic materials, making nutrients more available to your soil.
They have a broad growing season, typically lasting from spring through late autumn in temperate regions, with flushes occurring after heavy rain followed by cooler temperatures. In tropical climates, you’ll find peak yields during the coolest months of the year.
How to Grow Wine Cap Mushrooms
Wine caps can be grown indoors in buckets of straw if that’s the best option for you. However, when they’re grown outside, they’ll come back repeatedly, and you’ll get a much more substantial yield over time while consuming far fewer resources.
Generally, you can expect your first harvest 6 to 9 months after establishing the bed. You can start growing them anytime during the year, as long as the ground isn’t frozen. I recommend planting them in either early spring after the thaw or mid-autumn. If you plant in spring, you’ll get your first harvest before winter; if planted in autumn, watch for your first mushrooms the following spring.
Wine caps love to grow on wood chips; mulch or chunkier sawdust work as well. Box elder seems to have the best yields, but maple, oak, and willow also work. Wine caps will colonize and fruit faster in softwoods, but these chips tend to get eaten up much more quickly by the mycelium. While softwoods will help you get your first mushrooms sooner, hardwoods will make your mushroom bed last longer.
What to Avoid
Pine isn’t advised because it’s a fungal inhibitor. Black walnut is also not a great choice because it can inhibit the growth of some garden plants. Wine caps can grow on straw, but if you’re doing an outdoor bed, you’re unlikely to get multiple years of harvest out of a straw bed. Hardwood beds will keep producing mushrooms longer. I do tuck in all of my outdoor mushroom beds with a layer of straw on top right before winter hits to give them an extra buffer from the harsher weather.
Prepare Your Wine Caps Mushroom Spawn
The first step of mushroom cultivation is to prepare your grain spawn. This takes minimal effort, but it needs several weeks to sit while the spawn colonizes the grain. If you’d like to skip this step, you can alternatively purchase ready-made wine cap spawn. You’ll save quite a bit of money using culture to prepare your own spawn, but if time is of the essence, premade spawn will be your friend. If you opt to purchase ready-made wine cap spawn, skip this part and go to the steps for preparing your bed or border.
For some of the more advanced methods of making your own grain spawn, you can use a pressure cooker. The method outlined here is a great way to get started and give wine caps a try without needing any special equipment.
- Gather your supplies.
• Wine cap mushroom culture.
• Rice: You can choose uncooked or precooked brown or white rice, but brown rice is recommended because you’ll be better able to see your mycelium colonizing it.
• A jar with a lid or a freezer bag, if you’re not purchasing a bag of rice.
• A drill for the jar method or scissors for the bag methods.
• Pots to cook the rice and hold your jar in hot water, plus a canning jar lifter to handle the hot jar.
• Paper bandage tape (choose the paper medical tape for good airflow, not cloth tape).
• Hydrogen peroxide or 70 percent isopropyl alcohol and a clean cloth. - Prepare your workspace and jar. Begin by wiping down your work surface, tools, and the jar and lid or bag with hydrogen peroxide or alcohol. This will help get rid of any potential contaminants that might be lurking and give your spawn the best chance of success.
Next, if you’re using a Mason jar, before you start, drill a small hole about the diameter of a pencil into the lid.
When you’re ready to start your rice, warm the jar a bit by putting some warm or hot tap water in it (this is to prevent cracking from temperature shifts), then pour the tap water out and submerge the jar and lid in boiling water and let the jar sit under water until your rice is ready. - Prepare your rice. Cook a pot of brown rice slightly on the dry side. For quantity, aim for about 1 cup of cooked rice per 2 to 3 square feet of your intended growing area.
- Transfer the rice. While the rice is still hot off the stove, use a canning jar lifter to take the jar you prepared out of the hot water, dump the water out of the jar, and then quickly fill it halfway with rice. Put the lid on immediately and stick a square of paper bandage tape over the hole you drilled. The bandage tape will allow your spawn to breathe without allowing in ambient spores or bacteria.
Doing this transfer while the rice is hot will help deter unwanted contaminants from getting into your spawn. If you’re using a freezer bag, similarly fill it halfway with freshly cooked hot rice, squeeze the air out, and zip it shut. If you’re using a bag of precooked rice, follow the steps for the freezer bag. - Inoculate the rice. Once your rice has cooled down, slightly peel back the tape and inject 1 to 2 milliliters of wine cap liquid mushroom culture into the jar, sealing the tape shut again right away.
If you’re using a freezer bag or a bag of precooked rice, turn the bag upside down and shake the rice away from one corner, and snip the corner off – go for a 1-inch-wide opening – and inject your culture through there, immediately taping it shut again with the bandage tape.
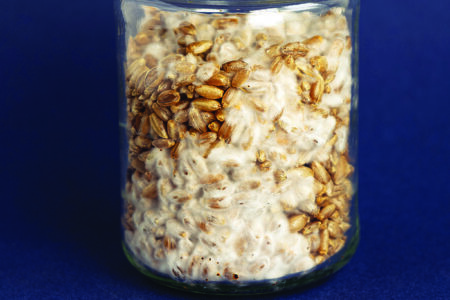
Overall, don’t use an excessive amount of mushroom culture – a little extra may speed up growth, but slightly too much culture can cause your rice to ferment instead of getting colonized. - Wait. Once you’ve inoculated your rice, let it sit for a few weeks at room temperature – 60 to 75 degrees F is ideal for wine cap spawn colonization. After about a week of sitting, you might see some white patches – this is the mycelium forming.
Once you’ve got about 30 percent of your rice colonized with mycelium, shake the jar or bag to increase the surface area that the mycelium is touching, which will speed up colonization and keep too much moisture from sitting in one spot. Once it’s fully colonized (most of the rice will be covered with white mushroom mycelium), it’s ready to use!
If you’re not ready to use it right away once it’s colonized, put your wine cap spawn in the fridge for up to six months to keep it dormant until you’re ready. However, you’ll see the fastest growth time the sooner you use it.
Prepare Your Growing Bed
To prep your outdoor growing area, you’ll need a handful of things.
- Enough wood chips or mulch to fill the area. Remember, box elder wood is the best for wine caps, but other woods work too. You can mix some leaf litter into your growing medium and use compost too.
- Your fully colonized homemade wine cap spawn, or a bag of purchased spawn all ready to go.
- Straw to go over the top. This is optional but will help hold in moisture and is helpful in drier areas.
- A water source. A hose will make tending your bed easy.
- A shovel (sometimes a small trowel comes in handy when you’re working on path borders).
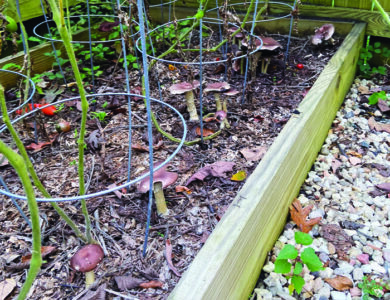
I typically dig a bed or border 8 to 10 inches deep. For beds, I usually do about 3-by-3-foot areas, and for path borders, usually 8 inches wide and however long I need it. There’s a lot of space for getting creative, and there are many options to scale or shape these areas. The main objective is making sure you dig your bed or trench deep enough to keep its contents from being blown, kicked, or raked out of place before the mycelium has time to establish.
After you’ve dug up your area, it’s time to get the spawn in. If you’re using compost, put a layer of that in first – this is the best time to add it. If you’re using leaves, mix them in with the wood chips or mulch.
Whatever your growing medium is, use it to fill your trench about one-third full. Next, crumble about 1⁄2 cup of spawn per 3 square feet over the top of everything.
Add another layer of growing medium so your area is now a third of the way full, and then crumble another layer of spawn over it.
Put a final layer of growing medium over the top, filling the space to the brim. If you’d like an extra buffer to help hold in moisture, put a layer of straw over the bed.
Last, water everything thoroughly – the goal is to soak it well. Come back the next day and hose it down again. At this point, leave it alone until it begins producing mushrooms some months later. If you go through any particularly dry spells over the course of the growing season, hose it down again, but in general, there’s nothing you need to do in the meantime.
Harvest Your Mushrooms
Wine caps have the finest flavor when they’re buttons – firm and a decent size – before the veil under the cap breaks. If you’d like bigger mushrooms, wait until the veil breaks, which will give you much larger caps, but harvest those as quickly as possible. Once the veil breaks, spores will start to fall, altering the flavor noticeably – you’ll know when your wine caps are dropping spores because you’ll see a fine black dust on the stems.
Feast and Preserve
Don’t wash your mushrooms until you’re ready to eat them! Store them in a paper bag in the fridge and they’ll stay nice and fresh for a week or so.
To preserve them long-term, slice your mushrooms thinly and place in a dehydrator until cracker-dry. I usually store dehydrated mushrooms in a Mason jar with a silica packet. If space is limited, I’ll put the jar in a cabinet, but if I have space, I’ll put it in my freezer, as the mushrooms will keep indefinitely that way. You can also cook your wine caps and then freeze them.
Fresh, uncooked mushrooms generally don’t hold up well in the freezer, so dehydrate or precook them in oil before freezing. This will let you get the best texture and flavor from them.
Wine caps are a versatile treat, and growing them is a fun project that can level up your garden efforts with very little ongoing maintenance needed. They have more flavor and personality than your classic white button mushroom, and with their ability to thrive alongside your herbs and vegetables while also improving the health of your soil, they’re a delight that any gardener will appreciate.
For wine cap recipes and information:
Smoky Wine Cap Mushroom Recipe with Gremolata
Vegetarian Stuffed Wine Caps with Cheese & White Beans
Crispy Wine Cap and Potato Fritter Cakes Recipe
Creamy Wine Cap Mushroom Potato Chowder Recipe
Erin Hamilton is the founder of The Mushroom Conservatory. Through her innovative mushroom-growing kits and workshops, she’s taught thousands of budding mycologists how to grow mushrooms and start businesses.
Originally published in the April/May 2026 issue of MOTHER EARTH NEWS and regularly vetted for accuracy.


