
What is calendula? Learn calendula plant care, and its benefits by growing this cheery flower to stock your home with a calendula tincture recipe and calendula lotion bar recipe.
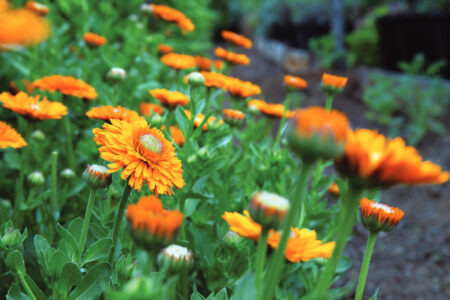
Growing calendula is like planting sunshine in your garden. There are so many beautiful cultivars and they thrive in an array of conditions, which makes them so easy to grow. Calendula is usually grown as an annual, which means you’ll need to replant fresh seeds each year, though the plants tend to reseed as well. If you live in a warmer USDA Hardiness Zone (8+), the plants might perennialize for you. In my Zone 8b garden, they last for several years and will sometimes bloom even through the winter.
Calendula is one of the top herbs I recommend growing for your home apothecary. It’s difficult to find good-quality dried calendula commercially, so when you grow it yourself, you gain access to more-potent plant material. Higher-quality plant material makes for more effective remedies, so it really is worth the effort to grow it if you have the space. Calendula blooms prolifically throughout the whole growing season, so you can also harvest quite a bit of it from a small garden.
Calendula vs. Marigold
Here’s one of the most common questions I receive about calendula: “Is calendula the same as marigold?” Calendula is the species Calendula officinalis. One of its common names throughout history has been “pot marigold” because it’s often grown in containers. It’s not the same species as the plant we typically call “marigold,” though, which is a plant in the Tagetes genus. Both plants come in cultivars that produce orange and yellow flowers, but the two can’t be used interchangeably in the apothecary. The calendula we’re discussing in this article is edible once you’ve learned to identify it.
Calendula Plant Care
To grow calendula for therapeutic purposes, choose cultivars that have a high concentration of resinous constituents. One of the most popular cultivars among herbalists is Calendula officinalis ‘Resina.’ The flowers of this cultivar are often a bright, cheerful orange, but you can sometimes find them in brilliant yellows as well.
Six weeks before your last frost date, sow your calendula seeds in a flat or in small pots, and cover them with 1/4 to 1/2 inch of soil. (If your seeds are on the larger side, err toward 1/2 inch.) I usually see the best results when I use a good seed-starting mix, but you can also use a light, airy potting mix that isn’t too chunky. Gently water your seeds, then keep them in a warm area with access to plenty of light. Keep the soil moist but not waterlogged until the seeds germinate.
When spring weather arrives and the ground has thawed in your area, harden off your seedlings and then plant them in pots or the garden. If you live in a place where they might survive the winters or where the summers are very humid, give them a bit of extra room – 18 to 24 inches between plants. Otherwise, 12-inch spacing seems to work well. I like to plant them with a bit of starter fertilizer to help encourage root growth as the plants establish themselves.
Calendula is happiest when it’s grown in full sun. You might be able to get away with planting it in an area that receives partial sun exposure, but you’ll likely see fewer blooms on the plants with a decrease in the number of hours of full sunlight they get each day.
Once the plants start to produce buds, I feed them an organic fertilizer regularly. Unless a soil test shows specific deficiencies, just use a balanced fertilizer to help encourage flower production throughout the season. Use the fertilizer of your choice per the manufacturer’s instructions for best results.
When the flowers begin to open, you’ll need to harvest them every day or two to keep the plants from transferring their focus and energy to seed production. As you continue to harvest flowers, the plant will branch out and make more.
Dry the flowers in a single layer in an area with good airflow. They’re dense, so it may take a couple of weeks for them to fully dry in the middle. Turn them regularly as they dry.
Harvesting calendula can leave your hands coated in sticky resin from the bracts on the flower heads. This is a good thing – it means the flowers you’re harvesting have been producing good therapeutic constituents! To get the resin off your hands, massage some olive oil into your hands, then wash them with a bit of dish soap.
Calendula Medicinal Uses
The primary reason to take calendula remedies internally is to help support digestion, specifically the health of the mucous membranes in the digestive tract lining. To do that, we need to make sure the resinous constituents from the calendula flowers can make their way into our teas or tinctures.
As with any new plant, use caution and pay attention to potential allergies. Calendula is a member of the Asteraceae (daisy) family, so avoid calendula if its relatives (such as chrysanthemum and dandelion) aren’t a good match for your body.
Calendula Tea Benefits
Making a traditional herbal infusion (steeping covered for 10 to 15 minutes) won’t work for this. Resinous constituents aren’t very water-soluble, so coaxing them from the plant material takes a bit of extra effort and time.
- Grind your dried calendula flower heads into a powder (make sure the green bracts are included; that’s where most of the resins are).
- Place 1 to 2 teaspoons of your calendula flower powder into a small saucepan with 8 to 12 ounces of water. Simmer over low heat for about 10 minutes.
- Turn the heat off and allow the plant material to steep, covered, for about 30 to 40 minutes.
The calendula tea will taste a bit bitter and can be mixed with more palatable herbs if desired. This type of calendula preparation works well for someone who wishes to take calendula internally but can’t work with calendula tincture.
Calendula Tincture Recipe
Because resinous constituents are most soluble in an alcohol solvent, calendula tincture is the most effective way to work with this plant internally. High-quality calendula tincture is commercially available, but you can also make it yourself. Commercial calendula tinctures are usually made with high alcohol percentages (sometimes as high as 95 percent) to take advantage of those resinous constituents. If you don’t have access to high-percentage alcohol, you could also work with something like a 100-proof (50 percent) vodka. A standard adult dose of calendula tincture is 1 dropperful 2 to 3 times per day. Here are the steps to make your tincture.
- Chop your dried flower heads into fine pieces (or powder them), then place them in a sanitized glass jar.
- Cover them entirely with your tincturing alcohol, ensuring that the plant material is covered by at least an inch of extra alcohol.
- Secure the lid on the jar and set it in a cool, dark place for 4 to 6 weeks. Some people like to shake the jar every day or so.
- After 4 to 6 weeks, strain the plant material from the alcohol, and your calendula tincture will be ready for use.
Calendula Oil Recipe
Calendula herbal oil is the most common herb-infused oil I work with in my own apothecary. It makes its way into almost all of my topical herbal remedies, and I love how supportive it is for the health of the skin.
- Chop your dried flower heads into small pieces (bracts from the back of the flowers included), then place them into a sanitized glass jar.
- Pour your carrier oil of choice over the plant material, ensuring that it’s covered by at least an inch of extra oil. I like to work with raw, organic sunflower seed oil because it has a light, pleasant feel on the skin, but you could also work with almond oil, olive oil, or whichever other carrier oil you prefer. Don’t use mineral oil, as it’s a petroleum product, not a fatty oil.
- Secure the lid on your jar and place your oil in a cool, dark place for 4 to 6 weeks.
- Before straining out the plant material, place the jar (with the lid on) in a slow cooker that has a couple of inches of water in the bottom of it (the water shouldn’t come into contact with anything on the inside of your jar).
- Turn the slow cooker heat on a low setting and allow the jar of oil to sit in the slow cooker for the day, checking it now and then to make sure the oil isn’t getting hot enough to cook your plant material. This step helps coax some extra resins into the carrier.
- Remove the jar from the water bath, allow it to cool enough to be handled safely, then strain the plant material from the oil by slowly pouring it through a coffee filter. This will take some time. I like to perch my pour-over coffee cone atop a freshly sanitized (and fully dry) Mason jar for this step, as it allows me to pour a little bit of oil into the filter at a time, then go about my tasks as the oil drips through it.
If you’re working with purchased calendula that doesn’t look vibrant, you can repeat the infusion process by adding a second batch of dried calendula flowers to the same carrier oil and re-infusing it for another 4 to 6 weeks. This will leave you with a stronger and more effective herbal oil than a single-infused batch.
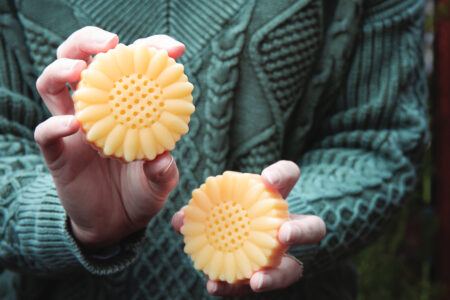
Calendula Lotion Bar Recipe
Ingredients and Materials
- 2 ounces beeswax
- 1 ounce mango butter
- 1 ounce cocoa butter
- 8 ounces calendula-infused sunflower seed oil
- Molds; I prefer food-safe silicone molds
One of the whimsical yet useful products you can make with your freshly decanted calendula oil is a batch of lotion bars. They’re so easy to make, and they can be fantastic gifts. This is one of my go-to recipes for them. Yield: six 2-ounce bars.
- Bring a few inches of water to a simmer in a small saucepan.
- While you’re waiting for the water to heat up, add the beeswax and the plant butters to a glass Mason jar or a glass measuring cup with a pour spout.
- Place the jar of wax and butters into the saucepan, which will act as a double boiler. Make sure the heat on your stove is set to low.
- Once the wax and butters have completely melted, gently stir in your calendula oil. If your kitchen is cold, this may cause some of the wax to solidify again. It’s not a problem if this happens. Just stir the mixture now and then as it melts back down.
- While you’re waiting for your ingredients to melt, sanitize your molds and make sure they’re completely dry. Set them in a place where they can rest undisturbed until your lotion bars have completely set up. You won’t want to have to move them once you pour your lotion-bar mix into the molds.
- Pour your mixture into your molds, then leave them alone until the bars have completely solidified.
To use a lotion bar, warm the bar slightly in your hands, rub the lotion into your hands, and allow this powerful flower to soothe and nourish your skin!
Erin Young is a clinical herbalist and aromatherapist, organic gardener, and artisan distiller based in the Pacific Northwest. She teaches herbalism and aromatherapy at Floranella.
Originally published in the February/March 2026 issue of MOTHER EARTH NEWS and regularly vetted for accuracy.


