Enhance your garden with a backyard wildlife pond. Learn how to build a backyard pond and get tips for pond plants and wildlife pond-edging ideas.
Having a water source, especially a pond, on your property is one of the cornerstones of providing a welcoming environment for natural systems. From deer and raccoons to birds, amphibians, and insects, the draw of water is unmistakable.
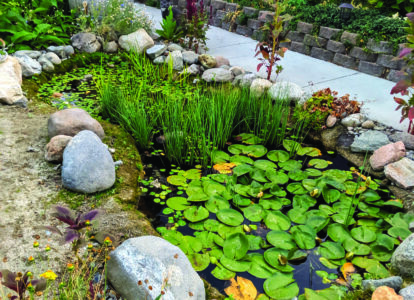
What’s in a Backyard Wildlife Pond?
My pond is in the high desert of the Great Basin, where water is rare and sought after. Providing a water source, even in the middle of town, is a small miracle. The different critters that come together and call a pond home are nothing short of spectacular.
In winter, when the ice breaks up, local songbirds bathe themselves, delighting us as they flit and play. Springtime is alive with frogs and toads singing to attract mates, and then, naturally, hordes of tadpoles appear. Frogs and toads will move out of the pond after mating season, living in the nearby ecosystem and helping keep insect populations in check.
Mating pairs of dragonflies are also attracted to the pond, where they lay their eggs, which later hatch into nymphs. These ravenous nymphs are expert predators, feeding on small insects and other animals, including mosquito larvae and leeches.
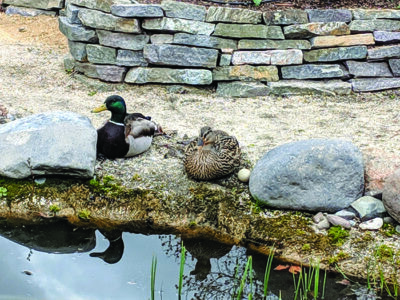
Other pond visitors include insects that depend on the pond as a water source. Pollinators need water. The trouble is, “modern” pond installation for dryland areas can be dangerous for many species of insects, amphibians, and even mammals. The rubberized pond liner and the rocks used at the edges to hide the unsightliness of the liner are slippery and can cause animals to fall back in, often to their demise.
How to Build a Backyard Pond: Carpet-Sandwich Technique
Carpet-sandwich ponds not only eliminate these dangers to wildlife, but they also use upcycled materials that would otherwise be headed to the landfill. For these reasons, carpet-sandwich ponds play a key role in permaculture-based installations. My 12 years of experience in building and maintaining several carpet-sandwich ponds inform the techniques shared here. However, please share any new knowledge you gain if it differs from (or confirms) these methods.
The term “carpet sandwich” refers to the method of sandwiching the pond liner between two layers of used carpeting. The bottom layer of carpet acts as a cushion, eliminating the need for “underlayment,” which is used in most professional pond installations. Commercially available underlayment is expensive, while the carpet or rugs can often be found free because they’re otherwise bound for the landfill.
Note: The bottom layer of carpet is laid pile-up and the top is laid pile-down (toward the liner). The liner is sandwiched between the two soft sides of carpet, and the bottom of the pond is actually the backside of the upper piece of carpet.
I built my first carpet-sandwich pond in my own yard in fall 2012 with used synthetic-pile glued carpeting from a rental house and 10-mil plastic sheeting for the liner. It worked perfectly for 11 years until 2023, when I pulled it apart because I made the mistake of planting an invasive water grass that took over the pond. The liner needed to be replaced because the grass roots had grown into it, but the bottom pieces of carpet were still perfect, and I reused them where they sat.
Since that first pond, I’ve built several more using this technique, but I’ve since used a stronger pond-liner material to last longer.
Wildlife Pond-Edging Ideas
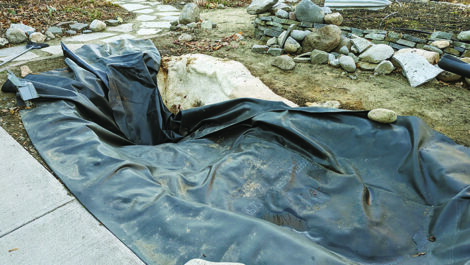
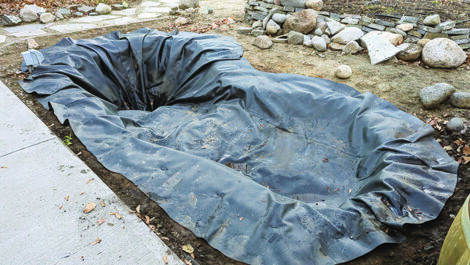
The size of the pieces of carpet and liner must be significantly larger than the surface area of the pond. The size must include the depth of the pond as well as at least 1 foot of overhang on both sides to be safe. So, for an 8-by-10-foot pond that’s 3 feet deep, the carpet and liner size will be around 16 by 18 feet. If you need to use more than one piece of pond liner, properly seal it with liner tape to keep it watertight. It’s best to use a single piece.
To build a pond of your own, first determine where to place your pond. Partial sun is best, but if there are large trees nearby, there’ll be more leaves and muck to remove from your pond. Also, your pond should be someplace where you can enjoy it, both outdoors and from an indoor window view if possible. Note where the lowest point of the pond edge will be and plan for water to escape from that corner in the event the pond fills over its lip. You don’t want your pond to drain toward your home, so put the pond and other planted areas downhill from the house. If you want to put it uphill from your house, create swales that’ll move water away from and around the structures on your property.
A major consideration for placement is power. The pump and aeration system will need it, and extension cords across the landscape aren’t a safe long-term solution. An electrician should put in a waterproof outlet protected by a ground fault circuit interrupter (GFCI) within a few feet of the deep end of the pond.
Determine the size of your pond. Mine range from 6 by 8 feet up to 8 by 13 feet. The method is the same regardless of size. The pond should be at least 3 feet at the deep end to allow critters living in the pond to survive the winter.
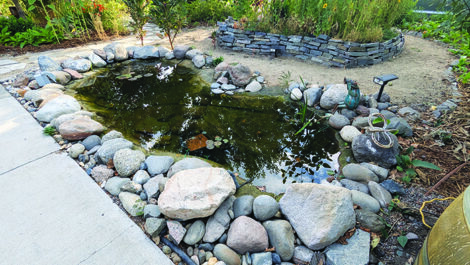
Dig out the pond shape. Create at least one area where the entry into the pond is gradual, also known as the “beach.” If the surface of the pond is rocky, remove the rocks or import some clay-type soil to soften the edges of the rocks.
Lay in the first layer of carpet, pile-up. Work it into the shape of the pond, pushing and folding it to settle in. It should extend 6 to 12 inches outside of the pond hole. Use strong ground staples a few inches from the edges and every 6 to 12 inches, pulling the folds taut and stapling in place. For this layer, it’s fine to patch together smaller pieces of carpet, since its main function is to protect the liner.
Lay the pond liner in place. When stepping into the pond, take care not to disturb the steep edges; use the beach to get in and out. For the liner, I recommend a heavy-duty rubberized pond liner or two layers of 10-to-15-mil plastic. It’s hard to rebuild the pond, so start with quality liner. Again, work the liner into the shape by pressing and creasing the liner into folds. Be careful not to get rocks between the layers. Hammer in a ground staple every 6 to 12 inches along the edge inside the carpet layer, cutting off excess with heavy-duty scissors.
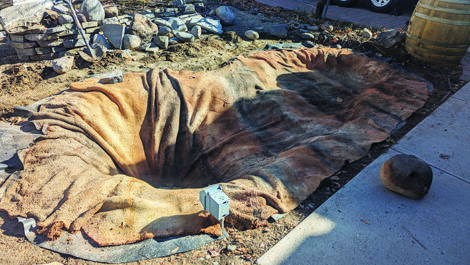
Put in the upside-down piece of carpet. For this layer, use one piece of carpet so the pieces don’t separate and tear as the pond ages. Again, staple the rug into place, overlapping the liner so it can’t be seen.
Install the pump. You’ll need to know the volume of your pond, which you can figure out by multiplying pi x L x W x 1/2 D, where pi = 3.14, L = longest length, W = longest width, and D = deepest depth, assuming only half the pond is that depth. For an 8-by-10-foot pond, V = 3.14 x 8 x 10 x 1.5 = 377 cubic feet.
Your pond will require inputs of water on a regular basis. Here in the hot, dry, windy high desert, we use our existing drip irrigation to provide the water source. Of course, the pond could be filled by hand with a hose, but pulling a PVC line off the mainline irrigation with a shut-off valve and float switch is slick. In my own pond, I just dropped a ¼-inch line off the local drip zone with a small gate valve that fills my pond each time that zone runs. Carpet-sandwich ponds lose more water than a modern pond design because of water wicking through the fabric, so adding water is important.
Make It Your Own
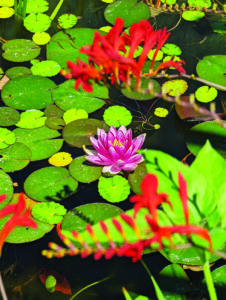
Decorate your pond with rocks, gravel, sand, and plants. The shallow end (I usually make about half the pond only 1 foot deep) is perfect for bog plants. The deep end can accommodate water lilies and deeper-water plants. Before planting, find out what’s hardy in your zone. A huge advantage of the carpet liner is that plants can anchor to it. Keep the plants in pots, but in time, you’ll find them rooted to the carpet, so place them where you want the plants to stay. Plants are necessary for a well-balanced pond.
It’ll take a year or so for the organic systems in the pond to fully engage. Keep an eye out for mosquito larvae and use mosquito dunks if you see them. Once your pond naturalizes, you won’t have to deal with them often. We usually invest in several feeder fish to keep the larvae down.
When the pond is in its first year, you may fight algae growth. Nontoxic algaecides should be a last resort. The best solution to algae is always air: Get an appropriate aeration system for the pond. Also, investing in trapdoor freshwater snails and algae-eating fish will help.
Native frogs and toads usually find the place, but if not, ask around for people who have ponds, and usually they’ll allow you to get tadpoles in spring to stock your pond.
Like them or not, cats, raccoons, and other animals are in our landscapes, and they’ll come to rely on your pond for water, food, and fun. I haven’t had any negative effects from them except when introducing new plants into the pond. The city raccoons love to play in the pond at night. All is good until they knock over a plant that hasn’t rooted into the carpet yet. I’ve resorted to attaching wire to the planting pots and stapling them to the side of the pond to keep them stable until they root in. If you build it, they will come. I can’t blame them; it’s a lovely place for us to hang out too!
Old carpet can harbor lead, while many newer carpets are treated with flame retardants, PFAS, and more. However, commercially produced pond underlayment is certainly not without its own potential health and environmental issues. We’re fans of saving money by repurposing waste and keeping it out of the landfill. Do your research and make the right choices for your situation. – Mother
Valarie Rider is a certified permaculture designer and advocate as well as an International Society of Arboriculture-certified arborist. As a residential landscape designer in Reno, Nevada, she prides herself in providing sustainable designs, with the parallel goals of creating landscapes geared toward human enjoyment while keeping true to the reduction of human and synthetic inputs. Permaculture concepts inform all her designs.
Originally published as “Design and Build a Carpet-Sandwich Pond” in the December 2024/January 2025 issue of MOTHER EARTH NEWS magazine and regularly vetted for accuracy.


