
Want to learn how to process a chicken from start to finish? Find out which chicken butchering supplies you need to get started and benefit from the meat of your own chickens.
Chickens in the backyard can become meat on the table, but only if we can get them from the backyard into the cooking pot. This can challenge our skills as well as emotions, so let’s discuss the basics on how to process a chicken from start to finish.
In the years past, my husband and I have only processed three to four chickens at a time: killed them with a hatchet, hung them from a clothes line, scalded and then hand-plucked each bird. Because we lacked skills and even proper knives, the job was unpleasant and the results not picture-pretty. We wanted to get 16 chickens into the freezer this fall, and so we improved the process.
Processing Chickens at Home with Killing Cones
First, we transitioned from the hatchet to five “killing cones” made out of sheet metal, using a pattern out of the “Anyone Can Build a Tub-Style Mechanical Chicken Plucker” manual by Herrick Kimball. I feel the cones allowed the birds to remain calmer and eliminated the risk of a misdirected hatchet stroke. Each cone was positioned over a 5-gallon bucket so the blood could later be transferred to the compost pile.
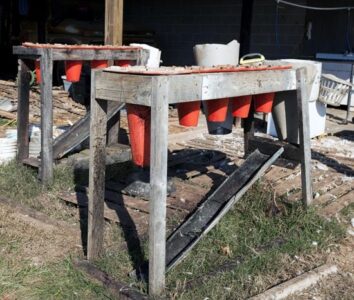
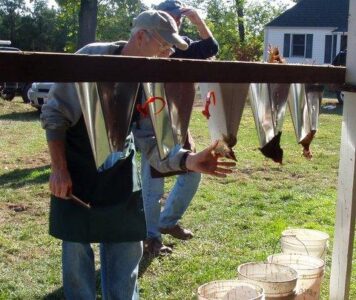
While in the cones, the birds’ carotid arteries are cut bilaterally with a very sharp knife. It was helpful to have their legs anchored so their movements didn’t result in a bird flopping out onto the ground. Cable-clamps attached to each cone by a light-weight chain did a great job because of the ease of taking these clamps on and off. The birds only take about five minutes to bleed out, and then it’s off to the hot water pot for scalding so the feathers can be easily removed.
Our pot is made of aluminum and is barely wide enough to dunk two medium-sized chickens at a time. The water is heated over a propane burner and a thermometer helps to keep the water temperature at 150 degrees rather than boiling. This temperature makes a huge difference in having the feathers come off easily.
Chicken Plucker for Home Processing
Next stop was the “Whiz Bang Chicken Plucker” made with the detailed instructions from Herrick’s well-written manual. A new chicken plucker costs $2,000, so it seemed worth it to spend about $500 for parts and lots of effort to assemble one. However, we became totally endeared with the chicken plucker when we saw it pluck two chickens clean in less than 20 seconds. Now chicken plucking doesn’t seem like such an onerous process!
The plucked birds were then brought to a Corian processing table with double sink — a $50 Craigslist special. Running water was adjusted with a ball-valve at knee height and there’s room for two people working on either side of the sink. 5-gallon buckets were placed conveniently below for the uneatable innards, and clean pots were on counters for livers, hearts and gizzards (and even feet) that can be cooked separately later. Cleaning the birds efficiently is important so the meat is not contaminated with feces.
Cooling and ‘Aging’ the Meat
The birds were then cooled by placing them in cold water. We used well-water without ice and the sixteen birds fit fine in a 60-gallon cooler. After cooling, the birds weren’t put in the freezer as we used to do. Instead, a friend instructed us to age them in the refrigerator to tenderize the meat. Our heritage birds are slower growing than the Cornish-cross hybrids, and we often don’t process the males until 22 weeks. Tenderizing these birds is the better part of valor!
To do this, each cooled bird is wrapped loosely in plastic or cheesecloth, placed on trays and set in the refrigerator for at least five to seven days. Having them sit upright is preferable. After aging, the birds are dried gently and thoroughly before being placed in freezer bags. We achieved “vacuum packing” by sucking air out of the bags with a straw, but I can imagine an electric vacuum packer might impress people as more professional!

The Emotional Components of Home Processing
The techniques and equipment I’ve talked about are only two components of processing backyard birds. There’s also the unspoken emotional component that is better to face head-on than trying to ignore. We are attached to our chickens. We’ve raised them from babies, laughed at their antics and worked hard to give them a good life with nutritious food and a comfortable home. Then it becomes time to kill them.
Part of our dilemma is that we can’t let the chicken house fill with aging birds if we want to help save the endangered Dorking breed of chicken. Additionally, half the chickens we hatch each spring are boys, and these guys fight once they’re let out of their mobile chicken pens and are with the girls. It’s also logical to eat the beautiful meat that is free of contaminants, very flavorful and high in nutrition. So how do we handle this?
Interestingly, what works for me is not to distance myself from the animals we eat and treat them like commodities, the way the corporate food system does. Instead, I choose to treat all living things with reverence. We thank them for providing food for us, we’re grateful we could enhance each other’s lives, and before meals we say a prayer of gratitude. That doesn’t mean that there’s not some sadness and even some negotiations to prolong a life now and then, but over-all, this works best for us.
Mary Lou Shaw homesteads with her husband, Tom, south of Columbus, Ohio, where they maintain a large garden and orchard and keep Dorking chickens, Red Wattle hogs, Narragansett turkeys, Dutch Belted cows, bees and several funny Ancona ducks. Pick up Mary Lou’s book, Growing Local Food.


