Modeled after MOM’s life-sized original, this easily made toy will provide hours of fun.
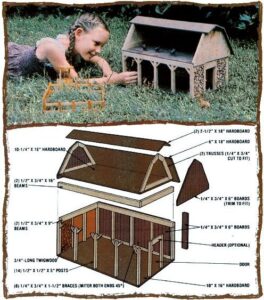
After MOTHER’s stackwood livestock shelter was completed last spring, research staffer Clarence Goosen was so taken with the building’s design that he decided to build a model of it as a plaything for youngsters . . . and you can see the handsome result of his handiwork in the accompanying photo. Better still, by reading through the following construction details, you’ll be able to delight your animal-loving children with a similar downhome toy. Clarence estimates that the project requires about eight hours–and a few inexpensive (or even free) materials–to complete.
THE FIRST FLOOR
To begin, cut out a 10′ X 16″ section of tempered Masonite hardboard to serve as the barn’s floor. The frame of the model pictured here was fashioned from one-by dimensional lumber, but you could use just about any leftover wood that might be cluttering your shop or work area. Cut two 1/2″ X 16″ pieces and two others that measure 1/2′ X 9″. Then fit the shorter timbers inside the other two and nail the rectangular frame together.
Next, you’ll need to make the posts to support that frame. Cut out 14 uprights, each measuring 1/2″ square and 5″ long, and glue them along the edge of the Masonite base . . . with five spaced evenly across the front of the building, five across the back, and two more on each end wall. Then drive one 4-penny nail up from the underside of the floor into each post, and nail the rectangle of beams atop the uprights.
The small-scale building’s back wall isn’t exactly like that of its “parent” (which is earthbermed) . . . instead, it’s planked with 1/4″ X 6″ strips that are ripped from the one-by dimensional lumber and then glued onto the back of the model. (You could make this a cordwood wall, using the technique described below . . . but doing so would increase the model’s total assembly time.)
Now, you can take a break from your labors, go for a walk in some nearby woods . . . and collect a goodly supply of small branches (all about half an inch–more or less–in diameter) for the stackwood end walls of the barn. Once you’ve gathered a bundle of sticks, use a fine-toothed saw to cut them down to little logs, each about 3/4″ long. Stack the twigwood into the open spaces between the posts, leaving the middle section open on one end to provide a “side door” for the structure. Clarence used white household glue to secure the tiny timbers . . . and left the open spaces between them unchinked.
The bottom story of the miniature outbuilding can now be finished off with three pairs of diagonal supports to firm up the posts on the front (open) side of the barn . . . plus two more that fit against the corner uprights. The tips of these braces are mitered 45°, and each one measures about 1-1/2″ on its longer side.
AND UPSTAIRS. . .
The removable upper story of the model barn features a loft floor and compound-angled roof somewhat like the one on MOTHER’s full-sized building. Start with a hardboard floor that’s 10-1/4″ X 16″ (it needs to be slightly wider than the first floor foundation to allow for a bit of overhang).
Next, we’d suggest that you draw cardboard patterns to determine the shape of the trusses that support the roof at either end. Clarence’s design uses five 1/4″thick, 3/4″-wide pieces–made from the same material as the frame–at each end . . . one bottom strip (which is affixed directly to the loft floor), two side strips, and two smaller pieces that meet under the main peak of the roof. (Of course, their ends will have to be angled to fit into each other.) The ridge of the gambrel roof shown in the diagram has an angle of 20°, and the secondary peak slopes at 15°.
To close in the structure’s ends, rip out 1/4″ X 6″ miniature planks–just as you did when making the lower story’s back wall–and glue them together. Fasten these boards to the outside of the rafters, placing them so that they’ll overhang the loft floor by approximately half an inch. Then trim off their top ends to match the outline made by the rafters.
Now, all the building needs is a roof, which will require three sections of Masonite hardboard. The smaller pieces each measure 2-1/2″ X 18″, and the back section (which is designed to overlap the barn’s rear wall) is 6″ X 18″. Run a bead of glue along the building’s supporting ends, where they’ll contact the underside of the roof, and along the to-be-joined edges of the hardboard . . . then put the covering in place. (You’ll probably have to stand over the barn and hold the roof down for a few minutes to insure a tight bond.) To finish the job, sand away any excess glue that seeps through to the outside . . . and hammer a wire brad into each corner of the back roof segment, to clamp it securely onto the rafters.
That’s all there is to it! Of course, if it’s likely that your pint-sized livestock managers will be playing outdoors with the miniature barn, you may want to weatherproof the structure with a couple of coats of polyurethane varnish . . . but otherwise, it’s now ready to be turned over to the active young imaginations in your household.


