
This step-by-step guide will show you how to make Roman shades without dowels to fit any window in your home and save loads of money.
The Roman shade on our bathroom window finally disintegrated after decades of use. Bathroom shades must be replaced for obvious reasons, but our window is an unusual size and hard to fit with readymade coverings. Custom retail shades can cost up to $200! Although I knew that buying new fabric for a homemade replacement would save us a lot of money, I decided to take it up a notch and figure out how to make a Roman shade from an old linen garment. This would save us buckets of money, and I knew I’d like the result much better than a commercial window covering.

My DIY Roman shade project turned out even better than I’d hoped. You, too, can make a cheap Roman shade for your home. All you need are basic sewing skills and a few simple tools — no sewing machine required. First, carefully read these instructions and plan your shade before you search for clothing to recycle.
Materials
The measurements and quantities of the materials you need will depend on the size of your window.
Tools and Supplies
- Graph paper – optional
- Tape measure
- Seam ripper
- Scissors
- Marking pencil
- Straight pins
- Clothes iron
- Sewing needle
- Handsaw
- Drill
- Staple gun or 1/2-inch finish nails & hammer
- Screwdriver
Step 1: Measure Your Window
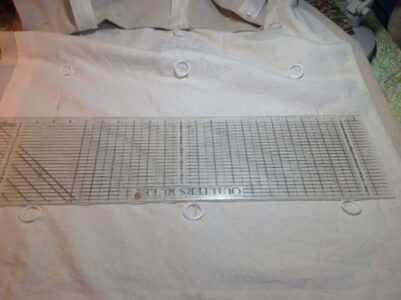
Your first step is to take careful measurements of your window. Graph paper is a good way to figure your fabric needs, and is especially helpful if you must make your Roman shade out of multiple clothing panels, as I did. Don’t forget to include extra for seam allowances and hems in your calculations.
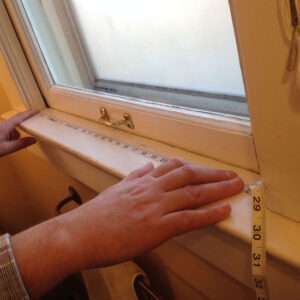
Because I wanted to make a Roman shade that could be raised and lowered inside (not overlapping) the window frame, I needed to take accurate measurements of the distance between the frame’s interior wooden elements (see photo). Inside-mount Roman shades should be slightly narrower than the window’s inside width so they can move without dragging on the frame, so I remembered to subtract a small amount from the measurement: The interior width of our bathroom window is about 26-3/4 inches, so I rounded down to 26 inches. I also measured the inside height of the frame and added on several inches to create plenty of wiggle room. (Step 7 includes information on how to adjust the finished height.)
Step 2: Go Shopping
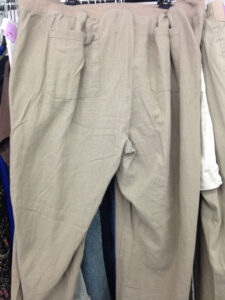
Go forth in search of clothing to recycle into a cheap Roman shade. Bring along your finished measurements from Step 1 because they may influence the garment you buy. You’ll be lucky to find a single piece of clothing wide enough to cover your window. Never mind — you can stitch together several vertical segments to make what you need. The most important thing is to get enough fabric height to avoid a distracting horizontal seam.
For my window covering, I knew I needed a finished shade that measured 26 inches wide by 32 inches high, not including seam allowances and hems. But the $3.00 dress I found at a thrift store was made up of long, flared panels, none of them wide enough for my window. I really liked the dress’s linen fabric, so I decided to make the Roman shade by sewing together three strips cut from individual dress panels. That meant I needed three separate panels, each measuring 9 inches by at least 40 inches. (This is why graph paper comes in handy.) A quick measurement of the dress panels in the thrift store showed me that it would work.
After finding the exterior fabric for your shade, your next step is to refer to the lists at the beginning of this article and gather the materials and supplies needed for the project. All the thread, lining fabric, equipment and supplies I needed for this project came from my sewing room. I used leftover polyester cord from the original bathroom shade; you may have to look for “blind cord” or “lift cord” in the curtain section of your local sewing supply store.
Buy, scavenge or recycle enough decorative ribbon to cover the seams and the stitches for the plastic rings — the reason will become clear in Step 6. Be sure to calculate how much ribbon you’ll need to cover the stitching for every row of rings. So, for example, my shade plan called for three vertical rows of rings to hold the lift cord. To cover the stitches, I would need the height of my shade times three: 32 inches x 3 = 96 inches of ribbon, plus a few extra inches for hems. Other than the dress, the ribbon was the only item I had to buy for my cheap Roman shade.
Step 3: Prepare the Fabric
Use a seam ripper to pick out the pockets and any decorative or structural features that you don’t want to end up on your finished shade, and wash, dry and iron the clothing you’ll be recycling. I put the linen dress and ribbon through a regular cycle in my washing machine because I knew I’d want to launder the shade eventually.
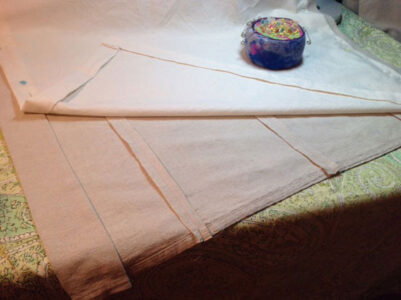
Take up a scissors and break down the garment by cutting along the seam lines to separate the panels you need. For my shade, I ensured perfectly straight edges on these panels by pulling a single thread along one raw edge and cutting along that line. Then, I measured 9 inches across from this straight edge, pulled a thread on that mark, and cut along that line. The result was a panel that would hang perfectly straight inside my window frame. I repeated this for the remaining two panels. (To watch this technique in action, see the video Pulling a Thread to Get a Straight Cut in Fabric.)
I decided that the dress’s existing hem would make a nice bottom edge for my shade, so I lined up and pinned the bottom hems on all three panels before sewing them together along their long, cut edges. I didn’t bother cutting or hemming the top edge of the shade because it would be hidden by the wooden batten in Step 7. I used a sewing machine for this step, but you could stitch these seams by hand.
Before proceeding to the next step, I re-measured the finished three-part panel to make sure it was the correct width for the window, then marked and turned under the side hems, wrong sides together, and ironed them in preparation for stitching.
Step 4: Lining
You can use whatever plain, sturdy fabric you have handy for the lining of your DIY Roman shade. I chose muslin because I had some in my fabric stash. Instead of carefully measuring and cutting the lining for your own shade, you can do as I did and sight it, tear the fabric, turn under and iron the side and bottom hems, and then whipstitch the lining to the back of the shade’s side and bottom hems with a needle and thread. I left the top edge raw because it would be hidden by the wooden batten in Step 7.
Step 5: Rings
To make an operable DIY Roman shade, you’ll need to sew rings onto the back for a lift cord to slide through. You can buy shade tape with pre-sewn rings, or you can sew separate rings to the shade lining.
Shade rings are usually made of super-smooth, snag-free plastic. The typical spacing of Roman shade rings is 5 to 6 inches apart from top to bottom, arranged in evenly spaced rows across the lining. A 6-inch spacing between rings will give your shade 3-inch folds when it’s drawn. Because I like the look of 3-inch folds, I marked the lining with pencil every 6 inches from the bottom hem to about 6 inches from the top. I recycled the plastic rings from the lining of my old shade, and sewed them onto the new shade at the seams joining the three dress panels, stitching through all the layers.
Step 6: Decorative Ribbon
Next, you’ll add decorative ribbon to hide the seams and the stitching on the front of the shade. I cut the ribbon into strips that extended slightly beyond the top and bottom edges of the shade. I pinned the ribbon in place on the front of the shade, covering up the ring stitching and making sure the strips were straight and evenly spaced, and then whipstitched them into place with matching thread. At the bottom edge of the shade, I wrapped the ribbon around the hem and secured it by stitching through all the layers.
Step 7: Batten
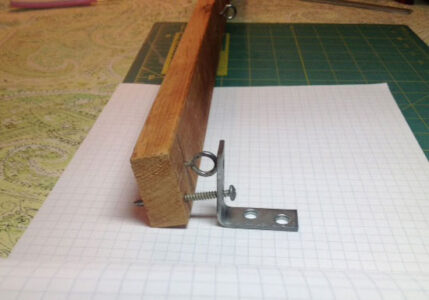
Your next step is to prepare a wooden board (aka “batten”) for mounting the shade to the window. To make a batten for your project, you’ll need to saw a small board to fit loosely inside your window frame at the top. Install eye hooks — one for each row of rings on your shade — to the bottom of the batten, spacing them exactly the same distance apart as your rows of rings. (You’ll be threading cord through these eye hooks in Step 8.) You’ll also have to drill holes through the ends of the batten for screws that will secure it to the window frame. I reused the old 1-by-2 batten from my original bathroom shade. For extra stability, I added angle brackets on the ends to connect the batten to the window frame.
You’ll have to mount the top of the shade to the batten, but first, it’s a good idea to adjust the shade’s length. I lightly tacked the shade to top of the batten and had my husband hold it in place while I marked where the shade needed to wrap around the batten’s top. I took down the shade and trimmed the remainder of the shade’s top edge even with the back edge of the batten. I also zigzagged along the top edge with my sewing machine to prevent raveling, although you wouldn’t have to bother with this if you didn’t intend to ever launder the shade. After all the adjustments had been made, I used 1/2-inch finish nails to mount the top of the shade to the top of the batten. A staple gun would also work great.
Step 8: Lift Cord
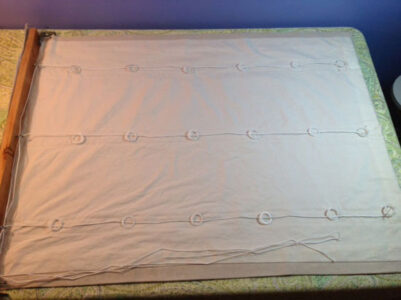
To make a Roman shade that can be raised and lowered, you must install a lift cord. First, decide on which side of the shade you want the pull to be located. I wanted my pull to be on the right side of the installed shade so we could use the cleat already mounted to our window frame. I flipped my shade and batten to the lining side and reminded myself to leave the loose cord ends on the opposite side of where I wanted the pull (because the shade was upside-down). Next, I tied the cord in a double knot to the ring on the bottom-right corner of the lining and snaked it up the shade’s entire height, across the batten, and down the shade’s opposite side about two-thirds of the way. I cut this first cord, threaded it through all the plastic rings and metal eye hooks, and then repeated these actions for the remaining sets of rings (see photo, above). Each cord on your DIY Roman shade will be a different length, so don’t pre-cut them all the same.
When you’re finished threading every cord through the rings and eye hooks, tie their ends together loosely. Mount the assembled Roman shade to the inside top of your window frame with screws, and test the operation. The shade should glide smoothly up and down when you pull and release the end of the lift cord. If the bottom of the shade is lower in one spot than another, untie the knot and experiment with pulling or releasing the individual cords until you get the look you want. Trim the ends of the cords even at this point; this will make it easy to line them up for installing the pull in the next step.
Step 9: Pull
You’re almost finished! You only have to install a pull. Almost anything small and unbreakable with a hole or loop for the lift cord can be used as a pull — jewelry pendants, upholstery tassels, even metal washers. To install your chosen object, you’ll need to thread the cord ends through the pull’s hole or loop, line up the ends (now you understand why you trimmed them even in Step 8), and knot them together securely. Mount a cord cleat to your window frame, and your project is finished.
Now that you know how to make Roman shades by recycling clothes, you can stitch up money-saving coverings for windows all around your house. Whenever you’re at a thrift store, browse the plus-size racks of extra-large clothing made of beautiful fabrics, and stock up on materials you can use to sew a cheap but stylish Roman shade.
Total cost for my DIY Roman shade: Less than $5.00 for the linen dress and ribbon.
Rebecca Martin is an Associate Editor at MOTHER EARTH NEWS magazine, where her beats include DIY and Green Transportation. She’s an avid cyclist and has never met a vegetable she didn’t like.


