How to build a rocking horse using a traditional spring-suspended design. Includes instructions for framing, a cutting pattern and rocking horse and trimming diagrams.

How to Build a Rocking Horse
INJECTION-MOLDED CHILDHOOD fancies come and go by the thousands, but a few special playthings just seem to endure. Take the rocking horse–a classic toy that’s lost little allure since its premiere in the 1600s. The secret, of course, is that the rocking horse offers something timeless; though real horses may no longer be an everyday part of the average child’s life, youngsters still take a delight in such a willing outlet for their ample energy.
Technically, of course, what you see here isn’t exactly a rocking horse. Suspended on springs instead of rockers, it might better be described as a bouncing horse. The distinction is an important one. By comparison to the well-broken rocking breed, this mount is a bit of a bronc. A really vigorous youngster can set up a mighty commotion on Ol’ Paint. For that reason, a sprung horse is only suitable for children at least two years old. Toddlers will have a hard time mounting and may not be coordinated enough to stay safely a’saddle. On the other end of the scale, depending on their exuberance, youths weighing more than 50 pounds are likely to bang the hooves against the floor or frame.

Rocking Horse Frame

The rocking horse’s frame must do two things: be stable and withstand the inward tug exerted by a cavorting child. Beyond that, it’s useful if the wooden members are out of the way for mounting and if the height can be adjusted. We settled on the version shown only after extensive experimentation. Feel free to adapt, but please do keep close to the basic footprint. A narrower frame will allow the horse to swing side to side too much; a shorter length cramps the rider’s legs and allows too much fore-aft movement; a longer frame will inhibit the horse’s movement on the springs.
Use whatever warp-free structural lumber is readily available in your area to make the base. In the mid-Atlantic states, that’s No. 2 spruce-fir, but other parts of the country rely on different species. Ask for better-grade, kiln-dried 2-by-4s. When you’re assembling the base, we suggest cutting out the pieces and loose-fitting them on a flat surface. While the glue is still wet, adjust the base until it’s absolutely flat on the bottom, so the corners won’t tap out annoying rhythms when horse and rider hit the trail. As you tighten the screws, check to see that the four corners stay put on the flat surface.
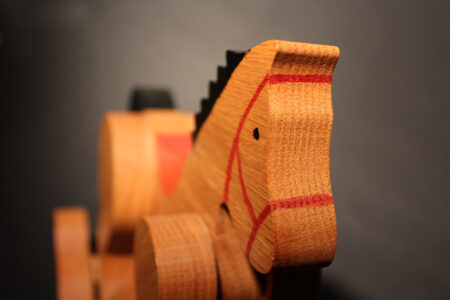
Horseflesh You’ll need a saber or band saw to scroll the curves of the horse’s body into the 2-by-12-by-10-foot stock. At that, you’ll have to fit a long blade into the saber saw to get through the 1-1/2-inch-thick lumber. Be picky when you select the 2-by-12. Warped boards just won’t do, since the pieces have to be face-glued. You shouldn’t have too much trouble finding a good 2-by-12, since it’s the material from which carpenters make stair stringers (the sawtooth-shaped sides of stairs). But, if you don’t like the look of the No. 2 material you’re shown, by all means spring for the next better grade.

There are two equally acceptable ways to laminate the 2-by stock for the horse’s body, legs, saddle and head. If you have a 5 inch long, 1/2 inch auger, brad-point or Forstner bit, you can clamp the pieces, drill through all three at the same time and then glue a dowel all the way through. (Hint: Bore just until you see the tip of the bit poking through the other side. Then come in from that side to get a clean hole.) Otherwise, you can set No. 12 by 1 1/2 inch wood screws from each side in 1/2 inch holes you fill later with hole plugs.

Whichever approach you use for laminating the body, the 1 1/4-inch closet rods on which the horse is hung must pass all the way through. Unless you happen to have an appropriate auger or Forstner bit, both of which are expensive, you’ll need a 1 1/4 inch spade bit. Spade bits, though inexpensive, are prone to make ragged holes unless you take precautions. The best approach is to file down the cutting surface, except at the very outside, as shown in the illustration. Lower the inner cutting edge about 1/16 inches, maintaining the same angle, using a small flat or triangular file. This “improved” spade-bit profile will slice the circumference of the hole before the main cutting edge begins to “hog out” material.
Rocking Horse Trimmings

As dashing a profile as this steed strikes in bare wood, it just doesn’t quite come alive without ears, mane, tail and your favorite breed’s paint scheme. We snipped out some ears from leather and unraveled pieces of rope for mane and tail. Cotton line is softest, but stiffer hemp or polyester rope stands up better. Paint is a matter of equine preference, but be sure to use nontoxic coatings on any nursery item you build.
Of course, when you watch an eager child leap aboard without a second glance, you’ve got to wonder whether all the cosmetic trappings are really for the children. It’s only we adults who’ve been around long enough to wax nostalgic about horses and rocking horses. But then, why shouldn’t we enjoy the toy too?
Editor’s Note: If you’re interested in getting involved in the art of rocking horse construction–carving, paint schemes, leather harnesses–check out Anthony Dew’s book, Making Rocking Horses (Sterling Publishing Co., New York, NY).
Originally published as “A Well-Sprung Rocking Horse” November/December 1988 MOTHER EARTH NEWS.


