This wobbly, old chair was made using mortise-and-tenon construction. There were nails in almost every joint. Always look for hidden nails if a joint doesn’t come apart easily, otherwise you’ll damage the piece even further.

1. Mark all the parts using masking tape. Make sure you use “left,” “right,” “top,” etc.

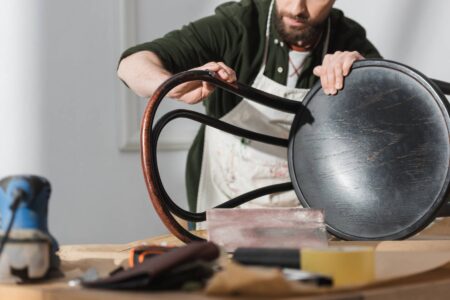
2. Remove all visible fasteners such as screws from the glue blocks. If you see a screw-hole cover like the one here, pry it off to expose the screw.

3. Gently tap stubborn parts with a rubber-faced mallet. Glue blocks may need a gentle whack with a hammer to break the glue joint.

4. Try to take the joints apart by hand, wiggling a little. If necessary, use a rubber hammer.

5. Check for hidden fasteners if the joints don’t release, especially hidden nails. You may have to remove some wood around the nail to pry it out.

6. Take the chair apart in stages; for example, take the front legs and stretchers off first, then the side rails. After that, you can take apart the back legs, seat rail, the crest, the splat, and so on.
How to Assemble a Chair
Reassemble the chair in the reverse order in which you took it apart, creating subassemblies. Get your clamps, glue, and other materials ready in advance so you don’t have to look for them after the glue is spread.

1. Repair any cracks or splits, whether the result of hard use or from the dismantling process.

2. Clean off the glue you can see on the wood surfaces and then wipe well around the joints using a rag and water.

3. Put the piece back together using logical subassemblies. In this case, I reassembled the back legs, seat rail, crest, and back splat first. Then I reassembled the front legs and stretcher.

4. Allow the glue in the subassemblies to set for an hour or longer. Then remove the clamps and assemble the chair. Attach the front to the back using the side rails. Make sure you do this on a level surface and check that the chair doesn’t wobble. If it does, you can correct the wobble by angling the clamps to compensate.

5. Install the glue blocks last, using glue and the original screws.
More from Refinishing Furniture
• Repair Wood Furniture: Regluing a Tabletop
• Repair Wood Furniture: How to Steam Out Dents

Reprinted with permission from Refinishing Furniture Made Simple by Jeff Jewitt and published by The Taunton Press, 2012. Photographs by Gary Junken.


