
Want to learn how to build a simple potting bench? With these easy-to-follow DIY potting bench plans, you will be able to increase your outdoor garden storage and finish chores faster.
Do you wash your garden produce on the lawn with a hose? Or transplant seedlings on top of your picnic table, or on your knees in the garden? If so, this DIY potting bench will make your gardening chores easier and faster. These DIY potting bench plans will let you work at a comfortable height, and will provide a central place for stashing your hand tools and supplies. The tubs will offer places to store soil, compost, waste and other materials. You can even add a sink to one side.
Before building your potting bench, purchase the storage tubs or baskets you’ll be using for the cantilevered wings, and tweak the dimensions of the bench parts accordingly. The materials and cutting lists are divided into bench and cabinet sections so you can build only one component if that’s all you need. If you’re building an outdoor potting bench, choose cedar or another rot-resistant lumber. Remember that cedar board dimensions usually aren’t as uniform as those of pine, so adjust your measurements accordingly. For interior use, any wood is fair game.

DIY Potting Bench Plans
Potting Bench Materials List
- Ten 2-by-4s, 8 ft. long
- 4 decking boards, 10 ft. long
- Exterior screws, 3-1/2-inch
- Exterior screws, 3 inches
- 10d galvanized nails
- 8d galvanized nails
- Construction adhesive
Potting Bench Cutting List
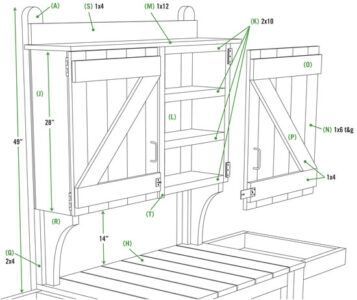
- 2 back legs (A), 1-1/2 inches x 3-1/2 inches x 80 inches
- 2 front legs (B), 1-1/2-inches x 3-1/2 inches x 30 inches
- 4 bottom leg blocks (C), 1-1/2 inches x 3-1/2 inches x 3-1/2 inches
- 4 middle leg blocks (D), 1-1/2 inches x 3-1/2 inches x 18-1/2 inches
- 2 front and back for lower platform (E), 1-1/2 inches x 3-1/2 inches x 46 inches
- 2 front and back for upper platform (F), 1-1/2 inches x 3-1/2 inches x 84 inches
- 8 platform crosspieces (G), 1-1/2 inches x 3-1/2 inches x 24 inches
- 16 platform slats, upper and lower (H), 1-inch x 5-1/2-inch x 28-3/4-inch decking*
*Most deck board material is a true 1 inch thick.
- Cut the 2-by-4 legs (A, B) and leg blocks (C, D) to length as indicated in the cutting list. Use a compass to draw 3-1/2-inch-radius semicircles on the top end of each of the rear legs (see A in drawing,) cut the ends to shape with a jigsaw, and sand the edges smooth. Secure the legs (A, B) and leg blocks (C, D) to one another with construction adhesive and 10d galvanized nails. Make the space between the leg blocks wide enough to tightly sandwich the platform and slats that will fit between. A gap that’s too big will result in a wobbly workbench, while a gap that’s too small will mean you’ll have to persuade the parts together with a hammer, or cut the blocks shorter after they’ve been attached to the legs.
- Build the frames (E, F, G) for the top and bottom platforms, fastening the corner joints with 3-1/2-inch exterior screws. Double up the (G) boards on the inside of the top platform’s frame for the tubs. Check to make sure the openings on the ends of the top platform will accommodate your tubs. (You bought the tubs first, right?) If the openings are too large, use scrap 2-by-4s to fill in the extra space.
- Make sure the platform frames are square, and then install the 1-by-6 slats (H) using 8d galvanized nails. Pre-drill the nail holes to prevent splitting. The top and bottom slats should overhang the frames by 1-3/4 inches. Notch the outer two slats on the bottom platform to fit around the front legs.
- Lay the two back legs on a solid, flat surface, and fit the bottom platform into the notches you created between the blocks. Position the top platform on top of the middle leg blocks (D). Secure the platforms to the back legs with 3-inch exterior screws. Use construction adhesive, too, if you want to increase rigidity. Install the front legs and secure them in place with screws. The top slats should extend just a hair past the front legs.
Note: If all you need is a potting bench, your work is nearly done. Just add open shelves to the back uprights and support them with brackets. If you also want a storage cabinet with doors, keep reading. But first, refer to the cabinet materials and cutting lists.

Build the Outdoor Garden Storage Cabinet
Storage Cabinet Materials List
- Two 2-by-10s, 12 ft. long
- 5 tongue-and-groove 1-by-6s, 10 ft. long
- One 1-by-12, 4 ft. long
- Three 1-by-4s, 8 ft. long
- One 2-by-4, 3 ft. long
- One 2-by-2, 3 ft. long
- Exterior screws, 3-1/2 inches
- Exterior screws, 1-1/4 inches
- 4 no-mortise hinges, 3 inches
- 2 cabinet pulls with screws
- 1 door hasp with screws
Storage Cabinet Cutting List
- 2 sides (J), 1-1/2 inches x 9-1/4 inches x 28 inches
- 4 top/bottom/shelves (K), 1-1/2 inches x 9-1/4 inches x 43 inches
- 9 backboards, tongue-and-groove (L), 3/4 inches x 5-1/2 inches x 28 inches
- 1 top cap (M), 3/4 inches x 11-1/4 inches x 48 inches
- 10 door boards, tongue-and-groove (N), 3/4 inches x 5-1/2 inches x 28 inches
- 4 door battens (O), 3/4 inches x 3-1/2 inches x 23 inches
- 2 door cross battens (P), 3/4 inches x 3-1/2 inches x cut to fit
- 2 upper leg blocks, back only (Q), 1-1/2 inches x 3-1/2 inches x 14 inches
- 2 support brackets (R), 1-1/2 inches x 9-1/4 inches x 12 inches
- 1 top rail (S), 3/4 inches x 3-1/2 inches x 46 inches
- 1 door divider (T), 1-1/2 inches x 1-1/2 inches x 28 inches
- Knock together the box for your garden storage cabinet by securing the bottom, top and shelves (K) to the cabinet sides (J) using 3-1/2-inch exterior screws. You can alter the spacing of the shelves according to your needs.
- Check the cabinet box to make sure it’s square by measuring the diagonals (if the measurements are equal, then the box is square). Install the tongue-and-groove backboards (L). You’ll need to rip the last board lengthwise to fit.
- Secure the cabinet top cap (M) in place. Position it so the back edge is flush with the back of the tongue-and-groove boards, and the ends overhang the sides equally.
- Install the 2-by-2 door divider (T). Measure from the edge of the cabinet to the divider and make your doors about 1/4-inch smaller in width. Fit five of the 1-by-6 tongue-and-groove boards (N) together to create a door panel that’s wider than you need. Mark out the width of the actual door on this panel before separating the boards and ripping one or both end boards to width so the door will be the correct width when the boards are reassembled. Fit the boards together again and lay them on top of the cabinet opening to make sure they’re the right dimensions.
![]()
- Place 1-by-4 battens (O) near the tops and bottoms of the doors of your storage cabinet. Check to make sure everything fits, and then secure the battens to the tongue-and-groove door boards (N) with 1-1/4-inch exterior screws. Lay the cross battens (P) into position, mark them, cut them to the correct angle and length, and then secure them with 1-1/4-inch screws.
- With the garden storage cabinet still on its back and the doors in place, secure the doors to the cabinet using 3-inch hinges — two hinges per door. Install pulls for opening the doors and a hasp for keeping them shut.
Join the Storage Cabinet to the Potting Table

- With the bench on its back, position the cabinet on the back legs (A) 14 inches above the top platform. Secure the cabinet to the legs by driving screws through the cabinet back and sides.
- Cut the upper leg blocks (Q) and secure them to the back legs (A) to support the bottom of the cabinet.
- Create and install your own cabinet support brackets (R) or use commercial metal shelf brackets. Install the top rail (S) to add rigidity and to prevent objects placed on top of the cabinet from falling off the back.
To secure your finished garden potting bench — and prevent it from tipping over because of unequal loading or climbing kids and cats — you can anchor it to a wall, railing, tree or fence with screws. Or, you could secure the legs to a concrete slab with L-brackets and concrete fasteners. To stop the soil or potting materials in the tubs from turning into mud, save the plastic tops and snap them in place when you’re finished for the day. You can also drill a few holes into the bottom of each tub to provide drainage.
Spike Carlsen is a master carpenter who’s been immersed in the wonderful world of wood for 30 years. These practical DIY potting bench plans are among the 76 ingenious ideas offered in his DIY guide, The Backyard Homestead Book of Building Projects.


