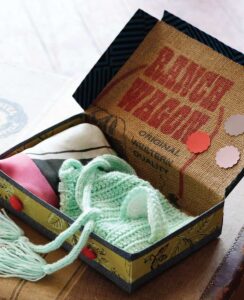
Reusing a cereal box — or any empty box from the pantry — can quickly becomes great gift wrap when you make a gift box from recycled cardboard. In Ruby Star Wrapping, authors Melody Miller and Allison Tannery inspire you to think resourceful, reusable and unusual when it comes to gift packaging. This project for a DIY gift box comes from chapter 2, “If the Gift is Small, Soft or Squishy.”
We love how easily an empty box from the pantry can become such great gift wrap. Cereal, pasta, hot chocolate, breakfast bars, crackers, popcorn, cookies–the variety of boxes is endless. One of our favorites is the toaster pastries box from Trader Joe’s (Melody’s kids love these, so there’s always a box available).
This past Christmas when we had prototypes coming out our ears, Blake and I used a cereal box to give our parents homemade photo books, which no, are neither small, nor soft, nor squishy, but worked nonetheless! Note: Very few grandparents can resist entire books of their grandchildren. Easy + impactful + inexpensive = SCORE.
Materials You’ll Need
- Empty food box from your pantry
Optional, but Helpful
- Rotary cutter and cutting mat
- Ruler
Reusing a Cereal Box Steps
- Carefully open all the glued seams of your pantry box, so the entire box is one long flat piece. If the paper peels a bit, it’s OK. If there are any raised blobs of glue left on the surface of the box, see if you can peel them off. (You just need a fairly even surface under the fabric; it doesn’t have to be perfect!)
- If the box has any small tabs for closure, like at the top of a cereal box, go ahead and trim them off.
- Find a piece of fabric larger than the flattened box, by at least 2 inches on every side. This can be a solid piece or a patchwork with the seams ironed open. You can add on trims or appliqué as well.
- Iron fusible web to the back of the fabric, and peel off the paper backing. If you need to trim rough edges off your fabric to make a nice, neat rectangle, do so now.
Make a Gift Box from Recycled Cardboard
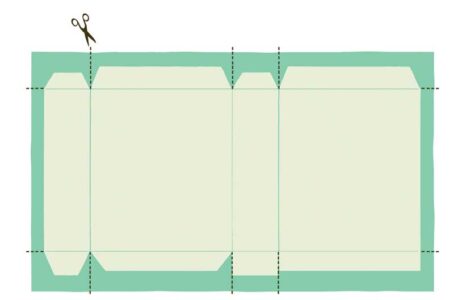
- Place your fabric on top of the box, fusible side down. If the box has a slick side, it will be best to adhere the fabric to the opposite (nonslick) side. Make sure the fabric hangs over all edges of the box evenly. Iron down (figure D1).
![]()
Tip: Place parchment paper or the peeled backing from your fusible web under the overhanging edges of the fabric so you don’t iron the edges of the fabric to the ironing board. - Flip over the box and fabric.
- Make vertical cuts in the fabric between each tab to separate the tabs from each other. Then make two horizontal cuts on each side to separate the side panels from the top and bottom tabs (figure D2).
![]()
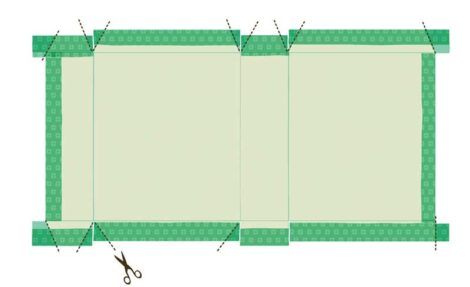
- Fold the fabric neatly over the two side edges and each tab, and iron it down.
- Use scissors or a craft knife to shape the short, diagonal, side edges of the top and bottom flaps (figure D3).
![]()
- If you have any ragged edges, trim them. If you are concerned about fraying on the edges you just cut, use a small bead of craft or paper glue on your finger, and smooth it along the edges.
- Reassemble the side and bottom of the box, and stick it together tight with hot glue.

Finish
- Cut a piece of ribbon long enough to wrap under and around the box, and tie on top.
- Secure it to the sides and bottom of the box using thinly cut strips of fusible web (Stitch Witchery works great here) or craft or hot glue. If you use fusible web, place the thin strip between the ribbon and the box. Touch the outside of the ribbon lightly with your iron on the silk setting to adhere. The ribbon will tie up into a sweet bow at the top of the box, and hold the top flaps closed.
Tips
- This same project works beautifully using decorative paper and spray adhesive or decoupage glue. Follow all steps above, substituting paper for fabric. To adhere the paper to the box, use spray adhesive (or you can evenly coat the back of the paper with craft glue). After you apply the adhesive, keep a piece of parchment paper under your project to keep the paper from sticking to your work surface.
- If using spray adhesive, coat the back of your paper entirely and spray a fine mist over the box itself. The glue sticks to itself beautifully for an extra-firm hold.
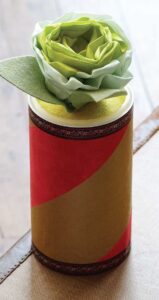
- If you’re using a tall, thin box (like a cereal box), you may find it helpful to reassemble and cut the box so it lays flat, with the largest surfaces acting as the top and bottom of the box (think: cigar box). If you do this, the top will lift open to reveal the entire inside of the box, which you may want to line with paper or fabric.
- Try reusing and decorating an oatmeal container or coffee tin here, too.

From Ruby Star Wrapping, by Melody Miller and Allison Tannery, © 2012 by Melody Miller and Allison Tannery. Photographs © 2012 by Gregory Miller. Reprinted by arrangement with Roost Books, an imprint of Shambhala Publications Inc., Boston, MA. www.RoostBooks.com Their 30 easy-to-make gift wrap projects illustrate how to create beautiful, reusable packaging from the common materials in your home.


