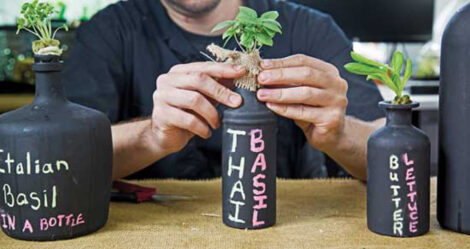
A quick Google search of “bottle hydroponics” will reveal the many ways to use bottles in hydroponics. Unfortunately, most of these are either complicated, ugly, or both. These simple hydroponic bottles are easy to build, low cost, low maintenance, require no electricity, and look great.
- Suitable Locations: Indoors, outdoors, or greenhouse
- Size: Small
- Growing Media: Stone wool
- Electrical: Not required
Kratky Method and Aeration
The Kratky method is the easiest hydroponic growing technique. No pumps, no complex irrigation systems . . . just plants sitting in water. Most of the early hydroponic research focused on static water systems like the Kratky method. These systems worked, but, as scientists tend to do, they kept experimenting and eventually found there was an increase in plant growth rate when the nutrient solution was aerated. This discovery spurred the development of circulating hydroponic systems with increased aeration, like nutrient film technique (NFT) and top drip irrigation.
Now most of the hydroponic research is focused on these circulating systems, but, there are still horticulturists experimenting with static noncirculating hydroponics. One of the most vocal proponents of noncirculating hydroponics is Dr. Bernard Kratky of the University of Hawaii. He has done so much to continue the development of noncirculating hydroponics that his name has become synonymous with the technique . . . the Kratky method.

Crops
The Kratky method has been successfully used to grow a wide range of crops, from leafy greens like lettuce to flowering crops like tomatoes and potatoes. Most hydroponic gardeners prefer to grow leafy greens and herbs with the Kratky method because the larger crops may struggle with inadequate oxygen levels in their root zone. The root zone oxygen demand for crops like lettuce is far less than it is for tomatoes.
The crops that are best for bottle hydroponics stay short or grow upright to mitigate the possibility of the system getting too top-heavy and falling over. Basil, kale, Swiss chard, and lettuce are my favorites for bottle hydroponics, but I’ve also had success with cilantro, dill, and other herbs.
Locations
The Kratky method can be used outdoors, indoors, or in a greenhouse. It may be difficult to use a Kratky-style garden outdoors in areas with heavy rainfall because the nutrient solution may be quickly diluted or washed away. Kratky-style gardens are great for off-grid gardens that do not have access to electricity.
The appropriate locations for bottle hydroponics are more limited. The black paint used in this build could lead to excessive heat buildup in the root zone. If you want to use bottle hydroponics outdoors you’ll want to use a light-colored paint for areas with warm climates. My favorite way to use bottle hydroponic systems outdoors is with a wall-mounted bottle holder on a porch. This keeps the bottles in a semi-shaded area and it looks awesome. Indoors, bottle hydroponics can be placed nearly anywhere–a kitchen counter, desk, windowsill, or even wall mounted in a hallway with a grow light above . . . the only limiting factor when placing a bottle hydroponic system indoors is access to light.

How to Build a Hydroponic Garden
This hydroponic bottle is the easiest hydroponic garden in this book and a great first step into hydroponics. I love building this system with kids from ages 8 to 18 when I do school visits. There are so many ways to customize the bottle with different paints and decorations, so it is easy to make this garden your own. To simplify the assembly of this system, you may wish to find a bottle with an opaque exterior to skip the painting process.
Materials and Tools (as shown)

Required
- Glass or plastic bottle
- Stone wool seedling plug sized for bottle opening
- Fertilizer

Optional
- Scotch tape
- Stake for mounting while painting
- Blackboard spray paint
- Chalk
- Burlap or cloth
- Bottle label
- Grow light
- Optional Tools
- Scissors
- Funnel
- Hot glue gun
Bottle Preparation
The bottle selection is the most critical decision in this build. The ideal bottle has a short neck so the plug can quickly access the main body of the bottle. If possible, select a wide bottle. Wide bottles maintain their water level longer, giving the roots more opportunity to grow into the nutrient solution before the water level drops due to evapotranspiration. The following steps are for clear bottles, so please skip to the next section if using a nontransparent bottle.
Remove any labels from the bottle.

2. Add a strip of tape along the side. This will be removed later to create a viewing window for the roots. Fold the end of the tape strip on the bottom of the bottle to make removal easier after painting.

3. My preferred method for painting bottles is putting them on a stake, but I’ve also had success dipping bottles in paint. Make sure there are enough coats of paint that light will not penetrate inside the bottle.

4. Remove the tape strip once the paint dries.
5. It is best to do any chalk art at this point before filling the bottle with water.
Plug Selection
Either select a plug that fits snugly in the neck of the bottle or select a bottle with an opening suitable to your plugs. It is possible to cut a stone wool plug to fit a smaller bottle but this can potentially damage the seedling’s roots.

6. The plug should be wide enough to hold itself firmly in the opening of the bottle.
7. Growing more seedlings than needed allows you greater options to select only the best seedlings for your hydroponic bottle.
Nutrient Solution and Transplanting
It is important to use a fertilizer designed for hydroponic gardens. In this garden I used FloraNova Grow, but there are many other options.
8. Mix fertilizer with water using the recommended rates listed on the fertilizer bottle or bag. Mix the water and fertilizer in a separate container to make it easy to check if the fertilizer has fully dissolved. Extra nutrient solution may be saved for a couple weeks if stored in an airtight container in a dark, cool environment.

9. Fully fill the bottle with nutrient solution. There is potential for some overflow when the seedling is inserted, but this is preferable to too little water.
10, If you do not plan on using a wicking strip, the seedling can now be transplanted into the bottle. The bottom of the plug should be sitting in nutrient solution; if needed, add more nutrient solution to make sure the plug is fully saturated. Make sure the bottle is completely full if you are not using a wicking strip because the plug will need access to the nutrient solution for several days until it can grow roots deep into the nutrient solution. The plug should not be placed too deep into the neck of the bottle. You will need to remove the plug to refill the bottle, so keep enough of the plug outside of the bottle to make removal easy in the future.

11. Check to see if the plug is dry during the first week. Depending on crop selection and environment, you may need to add more nutrient solution in the first few days to give your plant a chance to grow roots long enough to pull up water from the bottle. A wicking strip is not necessary, but it will help reduce the potential of your seedling drying out in the first week.
Optional Wicking Strip
A wicking strip is useful in bottles that are tall and skinny or with crops that grow slowly. The following steps use a clear bottle for demonstration purposes, but using a clear bottle for growing a crop is not recommended because it will encourage algae growth.
12. Cut burlap or cloth into a strip long enough to reach the bottom of the bottle and approximately as wide as the seedling plug (usually 1″ to 2″ wide).
13. String the wicking strip through the bottle opening.

14. Use the seedling plug to hold the wicking strip in place.
15. Leave enough stone wool exposed to make removal easy when refilling the bottle with nutrient solution.

16. A funnel can make it possible to refill the bottle without fully removing the stone wool plug. This can help reduce the potential of damaging roots when removing and reinserting a plug with a developed root system.

17. If not using a funnel, very carefully lift the plug out of the bottle.
18. Fill the bottle with nutrient solution. For young plants with poorly developed roots, it is best to fill to nearly the top of the bottle. For older plants with larger root systems, it is best to fill to three-fourths full so the roots have access to a balance of air and nutrient solution. Very carefully reinsert the plug back into the bottle after refilling. Make sure the roots are submerged in the nutrient solution.
Maintenance
Most of the crops that are appropriate for hydroponic bottles are fast growing and may not require a lot of maintenance during their growth cycle. It is possible to grow longer-term crops that have multiple harvests, such as basil, as long as the bottle is kept over half full with nutrient solution. It is a good practice to clean out the bottle and refill with fresh nutrient solution every month to avoid nutrient imbalances in the solution.
Additional Options

Decorations: Besides chalk art, I like to decorate my hydroponic bottles with name tags and burlap scarfs. Covering the neck of the bottle with a scarf can help hide any potential algae growth on the surface of the seedling plug. I use a hot glue gun to secure burlap on the neck of the bottle.

Lighting: Hydroponic bottle gardens are best suited for indoors. They can be placed on a windowsill and receive natural light or placed under a grow light. Hydroponic bottles under a small grow light are a great addition to a work desk.
Troubleshooting
Plants are wilting
- Check water level and add additional nutrient solution if water level is low.
- Water temperature or air temperature may be too high.
- Try adding wicking strip if roots are not reaching nutrient solution.
Plug is falling into bottle
- Try wrapping plug in cloth or burlap to create a snugger fit into neck of bottle.
- Place plug so more stone wool is exposed above bottle opening.
Plant is growing slowly or poorly
- The crop selection may not be appropriate for hydroponic bottle garden.
- Crop may not be receiving enough light.
- Use a fertilizer designed for hydroponics.


Reprinted with permission from DIY Hydroponic Gardens by Tyler Baras and published by Quarto Publishing Group USA, 2018.


