
Learn how to make cloth banners to decorate a roadside produce stand, your table at the farmers market, or a corner in your home.
What I love most about making an appliqué banner is that it’s great for all skill levels. Beginners can complete a beautiful banner without any sewing involved, while more experienced sewists can easily appliqué additional details or images and add durability by sewing around their lettering, either by hand or with a sewing machine. This project knows no limits, and you can let your creativity take over.
Tools and Materials
- Computer and printer or paper and pencil
- Scissors
How to Make Cloth Banners
When gathering your materials, think about your banner’s finished size and shape and the number of letters you’ll need to fit onto it. Felt can be purchased by the yard or in 8-by-11-inch sheets – you’ll need a large piece for your background, and you can use smaller pieces for your lettering. For reference, the words “FARM STAND” used one 8-by-11-inch sheet of felt. A yard or more of felt for the background of the banner will be sufficient. Choose contrasting colors so your words stand out from a distance – black and white is a classic combination, but don’t feel limited by that.
To make this project beginner-friendly and less finicky, purchase a roll of double-sided fusible interfacing. It will create a strong bond between your pieces of felt, and it will allow you to sew your letters without any fabric shifting. If you need the banner in a pinch, you can even skip sewing the letters altogether, since the fusible interfacing will keep your letters in place.
When preparing your lettering, use a word-processing program, such as Google Docs or Microsoft Word. Type your words into the program, adjust the font to a large size (275-point font or larger), and select a block-style font. A font with too many curves or extra details will be difficult to cut and sew.
Lastly, if you’re unfamiliar with sewing, consider purchasing a pair of scissors that you’ll use just for fabric. This will help you get clean-cut lines when cutting out your letters and the small internal spaces many letters will have.
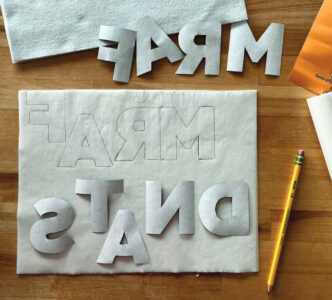
- Decide on your text – perhaps the name of your farm or homestead if you participate at area markets, or a favorite phrase. Using a word-processing program, type your letters, adjust the font and size, and print. Using scissors designated for paper (not your fabric scissors), cut out your letters, including any interior spaces. Don’t have access to a computer or printer? Draw your block letters in a style of your liking. Skip any duplicate letters to save time.
- Next, take your fusible interfacing and attach one side to the felt that will become your letters. Keep the paper backing on the other side of the interfacing, since that will be the surface in contact with your clothes iron. Follow the directions on the interfacing package or iron on high heat for approximately 1 minute.
- Using your letter templates, trace your letters backward on the paper backing of the interfacing that’s now ironed onto your felt. The interfaced side of the felt will be the back side of your letters in the next step. Cut out each letter. Folding the letter in half and cutting into the inside space can help you with removing any small interior spaces.
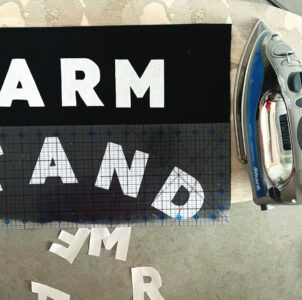
- Cut your background felt to size – tailor’s chalk works well to mark your straight edges if you don’t have a long ruler. Near your ironing station, arrange the letters on the background felt. Once you’re content with your overall design, remove the paper backing and iron on the letters, one at a time. Again, use a high heat setting and iron long enough to form a strong bond.
![]()
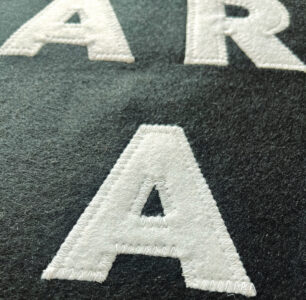
- At this point, your banner is ready to use; however, I recommend using a sewing machine or needle and thread to secure your letters and make a long-lasting, professional-looking banner. Use the zigzag stitch on your sewing machine to sew around the outside and inside edges of each letter, backstitching at the beginning and end each time. Rounded edges can be tricky for beginners – go slowly, and on tight corners, leave your machine’s needle down, raise the presser foot, and turn your work to a better angle. Trim your threads close to the felt and continue until all the letters are sewn down. If you’re sewing by hand, use a blanket stitch for a neat look.

Lindsay Krage is an artist living in rural Winona, Minnesota, and she serves with AmeriCorps at a local charter school. She tends a small acreage where she raises sheep and horses. As a maker, she focuses heavily on fiber arts, quilting, and sewing workwear. She and her family own and operate Anthem, a skate park and board shop, where she enjoys the role of merchandise creator, screen-printing clothing and skateboards.
Originally published in the June/July 2026 issue of MOTHER EARTH NEWS and regularly vetted for accuracy.


