
Learn embroidery landscape techniques, using hand embroidery grass details to capture the eye and guide us through the art landscape.
On a bitter February night, I gave birth to my first baby boy in an operating room. He was breech, and I needed a cesarean section. I heard the doctor speaking to the nurse and the steady beeping of the monitor, until one slight noise caught my attention. I heard a breath. My baby’s breath. He was here. I’d never met this person before, and yet I felt like I’d known him my whole life. All at once, what was strange became familiar, and what was familiar became strange – the first glimpse of how my life as an artist would become inextricably entwined with my life as a mother.
In this new season of my life, moments of the everyday and the ordinary had become almost painfully beautiful to me. Embroidery was a practical way to contemplate those ordinary things. Spending hours stitching the shift of colors and textures in the petals of a California poppy or studying the subtle brown of a patch of dead blue grama grass became small, intentional reflections on beauty that were just as meaningful and connected to the bigger questions of ecology and humanity that had always held my interest. Stitching these subjects is a grounding, meditative process for me, and the practice has integrated into the rhythm of my life and my children’s lives. In both form and function, thread is the perfect material for exploring landscape art and nurturing a connection to nature.
An Ode to Dead Grass
In the sea of grasses in a midwinter’s field lies a single blade of dead grass. It had a life before its death. That life is spelled out in every crevice and line of its forlorn shape. It’s a story – a little landscape all unto itself. There’s a stillness to it: a peace and an acceptance. If we could cut out all signs of death from our lives, wouldn’t we? A forever summer – but what is summer without winter? There’s no life without death. If you recognize even a little beauty in dead things, that awareness can transform the way you see the world. Suddenly, every part of the landscape is important. The mundane, the plain, the dead, the unsightly are all parts of a beautiful whole, sharing a communion with something greater than themselves. Suddenly, there’s a readiness to meet every moment of this life with expectant joy.
Next time you pass by a patch of dried grass, pause. Look closer. Find some beauty there. Perhaps delicate seed heads dancing in the breeze will catch your eye. The pale color of the dead grass might reveal a contrast of shadows in the field. Such moments of subtle beauty are worth capturing in needle and thread.
The only things you really need to start embroidering are a needle, thread, fabric, and an embroidery hoop. The best part? You can get all of this for under $10 at just about any craft store. Another best part? The materials are small, lightweight, and portable, so you can embroider just about anywhere.
The very first landscape I embroidered was a winter landscape. Winter is the perfect season to start with, since the bones of the landscape are obvious and building a composition is easier.
Tools and Materials
- 10-inch embroidery hoop
- Embroidery needle
- Scissors
- Marking tool (while there are numerous methods to transfer your sketch to fabric, my favorite is the water-soluble fabric marker; you draw directly onto the fabric and then run the whole hoop under hot water to rinse it off when you’re done).
- 2 layers of Kona cotton quilting fabric (in natural), cut into a 14-inch circle
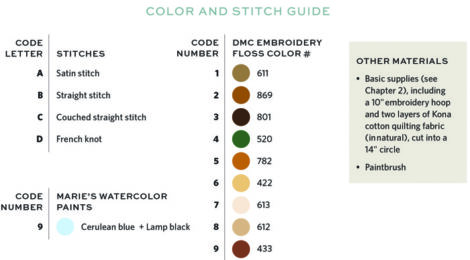
- Embroidery floss: DMC 422, 433, 520, 611, 612, 613, 782, 801, and 869
- Paintbrush and watercolor paints (I used Marie’s Watercolor Paints in cerulean blue and lamp black)
- 10-inch circle of felt to finish the back of the hoop (optional)
Design Process
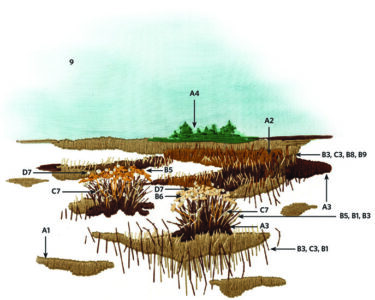
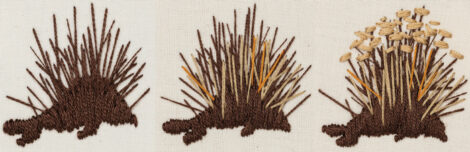
When I first looked at my photo, the dead rabbitbrush in the foreground stood out to me the most. I decided to make those two plant clusters the central focus of the piece. I placed them in my foreground and gave them the most detail. From there, I wanted to capture the patchy dead grass showing through the melted snow. I noticed that I could see a lot more texture and detail in the foreground, but the patches merged in the background. To achieve something similar in my hoop, I satin-stitched patches of brown farther apart in my foreground. As the grass patches went back in space, they gradually merged into one continuous area of satin stitching at the horizon line. The wispy grass between the two rabbitbrush clusters kept catching my eye. I was tempted to stitch them in detail because of how beautifully they struck me, but I decided that would detract attention from the rabbitbrush. I stitched these grasses as a few simple lines without putting too much emphasis on detail. The white of the snow creates negative space in the embroidery, highlighting the patches of dried plants and grasses. These patches lead our eyes around the piece, from the rabbitbrush in the front, up to and across the horizon line, then back to the second rabbitbrush, with the long lines of the individual blades of dried grass guiding us back to the starting point.
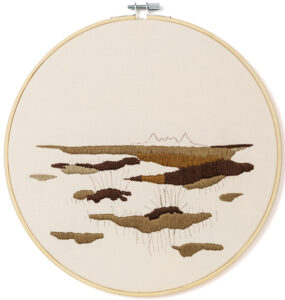
Create Perspective
Perspective is the art of drawing – or stitching – on a two-dimensional surface in a way that creates realistic spatial relationships between objects. In a landscape scene, perspective creates an appearance of spatial distance even though the surface is flat. There are two types of perspective in art: linear perspective (using a vanishing point on the horizon and making lines that converge at that point) and atmospheric perspective (making objects look like they’re fading into the background). I mainly use atmospheric perspective in my work. To do this, I try to make the stitches in my foreground as detailed and large as possible while making the stitching near the horizon line smaller and less detailed.
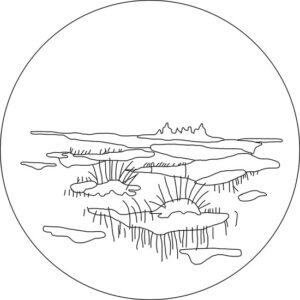
- Transfer the pattern. Using a water-soluble fabric marker, transfer the pattern onto the cloth.
- Stitch the middle ground. Fill each section of brown grass with six-strand satin stitches. Use color 611 for the lightest grass, 869 for the midtone grass, and 801 for the darkest grass.
- Stitch the background. Use six-strand horizontal satin stitches in color 520 for the tree line. The stitches at the tops of the trees will be much shorter than the stitches that form the base. We’ll come back to paint the sky at the end.
- Stitch the foreground. To add the dead rabbitbrush, first satin-stitch a mound in color 801 using six strands. From that base, extend two-strand straight stitches 1 to 2 inches long in all directions for the stems in colors 801, 782, and 611. Stitch with the darkest dark first, shift to your midtone, and finish with the lightest color. Create the top of the rabbitbrush with small, six-strand straight stitches. Use color 422 for the foremost rabbitbrush and 782 for the one farther back. You generally want to orient these stitches horizontally on top of the stems, but use a variety of stitch lengths and directions to make it look organic. Next, create French knots in color 613 on top of the straight stitches.
![]()
Use a two-strand couched straight stitch in your lightest light color (613) to add a few pieces of bent grass to each rabbitbrush, which will make the plants look realistic and draw attention to them. Finally, layer grass on top of your satin-stitched areas with two-strand straight stitches and couched straight stitches in colors 801, 611, 612, and 433. Leave the area nearest the horizon line free of any detail to create atmospheric perspective and a sense of depth.
- Run the hoop under water. Run the entire hoop under hot water to wash out the pattern transfer marks and tighten your fabric. Let it dry before painting.
- Paint with watercolor. Practice on scrap fabric before you apply paint to your final project! Wet the entire area of the fabric above the horizon line with a clean paintbrush and water. Then, mix your paint: Add a small dab of black to the cerulean blue. Clean the paintbrush in a container of water. The colored water in the container is what we’ll paint with, because we want a faint color in the sky. Add a dab of tinted water to four or five spots in the sky, letting it bleed across the fabric.
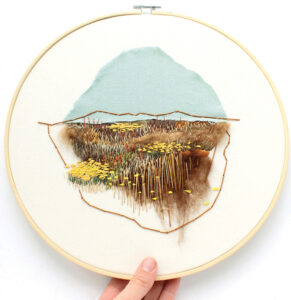
- Finish the hoop. I think the hoop itself is a beautiful frame for finished embroidery. Cinch the extra fabric to keep it tucked behind the hoop for a neat finish. To start, cut the fabric on the outside of your hoop so you’ll have 1 to 2 inches left around the circumference. Use a running stitch to cinch the fabric.
Cinching alone creates a tidy look, but I also back the hoop with felt for extra polish, which has the added benefit of securing the fabric’s stretch. Take the outer hoop off your piece, lay it on a piece of felt to trace a circle, cut out the felt, and then put the outer hoop back on. Center the felt over the back of the hoop. Whipstitch the felt to the fabric around the entire perimeter.
Excerpted from The Stitched Landscape by Anna Hultin, used with permission from Storey Publishing. Anna Hultin is the artist and educator behind Olander CO Embroidery. She uses needle and thread to create contemporary embroideries that explore the often-overlooked beauty of the subtle textures and colors of the Colorado landscape. She lives with her family in Loveland, Colorado.
Originally published in the February/March 2026 issue of MOTHER EARTH NEWS and regularly vetted for accuracy.


