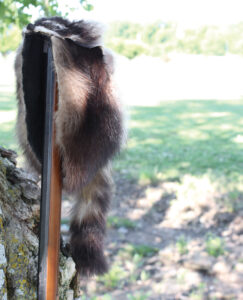
Turning deer and other animal skins into leather, as I described in the October/November 2016 issue, can lead to the creation of warm and durable clothing, including coonskin caps. The following instructions will help you craft a cap from hair-on raccoon leather. Such caps have been made and worn by generations of explorers and homesteaders, and you, too, will value the cozy feel of a quality, long-lasting cap.
This cap has a tapered liner and straight sides. Without the tapered liner, the cap would fit like a bucket. The liner can be removed for washing and will thus get you more years of service from the cap.
Before you get started, keep these tips in mind:
- When cutting hair-on leather, turn the hide hair-side down, extend the utility knife blade to the shortest setting, and carefully cut through the leather. Leave as much hair on the leather as possible so that it can cover the seams.
- Large needles and heavy-duty thread aren’t needed for sewing raccoon leather. Use a small quilter’s needle and all-purpose thread for this project.
Except for the raccoon hides, the materials for this project can be purchased from a craft store or a hardware store. You’ll need: large sheets of paper, a pencil, a light-colored fabric marker, a black permanent felt-tip marker, a cloth tape measure, a ruler, a carpenter’s square, a compass, lightweight work gloves or a thimble, needle-nose pliers, a small quilter’s needle, black all-purpose thread, scissors, a utility knife, 1/2 yard of black felt, and small and medium binder clips. Optional materials include: a wig or hatstand, black leather dye, and white all-purpose thread for sewing the liner (as it’s easier to see white stitches on black felt). You can make this cap using one extra-large raccoon hide or two medium-sized hides. If using two hides, one of the hides needs to be at least 8 inches wide. For this guide, I’ll be using two hides.
Shape Your Cap Patterns
Supplies: Cloth tape measure, paper, pencil or felt-tip pen, scissors, ruler, compass, carpenter’s square.
Measure the circumference of the wearer’s head just above their ears with a cloth tape measure. Write that number down and keep it handy, as you’ll need to reference it later. If you’re measuring your own head, use a mirror or ask a friend to help. See photo above this section for a visual of all the patterns described below.
Then, calculate the length of the sides: add 1/2 inch (for the seams) to your head-circumference measurement and divide by 2. On a large sheet of paper, use the carpenter’s square to draw two rectangles 4 inches tall and as wide as the length measurement you calculated. Label one of the rectangles “cap side,” cut out this pattern, and lay it aside. Label the other rectangle “liner side.” Label one of the long sides “top.” Next, create the taper in the liner-side pattern by marking 1/2 inch toward the middle of the rectangle from each top corner. Draw a line from the bottom corner to the 1/2-inch mark on each side. Cut out this tapered pattern and set it aside.
The liner top will be a circle. To figure out the diameter of the top, measure the length of the top of your tapered liner pattern. Double that number and then divide by pi (3.14). Then, with your compass, draw a circle with that diameter onto the paper. Label it “liner top” and cut out the pattern.
The top piece of the cap will be teardrop-shaped. Get a large sheet of paper and fold it in half to create a midline, and then unfold the paper. Divide your head’s circumference measurement by pi. Use the compass again to draw a circle with this diameter in the middle of the paper, putting the middle of the compass on the midline fold. From one edge of the circle, measure 4-1/4 inches along the midline and make a mark. Connect that mark to the sides of the circle by drawing an arc to both sides of the circle. Label the pattern “cap top” and cut it out.

Cut the Patterns and Sew the Cap
Supplies: Fabric pen, felt-tip pen, utility knife, needle, thread, binder clips, liner fabric, ruler, lightweight gloves or thimble, needle-nose pliers.
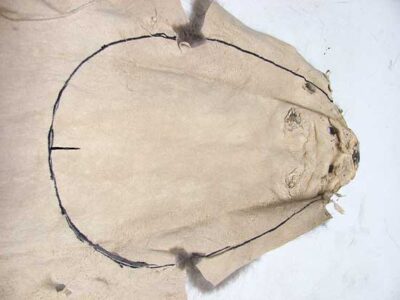
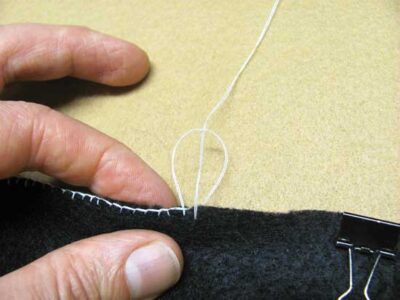
Trace the liner-side pattern twice onto the felt and cut out the pieces. Trace the liner-top pattern onto the felt and cut it out. Lay the sides on each other so the tops and bottoms match, and then clip them together. Using a blanket stitch (see Link Leather Seams with a Blanket Stitch), sew the short ends of the rectangular pieces of fabric together. Open the sides to form a circle, and then clip the liner top to the top edge in several places. Sew the top to the liner (see photo above this section).
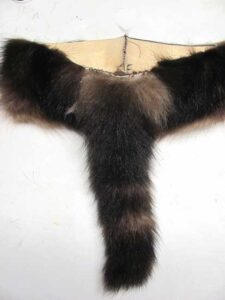
Gather the pelt you selected to use for the sides. Turn it hair-side down on a flat surface, and draw a midline down the entire length of the pelt, from nose to tail. Position the cap-side pattern on the hide so it touches the midline and so the 4-inch side is just behind the shoulders. Trace around the pattern. Then, flip the pattern to the other side of the midline and trace. Remove the pattern and write a “T” for “top” on both sides of the midline, and write an “F” for “front” on each of the 4-inch lines closest to the shoulders. Mark the top and the front in this way so the hair on the finished cap will go in the same direction as it grew on the raccoon (see photo below).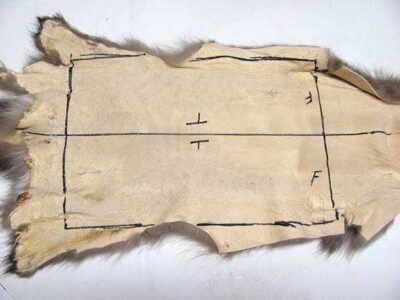
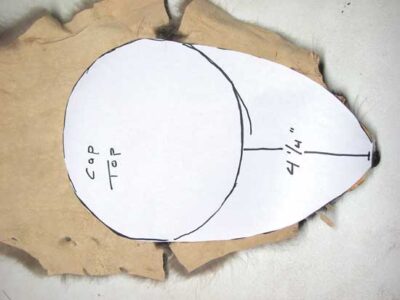
Place the pelt you selected for the top on a flat surface hair-side down. Position the cap-top pattern so that the point of the arc is at the nose and the circular portion is over the shoulders. Trace the pattern onto the hide. Make a small mark where the midline of the pattern crosses the circle (see second photo, below).
If using two hides, inspect the tails and choose the best one. From where the base of the tail joins the hide, measure 2 inches toward the head and draw a line. Draw a line on each side 1 inch from where the side of the tail begins.
Cut the sides, top, and tail section from the hides.
Position the two sides so the hair sides are against each other and the front and tops are together. Sew the front and back seams, and then turn it hair-side out.
Get the tail section and position it at the back and top of the cap so the middle of the tail is at the seam. Clip and sew the tail onto the cap (see photos below).

Next, get the top piece and position the tip of the nose so it’s at the bottom of the front seam, and then clip it into place. Turn the cap around and position the back of the top piece so the small center mark aligns with the back seam. Working from back to front, clip the top of the cap to the sides in several places.
Again starting at the back of the cap and working toward the front, sew about 3 inches of the seam on one side and tie off. Sew the same section on the other side.
Remove the binder clip from the nose and sew the edge to the cap on each side of the nose with a few stitches. Then, close the seam on the cap top, sewing from back to front on one side and then the other.
Position the liner in the cap so the liner and cap seams match. Clip the liner to the edges and sew it in place.
Finishing Touches
Your tanned leather’s light-colored edges, especially on the front of the cap, can be darkened with a permanent black felt-tip marker or leather dye. Work the hair from the top of the cap over the sides to cover the seams.
When you’re done, take pride in the skill you’ll have added to your DIY knowledge set. Hats off to warm, handcrafted headgear!
Link Leather Seams with a Blanket Stitch
A blanket stitch is used to join hair-on leather seams. You’ll be sewing with a double strand of thread.
To start, unspool 4 to 5 feet of thread and thread the needle. Pull the thread through the eye until the needle is situated in the middle of the length of thread. Even the thread at the ends, and then tie two half-hitches to knot the thread. Snip off the loose ends close to the knot. Hold the material to be joined so the edges are facing toward you, and push the hair away from the edges. Poke the needle through both layers of material about 1/8 to 3/16 of an inch from the edge, and then pull the thread to the knot. Bring the needle over the seam and poke it through both layers of material again, about 3/16 of an inch from the previous spot. Before pulling the loop tight, pass the needle and thread through the loop to create a half-hitch. Then, pull the stitch tight. Repeat until you’re at the end of the seam or nearly out of thread.
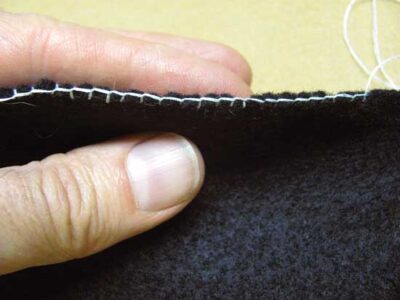
To tie off the end, poke the needle halfway through both layers of material. Wrap the thread around the sharp end of the needle three times, and then pull the needle and thread tight. Make the final knot by pushing the needle through the seam to the other (non-hair) side. Near the seam, push the needle halfway through the material. Wrap the thread around the sharp end of the needle three times and pull tight. Do this one more time and cut the thread close to the knot.
Dennis Biswell works for MOTHER EARTH NEWS and its sister publications as assistant director of information technology. He gives workshops on tanning animal hides at the MOTHER EARTH NEWS FAIRS, where his nickname is “The Griz.” He processes wild game meat at home and brews his own beer.


