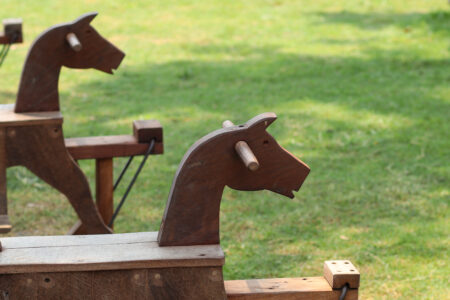
Give your children outdoor activity by using this easy horse diagram, pattern, and step-by-step instructions for how to build a rocking horse for outdoors. Your tots can ride the range till sunset if you spend a few dollars and an hour or two building an outdoor rocking horse and playset, including rocking horse diagram, pattern and instructions. (See the rocking horse diagram.)
Although many toys found on store shelves today are downright clever, the cost of that ingenuity sometimes shines through all too brightly. Don’t be discouraged, though, because — even in a world of alkaline batteries and high-impact plastic–there’s still room for an honest-to-gosh old-fashioned hobbyhorse . . . a plaything that won’t set you back more than a few bucks but is sure to thrill your tiny ones.
This stallion’s bounce comes not from curved inch feet inch , as is the case with rocking horses, but from a junked automobile leaf spring, the likes of which are littering scrapyards across the nation. It doesn’t matter what sort of vehicle “donates” your spring, of course, as long as it’s in one piece and measures at least 4 feet from eye to eye — but do try to find one with at least one rubber end bushing intact, since this will help dampen the shock of each bouncing stroke.
Material List
- Besides the main leaf, you’ll need a piece of 3/4 inch plywood measuring 31-inch-by-33-inch and another that’s 7- inch-by-11-1/2 inch
The metal components include:
- a piece of 3/16 inch by 1-1/2 inch by 1-1/2 inch by 5 inch angle iron
- a 2-1/2 inch-long section of channel bar measuring 3/16 inch by 1-1/2 inch by 3 inch
- and an 8-inch length of 1-1/4-inch- square tubular steel.
For hardware, you’ll need:
- a 1/2-inch-by-6-inch machine bolt with two nuts
- a 3-1/2-inch bolt of the same diameter
- a 5/16-inch-by-2-inch carriage bolt
- two No. 8 by 1/2-inch roundhead wood screws
- and an assortment of 5/16-inch machine fasteners: two 1 inch, four 1-1/4 inch, two 1-1/2 inch, and two 2 inch in length
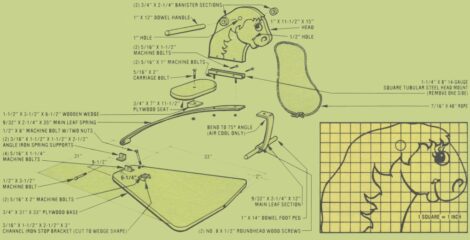
See the Rocking-Horse Plans in PDF
How to Build a Rocking Horse for Outdoors
Wooden Pieces
Begin by cutting the wooden parts to shape. To do so, use the grid diagram in this article to recreate the outline of the head and to position the necessary openings and embellishments. Then go on to trim the seat and the five-sided base. At the same time, lop a 12 inch piece from the dowel, and cut the 2 by 4 to form a broad wedge.
Drill the 1/2 inch and 1 inch holes in the horse’s head where indicated, then paint the whole slab one base color. (When that’s dry, you can add the black outlines, and — later still — perhaps finish up the mane with a few deft strokes from a can of spray paint.) To fasten the foot-long handle to the head, first bore a 1 inch hole through the core of the banister rail and cut that piece in half to form two wooden rings. Then cement the dowel into its opening in the head and the two rings–in turn–to both the head and the handle, using yellow carpenter’s glue.
The Spring
The next step is to form the spring. First, cut it into two lengths — one 35 inch and the other 12 inch — then bend the shorter section to a 75 degree angle so the leg with the eye is about 9 inch long. (Both these procedures will require the use of a cutting torch . . . plan to borrow one for a few minutes if you don’t have your own.) Drill four 11/32 inch holes through these metal parts . . . one into the middle of the short leg on the angled bar, and the other three through the arced piece, positioned about 6 inches from one another and with the first at a point 1 inch from the leaf’s cut end. (Hint: Spring steel is rather hard, so you may want to drill small pilot holes first, or possibly use a drill press to make these bores.)
To mount the main leaf, first place it on your plywood base in such a way that the core of its eye is centered about 1-3/4 inches from the narrow end of the platform. Mark this spot–along with the width of the eye — and cut the angle iron section into two equal pieces, and the channel iron into a solid-topped wedge shape forming an angle of 22 degrees. While you’re at it, slice one side from your length of square tubular steel to produce an 8 inch -long U-shaped section.
The Metal Pieces
Go on to bore the holes in these metal pieces to accept the various 1/2 inch and 5/16 inch fasteners (use the pre-drilled openings in the long leaf to position the holes in the newly made inch U inch piece). Then, with the angle and channel mounts as templates, drill the six 5/16 inch holes through the platform, being careful to center the 1/2 inch bore in the spring stop bracket 6-1/4 inches from the midpoint of a line drawn between the holes in the angled inch holders.
Fasten It All Together
Now, fasten the supports in place, using 5/16- inch bolts as illustrated (you may want to countersink the heads to keep them from marring the floor), and double-nut the 1/2 inch by 6 inch stop bolt firmly to its mount. Slip the 1/2 inch by 3-1/2 inch bolt through the angle brackets’ shoulders and the end of the leaf spring, then bolt the 8-inch length of modified square tubular steel to the spring and to the smaller angled leaf.
Next, fasten the base of the wooden head inside the groove of the exposed tubular steel section (you’ll have to cross-drill two more mounting holes and remove some wood at its lower edge to allow a flush fit). Slip the remaining dowel into the bushingless eye and lock it there with two No. 8 wood screws.
Finish up the project by fastening the seat to the main leaf with the wooden wedge between, using the carriage bolt, and tying the bridle rope into a loop through the 1/2 inch hole in the horse’s mouth. A coat of paint in the color(s) of your choice will serve to dress up your steed, as will the addition of leather ears, a sisal mane, or what have you.

Ride Into the Sunset
No matter how you deck it out after building an outdoor rocking horse, though, your youngsters are sure to enjoy the toy’s lively spring . . . and as long as they’re not much heavier than 50 pounds, this bronco won’t inch bust inch for quite a few years to come.
Hi-ho, Silver . . . awaaay!
Originally published as “A Scrapyard Stallion” November/December 1982 MOTHER EARTH NEWS.


