
After moving to a house in the country, we decided that we’d like to get some chickens. We needed a coop that would keep predators out, shelter the birds from the elements, and provide a convenient location for us to gather eggs. We thought getting a coop up and running for about a dozen hens meant either buying one or building it. After checking out manufactured coops, we realized the structure we wanted would cost over $10,000. We immediately went to Plan B — time to build!
Our idea for the coop was simple enough, and we already owned most of the basic tools we’d need — circular saw, jigsaw, drill, and sander. We acquired a miter saw after we started the project. A variety of plans were available for sale online (some free), but none matched what we had in mind, so we decided to design our own.
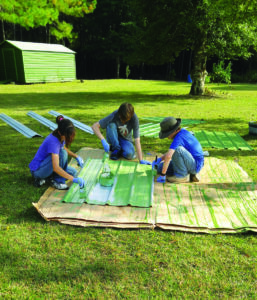
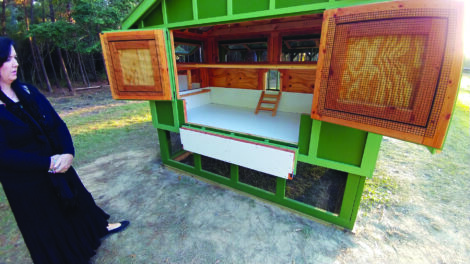
The coop design we developed measures 23 by 8 feet, with an interior elevated henhouse that’s 8 feet wide by 3 feet 10 inches deep. We decided to use the space underneath the henhouse to give the chickens extra room to run. We selected a slope of 22.5 degrees for the roof, because our miter saw had a preset for that angle. We wanted a metal roof, but the metal would be difficult to cut, so we designed the entire coop around the size of available roof panels. The goal was to cut as little metal as possible. In the end, we purchased metal roof panels that measured 3 by 10 feet so that we only had to cut each panel in half to create 5-foot panels.
1. First, we created the foundation by laying down a level 23-by-8-foot rectangle of treated 4-by-4 boards. We used the traditional “3-4-5” measuring method to make sure the foundation was a perfect rectangle with four 90-degree corners. To use this method yourself, simply measure 3 feet along one leg of your corner, and then measure 4 feet along the other leg, marking those points. If the legs form a 90-degree angle, the line from the 3-foot mark to the 4-foot mark will measure 5 feet.
After we squared the foundation, we set four 32-inch 4-by-4 posts 28 inches into the ground at each inside corner, so that the tops of the posts were even with the top of the foundation boards. We then set two more posts of the same length into the ground to support the feet of the elevated henhouse, and poured concrete around the posts.
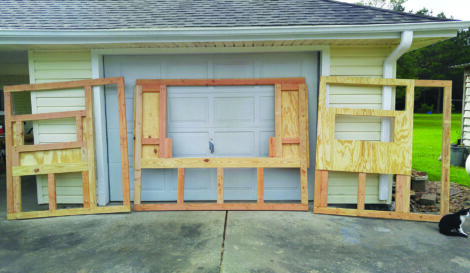
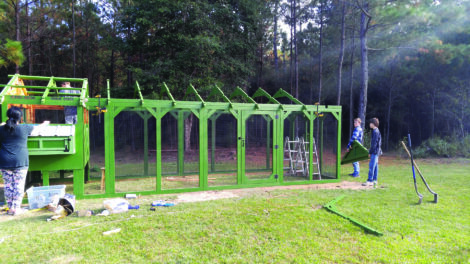
2. We decided to build each part of the coop individually under our covered carport and then assemble it all on-site. We divided the construction into the following parts: 1 front henhouse wall with entrance for birds, 1 rear henhouse wall with doors, 2 side henhouse walls, 6 run wall sections, 1 run wall with screen door, 2 nest boxes, 4 popup windows, 2 henhouse rear doors, 1 drop-down rear door, 3 roof gables, 10 roof trusses, and 36 roof purlins. The coop structure seemed like a big undertaking, but breaking the job up into segments made the work much simpler. To get experience and gain confidence, we decided to build the walls first, which were among the most straightforward components. After constructing each henhouse wall, we sheathed them with 1⁄4-inch plywood and 1-inch wood screws, leaving spaces for the windows, doors, and nesting boxes. Keeping the measurements accurate was especially important at this stage. We used a couple of techniques to join the 2-by-4s together for the frames, but we primarily relied on an inexpensive pocket-hole jig and 3-inch exterior screws.
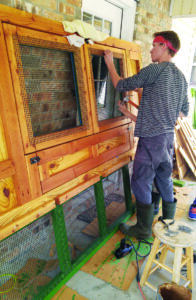
3. After we constructed the basic frame walls, it was time to add the details. We attached a pair of double doors to the rear wall frame, as well as a long horizontal door we could fold down to easily clean the henhouse floor. When the basic framework for all four of the henhouse walls was complete, we clamped them together to verify that everything matched up. Because of our concern about snakes getting into the coop, we stapled 1⁄2-inch, PVC-coated hardware cloth over most of the openings to keep out all but the smallest serpents.
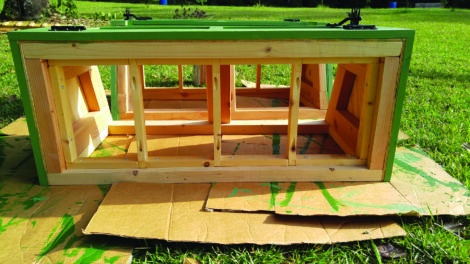
4. Designing the nesting boxes was almost as much work as building them, and was the most complicated part of the coop. We constructed each box with a removable floor for cleaning and two dividing walls that separated each box into three distinct nests. We added trim to the outside of each nesting box to improve the look of the coop and to seal the edges where two pieces of plywood met.
5. Before assembling the coop, we painted all the exterior surfaces (including the roofing panels) with a paint that included a primer. We brushed a generous amount of water sealant onto any wood that we didn’t paint.
6. For the floors and side walls of the henhouse, we installed high-density polyethylene (HDPE) plastic. We ordered the HDPE in large sheets and cut it to size. If we were to build this again, we’d probably save money by using plywood protected with several heavy coats of water sealant.
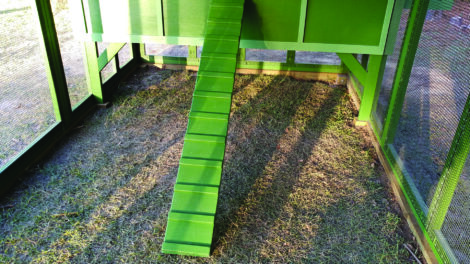
7. With the henhouse set up, we added roost bars and a ramp to make it easier for the birds to exit the structure. The narrow ramp consisted of two 2-by-6 boards nailed together, with 2-by-2 boards nailed across every 10 inches to serve as steps for the birds.
8. After we completed and painted all the prefabricated sections, we began assembling them. What we thought would take one day actually took several. Everything fit together nicely, including the metal roof. We attached two chains inside the run for hanging water and feed barrels.
9. After we’d set up the basic structure on the foundation, we nailed the nest boxes to the sides of the henhouse. We installed the windows, which were simple wood frames with plexiglass inserts. Each window has a simple latch, and we drilled drain holes in the bottom boards of each window frame.
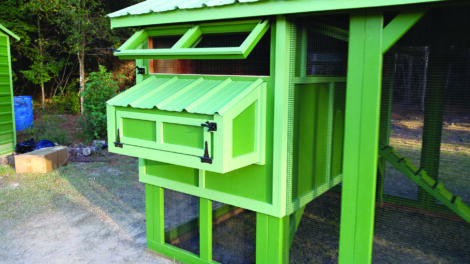
10. After we finished assembling everything, we nailed trim over every exposed seam, including the corners of the henhouse, around the windows, and anywhere two pieces of plywood met. To enhance the appearance of the finished structure, we added extra trim for decoration.

A project like this will take some time and money, but, for us, the price came out to about one-third of what it would’ve cost us to buy a prefabricated product from a commercial builder. This was a sizable project that took us a few months to finish, but our key to success was starting with a good set of plans.


