Kombucha has become a household name as well as becoming very expensive. It is known for its healing properties, most commonly as a probiotic. Fermentation has become very popular, and this is one of the more common fermented products today.
Kombucha “tea” has been around for a very long time. Some say it originated in Japan but has been known to have history in Russia as well.
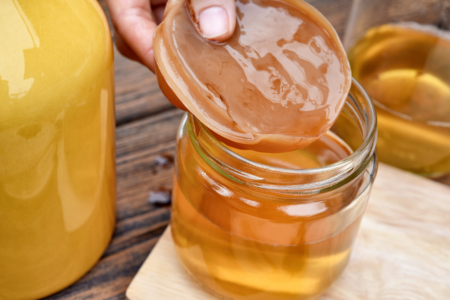
My first encounter with a SCOBY (Symbiotic Colony of Bacteria and Yeast) was about 20 years ago, in a most unusual way. At that time, I did not know the name “kombucha” or “SCOBY” — this was before it became popular. I was very interested in and studying herbology and medicinals, so a family friend (a very sweet elderly lady who has since passed away) gave me a “healing tea mushroom.” She said the tea was for ailments. The SCOBY is still referred to as a “mushroom,” but is not a mushroom. It is a combination of bacteria and yeast. She told me how to make the tea and how to feed the mushroom.
There has been controversy as to whether or not kombucha is “alcoholic.” Well, any fermented product does break down to have a small amount of alcohol. Kombucha purchased in markets are often sold as “non-alcoholic” beverages, but homemade can have a higher amount of alcohol. It’s all about how long you allow your tea to “work” and whether you do a second fermentation. Traditional kombucha is made with black tea and sugar.
I have Irritable Bowel Syndrome (IBS) and was concerned that the yogurt culture I was eating may be having a bad effect due to my sensitivity to dairy products. So, I considered using kombucha as a substitute probiotic. My main concern with kombucha was the fermentation aspect. I also have a sensitivity to fermented products. Fermented products have a very high histamine content and people who are histamine-intolerant can react. Since using kombucha, it seems to be helping, and my physician told me to continue using it as a probiotic.
Grow a Kombucha SCOBY from a Store-Bought Bottle
Here are the steps I took to grow my own Kombucha SCOBY (also known as “mother,” “culture,” or “mushroom”).
Ingredients
- 1 cup water
- 1 tea bag
- 1 to 2 tablespoons sugar
- Bottle of “raw” (nothing added, such as a flavoring) kombucha tea from market
- Quart glass canning jar
- Cheesecloth or muslin, and rubber band, string, or canning ring to secure
Directions
1. A traditional kombucha is made with black tea and sugar. Make 1 cup of black tea. Dissolve 1 to 2 tablespoons sugar in tea while hot. Cool to room temperature. This will “feed” the culture from your bottled product.
2. Add about 1 cup of the “raw” kombucha to the glass canning jar. Then, add the cool tea.

3. Cover the jar with cheesecloth or muslin. Use a rubber band to secure, or just place a canning ring on top.
4. Put the tea away in a warm spot, 70 to 85 degrees Fahrenheit, to break down or “ferment.” Some will say to put in a cabinet. I would not advise this. If the culture doesn’t get enough airflow, you can have a SCOBY that doesn’t grow as effectively. I put my jar on the kitchen counter, away from sunlight. Another precaution is to not place near ripening fruit or another type of fermentation project. You do not want cross-contamination.
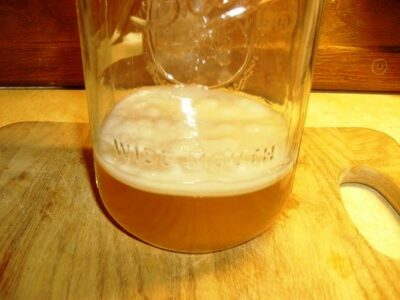
5. You should see the beginning of a baby SCOBY in usually 3 to 7 days. It could take up to 2 weeks to develop a large enough SCOBY to start your own tea. It should be about 1/4-inch thick to begin.

You now have a traditional kombucha SCOBY to start your kombucha tea. I always say: When you’re starting something new, always do a small batch first.
Make Kombucha Tea with a Homegrown SCOBY
Ingredients
- 3 cups boiling water
- 2 tea bags
- 1/4 cup sugar
- Quart glass canning jar
- 1/2 cup “starter” tea you grew your SCOBY in
- Cheesecloth or muslin, and rubber band, string, or canning ring to secure
- Flavoring, such as juice or fruit, optional

Directions
1. Combine 3 cups boiling water, 2 tea bags, and sugar. Dissolve sugar, let cool, and strain. (Remember, you are dealing with bacteria and yeast; hot water will kill your yeast culture.)
2. When cool, add this tea to a glass jar with 1/2 cup of “starter” tea that you grew your SCOBY in.
3. Carefully, remove your SCOBY from its jar and place on top of your tea in the new jar.
4. Cover jar with cheesecloth or muslin. Use a rubber band to secure, or just screw on a canning ring.
5. Place in a dry, dark area with a temperature around 70 to 85 degrees.
6. Let the kombucha tea ferment for about 3 to 5 days. Look for carbonation. I start checking the taste at 3 days. Because of fluctuating temperatures, the sugars can break down at varying rates, and you can have “vinegar” before you know it. At this point, it is all about your preference for flavor and pH. Usually, 3 to 7 days gives you a good batch. I check my tea’s pH with pH paper that I have on hand from cheesemaking. This is not something you have to do. I look for a pH of 3.5 to 4.0. I prefer mine a little sweeter, closer to 4.0.
7. When your kombucha gets to where you want it, you can either bottle and put in the refrigerator, or add flavoring and do a second fermentation.
Note: Reserve 1/2 cup tea to start a new batch of kombucha. Over time, you will notice your SCOBY getting thicker and growing new layers. You can separate the new layers into SCOBYs to use in separate batches or to give to someone to start their own kombucha. They’ll separate easily from the old SCOBY, but make sure they are at least 1/4 inch thick.

Kombucha Second Fermentation
You don’t have to do a second fermentation. This is mainly for adding flavor and fizz to your kombucha.
1. Bottle kombucha and add your favorite juice or fruit.
2. Close off bottle with lid and let sit for 1 to 3 days.
3. Watch closely, because this will cause more carbonation! Usually 2 days is enough.
4. Refrigerate and enjoy!
Susan Tipton-Fox continues the farming and preserving practices that have been passed down to her by her family. She presents on-farm workshops in Yancey County, N.C., and growing her on-farm agritourism by promoting “workshop stays” on the farm.
All MOTHER EARTH NEWS community bloggers have agreed to follow our Blogging Guidelines, and they are responsible for the accuracy of their posts. To learn more about the author of this post, click on their byline link at the top of the page.


