
You can build wood seed flats from scrap wood you already have or from pallets.
The weather will soon give way to temperatures warm enough to plant in our gardens and we need to have transplants ready, which means starting the seeds ahead of time. Although I start most of my seeds in the cold frame, rather than in flats, I thought I’d share what I did when I used flats. If you feel you don’t need to worry about flats because you have plenty of plastic food containers coming into your home that you can use, you might want to rethink that. What are you buying in those plastic containers? If your diet consisted of mostly whole foods prepared at home, those containers wouldn’t be a resource for you.
I would like to encourage you to make your own seed starting flats from wood. When I made the switch to wood flats I used scrap wood we already had, cutting it to the dimensions I needed on our table saw. If you don’t have a table saw, or a ready supply of scrap wood, you might be able to acquire a pallet or two to take apart. It would be nice if the boards on the pallet were the same as the height of the sides you want on your flats. However, unless you need everything to be the same size, you can work with some variation. I had old 1/2-inch plywood that I used for the bottoms, but you can put multiple narrow strips (such as pallet boards) for the bottom, if that is what you have to work with. Plywood does not work as well for the sides. It tends to come apart.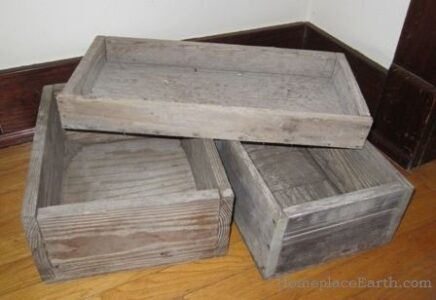
If you are working with many flats, it is nice if the footprint is the same — the length and width. If your flats are large, having some half that size would work–two would fill the same footprint. It makes it easier when using and when storing. Having flats of varying depths, however, can be handy. If you are starting seeds that won’t be in the flats too long, a shallow depth, say 2 inches, would suffice. If your seeds will be in the flat longer, or if you want flats to transplant into, you will need deeper flats — maybe as deep as 6 inches.
I built a three-tiered stand with lights to hold the flats when starting seeds. The shelves were made from 3/4-inch plywood that was coated with the type of polyurethane you would use on boats. Wood flats will be damp, but I did not have trouble with them leaking water, unless I over-watered, of course. I put the wood flats directly on the plywood shelves. Depending on the surface you will be using, you might want to cover it with plastic, at least until you know the amount of moisture you will have under the flats.
I followed the guidelines in New Organic Grower and in How To Grow More Vegetables for my early wood flats. You can read about that experience at Homeplace Earth. It was great to use the directions in those two books as a starting point for building my own. I learned what I liked about the size of both designs and would have worked more toward building a quantity to the dimensions that suited me the best if I had not stopped using flats for most of my seedlings. I discovered that I could plant seeds directly in the cold frames to start and didn’t need to bother with the flats at all.
No matter what, there are always new things to learn and experiment with. I hope you give wood flats a try. They will last a long time and you won’t have a build-up of plastic trash in your garden shed. No doubt, you will find other uses for your wood flats when they are not holding soil and seedlings.
Cindy Conner is the author of Seed Libraries and Grow a Sustainable Diet and has produced DVDs about garden planning and managing cover crops with hand tools.
All MOTHER EARTH NEWS community bloggers have agreed to follow our Blogging Best Practices, and they are responsible for the accuracy of their posts. To learn more about the author of this post, click on the byline link at the top of the page.


