Fruiting in Vessel
Simply fill vessels partway with substrate, leaving closed-off air space at the top. The humidity of the substrate usually provides enough for fruiting. This doesn’t work for all species, but reishi, pioppino, lion’s mane, enoki, and others with high CO2 tolerance can fruit like this. Others will either refuse to fruit or will form tough, exaggerated stems.
Humidity Tent
A humidity tent is the easiest and cheapest option, but it has a small capacity and doesn’t allow any automation. It is simply a light frame or rack larger than the vessel to be fruited with a plastic bag over it. It can be hung or placed on a surface. It can have a moisture-holding medium in the bottom such as perlite, coir, peat, or a folded towel to evaporate moisture into the chamber. Mist the inside walls of the tent 1-5 times per day. Make sure there are holes or slits at top and bottom to allow airflow and drainage. The heavier CO2 will fall out the bottom and be passively replaced by fresh air through the top. Having multiple tents can allow blocks of different species and ages to each have their own microclimate, and to segregate contaminated kits that are fruiting anyway.
Shotgun Fruiting Chamber (SGFC)
Invented by Marc R. Keith/RogerRabbit and widely used as a small fruiting chamber, the NPQ? uses natural air currents to provide high RS and QTU. Moistened and drained perlite fills the bottom and provides constant evaporative humidity and airflow. As humid air is less dense than dry air, the evaporation causes an updraft and further evaporation as fresh air is pulled in from the holes in the bottom. Supplemental misting is usually necessary, and if mushrooms show signs of CO2 overload, fanning out stale air with the lid occasionally helps.

- Get a large (+/- 64qt [61 L]), clear-plastic tub with a lid and a bag of perlite (available at garden stores).
- Drill 1/4″ holes in a 2″ (5 cm) grid on all sides, including lid and bottom.
- In a large colander, thoroughly rinse and drain perlite in batches, filling tub until 4-5″ deep.
- Situate tub on a table or shelf, not on the floor (to avoid contaminants).
- Elevate tub at least 2″ (5 cm) off its resting surface with blocks and keep sides of tub at least 2″ (5 cm) from any walls to allow airflow.
- Place fruiting blocks or jars within, allowing ample space for mushroom development.
- Mist 1-3 times per day, or as needed.
- If mushrooms are too stemmy, increase QTU by fanning or place a fan in the room blowing near but not directly on the tub.
Monotub
Another contribution from the online mushroom community, this system was designed for compost-loving mushrooms, but it can also work for reishi, king oyster, and others that are willing to top-fruit. The optional lining is to prevent primordia from forming on the sides. Pasteurized substrate and spawn are mixed, incubated, and fruited in the tub. Maintenance is minimal if set up properly. Many sizes and designs exist; here is how to make one time-tested model:
- Get a large (+/- 64qt), clear-plastic tub with a lid, some 2″ tape (non-porous), a trash bag or plastic sheet (optional), and some polyfill.
- With a 1-1/2″ (38 mm) hole saw, drill two evenly spaced holes 5″ (13 cm) up from the bottom of the tub on each of the long sides. Drill two more 1-1/2″ (38 mm) holes just under each of the handles on the short sides. When drilling, use light pressure so you don’t crack the tub.
- Invert tub and wrap the bottom like a gift, taping folds into place. If you wish, you could slip off the wrapping and put it inside tub as a liner, taping the top edge of the plastic to the tub.
- Fill with hydrated and pasteurized substrate and spawn (ratio depends on mushroom species and substrate) to 1″ (2.5 cm) below the lower holes, or less if you plan on casing. Mix thoroughly and level, but do not pack.
- Using scissors, cut away excess plastic liner (if using) at substrate level, or above if casing later.
- Put the lid on the tub and cover the six holes with tape. The lid isn’t airtight and allows for enough gas exchange. Incubate.
- If applying a casing, do so as soon as substrate is fully myceliated, and incubate again.
- When fully myceliated, initiate fruiting by removing the tape and replacing with a wad of polyfill in each hole. Stuff top holes loosely and lower holes tightly. Adjust polyfill density to dial in RS:QTU balance. Mist and or fan with lid only if necessary. Monotubs can be fruited indoors, or outdoors if temperatures are fairly consistent and agreeable.
- Substrate block can be taken out of tub to facilitate harvest. Replace substrate block, briefly soak, and drain for subsequent flushes.
The Shower

The bathroom is usually the most humid room in the house, though kitchens often get quite steamy. Hang bags in the shower but outside of the direct spray and shampoo splash zone (mushrooms don’t need shampoo, possibly with the exception of lion’s mane). A few showers per day may provide surcient humidity to support fruitings of oysters and others that don’t need consistently super-high humidity. And then your mushrooms get to see you naked, which may cause them to grow extra big. If showering alone doesn’t provide enough humidity, you can always mist by hand too. A spare shower stall is easily converted to a dedicated fruiting chamber with the addition of racks and a humidifier.
Mini-Greenhouse/Martha

Basically, this setup is a big humidity tent over a rack, automated with humidifiers, lights, and fans. It can be situated indoors or in a shady outdoor location, temperatures permitting. In the online forums, this unit is called a Martha, because the first ones were made from Kmart Martha Stewart storage closets retrofitted with racks.
Prefab units designed for starting seeds indoors or growing microgreens work great, but it is also easy to tent your own rack using clear poly sheeting and sheathing tape. A gabled roof helps to prevent pockets of stale air. You will need a way to open the front, so use Velcro, magnets, or clips to make a door. Create a false floor with a big plastic tray or other washable material. Cut a drain hole to release excess water into a pan below. Fill the floor tray with perlite, which will wick up and evaporate condensation that drips down into it. Empty shelf space can also hold trays of moist perlite to raise RS and allow for more QTU.
Place a cool mist humidifier (impeller type) on the false floor and point it to the side so it doesn’t blast the bottom shelf. Use a multi-function timer to control its output. You will have to experiment to find what works best for your setup, but start with running a cycle of 2-5 minutes on and 6-10 minutes off. Some growers also use an ultrasonic humidifier in addition to the cool mist, but this may be unnecessary unless the ambient humidity is extremely low. Some growers choose to house humidifiers externally and pipe in the mist, but this can reduce the life of the humidifier. Humidifiers can be modified by adding large auxiliary water reservoirs.
For light, situate your mini-greenhouse in a place with diffuse natural light and/or supplement with (compact) fluorescent light mounted outside the tent. Cut slits in the plastic at various levels as needed to increase QTU. A 4″ computer fan can blow air out if more exchange is needed. For heat, an oil-filled radiator can be placed near the unit.
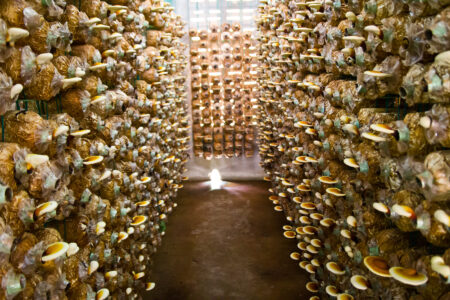
Fruiting Room

Many spaces can be retrofitted to be a fruiting room, including closets, pantries, spare rooms, basements, bathrooms, porches, sheds, trailers, greenhouses, shipping containers, barns, and garages. Great care should be taken to not allow water to damage the building itself. Floors, walls, and ceilings should be waterproof and can be painted with marine enamel or epoxy-plastic-based paint. Smooth cement floors with drains are ideal. Heavy-duty sheeting should be used for lining wood floors, and 2-4 mil plastic sheeting meticulously joined with sheathing tape can be used to line the walls and ceiling, as leaks will allow mold growth between the plastic and the walls. Exterior walls must be insulated to prevent the formation of condensation between the wall and the vapor barrier. Alternately, a greenhouse framed with wx? can be built within a room, leaving free space all around it.
Racks made of metal or plastic are preferable to wood, as they will not be readily inhabited by contaminant fungi and are more easily cleaned. Avoid solid shelves because they can hold standing water. Get or build racks that match the type(s) of fruiting vessels you use. If you are hanging oyster columns (strawsages), metal hooks are surcient. Lidded buckets or bins can be stacked and may not need any racks. Sawdust blocks grown in bags can be supported by racks made with two pipes of metal conduit spaced 4″ (10cm) apart, which is ideal for all-over fruiters like shiitake. Greater environmental control is needed in larger spaces, so ventilation, heating/cooling, lighting, and humidifiers are usually necessary. It is likely that there will be different microclimates within a fruiting room, so use this to your advantage and place species accordingly.
Growing seasonally appropriate strains and species allows year-round production and greatly reduces energy inputs from climate control. Keep in mind that the metabolism of the mycelium contributes heat to the space as well.

More from DIY Mushroom Cultivation:
Excerpted from DIY Mushroom Cultivation, by Willoughby Arvalo. Published by New Society Publishers © 2019 by Willoughby Arvalo. All rights reserved.


