Where Do Pawpaws Grow?
If you live in eastern North America, from southern Ontario to northern Florida and as far west as Nebraska, you’ve likely been hearing lots of buzz about foraging pawpaws. You might even know of someone who has a pawpaw patch of their own. My son’s friend still talks about the day they met the “Pawpaw Wizard,” a bearded older gentleman gathering pawpaws and handing them out to anyone hiking through. But what the heck is a pawpaw, anyway?
The word “pawpaw” acts a bit like a club pin, a cryptic handshake, or, more appropriately, a secret password. Say it in conversation, and you’ll either get a knowing look and instant conversation or a bewildered “Say what, now?”
Pawpaw Tree Identification & Foraging

Practically speaking, a pawpaw (Asimina triloba) is a large, green-skinned fruit with cream-colored to bright-yellow, soft, pulpy flesh, and 8 to 10 large, hard seeds per fruit. The pulp tastes a lot like a ripe banana mixed with mango or muskmelon, and even with a hint of vanilla or nutmeg. If you get the chance to sample one, don’t eat the skin or seeds; the skin is tough, leathery, and bitter-tasting, and both contain some toxic compounds. The flesh, however, is safe to eat and is a major source of vitamin C, magnesium, iron, manganese, and a suite of other minerals.

An Ancient Fruit
Pawpaws are North America’s largest native tree fruit, a northern member of an otherwise tropical family, and an ice age survivor that no doubt misses the mammoth. We can thank Indigenous Americans for preserving and spreading this unusual fruit. (Pawpaws were and remain a culturally important food to many Indigenous peoples today. For example, ha’siminikiisfwa, the Shawnee name for the fruit, translates to “pawpaw moon,” signifying the time in September when the fruit is gathered. – Mother)
But what do ice age mammoths (and ground sloths and mastodons) have to do with pawpaws in the first place? In a word: poop.
Okay, I admit, that’s oversimplifying things a bit. Large browsing mammals would ingest the fruit whole and later pass the seeds in large piles of dung. These piles provided fertilizer and kept the seeds moist. A pawpaw seed has three requirements to germinate successfully: It needs plenty of time, it can’t freeze, and it absolutely can’t dry out. Even one day of dry conditions drops the germination rate by 80 percent or more.
So, how does one go about planting a pawpaw grove? You can buy trees, but they can be expensive and have a delicate taproot, and you’ll need at least two for pollination. If you find a wild pawpaw grove or know someone with a grove of their own, you can start your own trees from seed. And, I promise, you won’t need a steaming pile of pachyderm poop.
Prepare Your Seeds
First, gather or otherwise source some ripe pawpaws. I sourced mine from trees planted at a historic park near me. I sampled the fruit of each and collected several from the one with the best flavor (melon and banana), ignoring the other (faintly bitter). To be honest, the parentage qualities aren’t that terribly important, but it never hurts to select from the tree you like best.
Now, this is the messy part. (No, it doesn’t involve dung.)

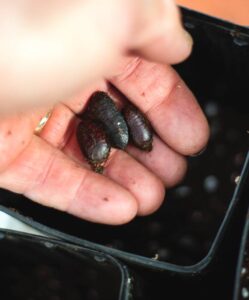
Remove the seeds from the fruit by cutting the skin lengthwise and tearing the fruit in half. Scoop the pulp and seeds out of the skin, and work the seeds out of the pulp. Save the pulp for later; you can make a killer pawpaw “banana” bread with it. Each seed is large, black, and shiny, wrapped in a thick membrane. Work the membrane off the seed. Collect a dozen or so large, well-formed seeds from several fruits from a single tree or several different trees.
How to Stratify Pawpaw Seeds
While you clean the seeds, soak sphagnum moss in a tub of warm water so it’ll be well-hydrated for storing seeds. Once the seeds are clean, pack them in damp sphagnum moss in a zip-close bag and store for an extended period in cool temperatures.
The sphagnum serves two purposes. It keeps the seeds moist, preventing dry-out, and because it’s naturally mold-resistant, it helps prevent mold formation in long-term storage. Write the date on the bag and place it in a refrigerator. Make a note on your calendar for March or April, and then forget about them for 70 to 100 days while they cold-stratify. This fridge time will allow the seeds to break from dormancy and get ready to germinate.
Growing Pawpaw From Seed
In early spring, when the calendar reminds you, it’s time to pot up the seeds. Start checking on them in the fridge every now and then: They’ll sprout in the fridge if you leave them there too long. If they do, just be extra careful handling each seed as you plant it in a pot. If the root snaps, that seed is ruined and won’t grow into a tree.
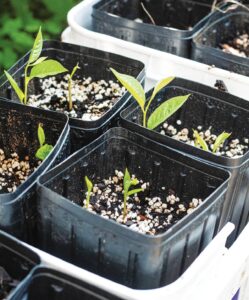
I like to use tree pots, a special kind of pot that’s 4 by 4 by 16 inches and designed to provide plenty of taproot growth without using a ridiculous amount of potting mix. They also fit quite nicely in square cat-litter buckets; be sure to drill drainage holes into the buckets. The tree pots won’t, however, stand upright on their own. You can also use nursery pots or 2-liter soda bottles with the bottlenecks cut off and drainage holes added to the bottoms. Don’t use plastic solo cups or anything shallower than 14 inches deep.
Fill each pot with moistened potting mix to within 2 inches of the top. Place 2 to 4 seeds on top of the soil, and then fill the pot the rest of the way with more mix. Each pot will provide one tree at planting time; the extra seeds are for insurance. If you’re feeling confident, you can plant a single seed in each pot; that’s up to your judgment. I like to tamp down the soil a few times to improve contact with the seeds, and then water well. Store the planted pots in a cool, dark, frost-free place until you move your other garden transplants outside for hardening off in a month or so. Place your pawpaw pots somewhere sheltered with morning sun and late-afternoon shade, where they can spend the entire growing season.
Waiting Is the Hardest Part
This next phase might be the hardest part of the entire process: Remember to water the pots regularly while waiting a ridiculous amount of time for growth to happen. Above the surface, nothing will occur for the next several months, while out of sight, beneath the soil, the seeds will be quietly growing impressive taproots.
By mid-June, I guarantee you’ll be ready to give up, certain the seeds were no good. Hang in there; good things are coming. Sometime around mid-July, the seedlings will finally break the soil’s surface, forming an understated little shepherd’s crook of a plant with two little purplish leaves at the very tip, which will be followed by a few more leaves. Those are your future pawpaw trees! Keep the soil moist but not wet through summer. You may need to water more often in the hottest, driest part of summer.
When to Plant Pawpaw Trees
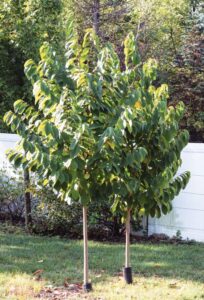
I’ve started pawpaw trees from seed twice now. When I started them for myself, I planted them in their final places that autumn, about the time fall rains had begun in late September. Because space is limited in my backyard orchard, I planted two trees in a single footprint, meaning they’re about 2 feet from each other, their branches intertwining. When I planted them, I thinned each pot to a single tree by snipping the extra trees off at ground level. I then dug a wide hole deep enough to accommodate the deep taproots of the seedling. Pawpaws don’t like having their roots handled more than necessary, so try not to knock the soil from the roots as you slip them out of the pots and into the planting hole. Space them about 2 feet apart and backfill with the native soil you dug out of the hole. Water them in well.
The second time I started pawpaws from seed, it was for friends and my wife’s co-workers. In the interest of supplying larger, stronger trees, I kept them in the pots for an extra year. In winter, I stored them in the back entrance of our cellar, under a metal exterior door, along with my potted figs and grafted apple trees. The temperatures in the stairwell stay cold but above freezing throughout my Zone 6a Pennsylvania winter. I watered the pots every few weeks through winter. The next spring, I treated them the same as any other potted plant, watered them as needed, and provided them with afternoon shade.
For their first year in the ground, I provided water regularly whenever the weather failed to supply at least an inch of rain in a week. To protect against voles, rabbits, and string trimmers, I placed trunk collars made of slit 4-inch black corrugated plastic drainpipe around each trunk. They grew strong and quickly, flowering and producing a few fruits within three years; four years later, my pawpaw crops continue to increase steadily.
Andrew Weidman lives and writes in Lebanon, Pennsylvania. He’s also a member of the Backyard Fruit Growers, a grassroots organization based in Lancaster County, Pennsylvania, that’s dedicated to sharing information and instruction on growing healthy, sustainable fruit in one’s own backyard.


