
Spring is right around the corner (hopefully), so we thought this would be a good time to write about hatching and raising turkey poults. Every year we have people contact us at S and S Poultry saying, “Help, my turkeys aren’t doing well.” It’s easy to get attached to the little guys and always sad when things don’t go as planned, so we decided to share what works for us.
Turkey eggs take approximately 28 days to hatch (stop turning them on day 25 of incubation). With the number of incubators available to use, it’s best to start with the instructions for your incubator and make adjustments as necessary. It’s best to start with chicken eggs until you have your incubator set up correctly and the chicken eggs are hatching well. (For those who use a GQF Sportsman, ours runs about 99.6 to 100 degrees Fahrenheit and 30 to 40 percent humidity during incubation. When we stop turning the eggs, we add a humidity sponge which brings the humidity near the 60 to 70 percent range.) Our hatch rates are about 90 percent year after year.
Natural Versus Artificial Incubation
We use both natural and artificial incubation and have found that each has advantages and disadvantages. Two of the biggest advantages of natural incubation are that the poults hatched by a turkey hen will be more inclined to sit and raise poults themselves, and we think the hen-raised poults are overall stronger. They will also tend to integrate into the flock quicker as they have learned the skills from the hen. The biggest disadvantages are that you’ll loose some poults — the hen may step on them or they may get chilled. Of course, some hens are better mothers than others, but it’s best to be prepared. Another disadvantage is that the turkey hens will lay fewer eggs; when a hen goes broody she stops laying eggs. You can control the number of eggs you set and when they will hatch when incubating eggs in a machine. This is a big advantage if you have limited brooder space or want to keep the poults from different matings separated.
Natural Hatching Tips
It’s best to have your hen sit in a secure area. Many times the hens will seek a quiet place to make a nest, such as a bush or brush pile, which makes them easy targets for predators, especially at night. After the hen hatches her brood, we move them all to a “maternity” pen for at least the first two months. The maternity area is covered to keep out the rain, plus it keeps the hen and her poults in a smaller area and closer together. We always put a fresh layer of sand down for each group to help prevent soil-borne diseases. Coccidiosis can be a major problem for poults raised on the ground if other poultry has occupied the area before.
Brooding Poults
Whether you hatch poults in an incubator or have them shipped to you, getting them off to a good start is important. You need to have everything set up and warmed up for the poults before they are ready to go into the brooder. Start with the brooder temperature at 95 to 98 degrees. We don’t even check the temperature in ours; we let the poults tell us what the temperature should be. If they are huddled under the heat lamp, they are too cold, and if they are on the outer edges of the brooder, it’s too hot. Raise the heat lamp once a week until they don’t need it.
If you have hatched the poults, make sure they are dry before you take them out of the incubator. For shipped poults, inspect each poult and dip their beaks in water as you put them in the brooder so they learn to drink. The first two weeks or so are crucial, especially for the shipped poults. Shipping is hard on them because of the temperature extremes, lack of water and food and being bounced around. It’s important to keep a close eye on them and make sure they’re eating and drinking.
“Starving out” is a common problem with turkeys; they will literally starve to death right in front of a full feeder. Keep an eye open for the one that gets pushed away from the feed or water, or hangs back while the others are eating. Watch for any poults that are lagging behind as they start growing. We hatch some chicken eggs with the turkey eggs; the chicks will hatch about a week before the poults. When the poults hatch the chicks will be experienced with eating and drinking in the brooder, and the poults will follow them around and learn from the chicks. Remove the chicks once the poults are eating and drinking well.
Overcrowding can also be a problem because turkey poults are twice as large as chicks and grow fast — they need plenty of room. Crowding makes it more likely for a poult to get pushed away from the feed and starve out. The smaller ones can also get trampled or smothered. Too many in a small area can make it more humid and cause respiratory problems.
For litter, we use only coarse pine shavings to start. Cedar is never used because the oils in the chips can irritate poults’ feet and legs. After the poults are about 3 weeks old, we remove the pine shavings and add clean, fresh sand to the brooder box. The sand is easy to clean: You can scoop it as you would cat litter, and it drains well so the area around the water will stay dry.
We also add a roost when the poults are about 3 weeks old. Getting the poults started roosting early will save you the trouble of trying to teach them later, and they will be warmer on the roost than on the ground.
We use 3-pound hanging feeders. We start with quart-sized waterers and move to gallon size as the poults grow. We have found much less feed waste by using hanging feeders, and you can adjust the height of the feeder as the poults grow.
There are as many different methods of feeding as there are varieties of turkeys. Medicated and non-medicated feed is available. Medicated feed has a coccidiostat mixed into the feed and is fed continuously to prevent coccidiosis. Quite a few people ask to know if the feed is medicated. It is required by law that medicated feed state so clearly on the label. If you choose to use non-medicated feed, coccidiosis can be a problem. Some people add apple cider vinegar to the water to prevent coccidiosis.
Turkeys need high protein levels in their feed to thrive. From hatch until about 12 weeks, we feed our poults a medicated, 28 percent protein starter for game birds. After 12 weeks, we switch to a 20 percent medicated starter. After the turkeys grow for five to six months, they’re ready to join the flocks. You can feed a lower-protein feed (and many people do), but your turkeys won’t reach full growth potential.
Hardening Off and Moving Outside
As the poults grow, raise the heat source in the brooder and move the poults to a larger brooder as necessary. We have a series of brooder boxes ranging from a plywood box that is 2 feet wide by 3 feet long to the last stage in the brooder barn where the boxes are 5 feet square. Through each step of the process, we let the poults tell us what the temperature should be by their actions. The first heat source is a 250-watt infrared heat lamp, then a 150-watt heat lamp and finally a 100-watt incandescent light bulb. By raising the heat lamp and switching to less powerful heat lamps, we are preparing the poults the outdoors while reducing our electric bill. Using a few 250-watt heat lamps 24 hours a day, seven days a week will show on your bill! The final phase of the process is getting poults accustomed to the outside temperature.
The colder it is outside the longer you will need to brood them. We never put poults outside until they’re fully feathered. Always remember the old rule: “a cold or wet poult equals a dead poult pretty quickly.” After we have the poults acclimated to the outside temperature, we move them to a covered “maternity” pen. Before moving them we always shovel out the old sand and put down a new layer of sand a few inches deep for good drainage and prevention of soil-borne diseases. For the first couple of days we go out at dark to make sure they’re all safe and snuggled in on the roost. It usually takes a day or so for them to get the idea.
Brooding Problems
Coccidiosis and respiratory disease complex are two of the most common problems when brooding turkey poults. Coccidiosis affects the intestines, and the symptoms are:
- Reduced feed consumption
- Rapid weight loss
- Droopiness
- Ruffled feathers (they look like they are cold, back hunched up)
- Diarrhea
- Mucus or red in the droppings
Over the years one thing we have noted is that once they get to the ruffled feathers/hunched up stage, it’s hard to save them. The best method of detecting the problem is to become a “poop inspector” and look for the changes in droppings. The diarrhea and mucus will tend to show first, but reduced feed consumption is also an early indicator. Medicated feed has an anticoccidial drug in the feed; however it’s not always 100 percent effective. Just because you’re using medicated feed, you shouldn’t let your guard down. Another anticoccidial is apple cider vinegar. We have never used it but quite a few do and say it is an effective preventative. Sulmet can be added to the drinking water as a treatment for infected poults.
Respiratory disease complex is a broad phrase that can cover quite a few problems, including infectious bronchitis, chronic respiratory disease and others. The causes are just as many: dust, ammonia, mold, poor ventilation and more. If you can smell ammonia in your brooder box, it’s past time to change the litter. The ammonia level will get stronger the closer you get to the litter and your poults are much closer to it. Keeping the area around the water as dry as possible is important and keeping the water fresh and clean are the best ways to inhibit the growth of mold. Mold can grow quickly with the warm temperatures and dampness of the brooder.
Some of the symptoms of respiratory disease complex include a cough, sneezing, head swelling, runny nose, foamy or watery eyes, or the poult can look like it’s gasping for breath. Prompt treatment is crucial as with any other sickness. Aureomycin and Tylan powder in the drinking water are the most effective treatments (from our experience), but proper sanitation is the best treatment of all!
A good reference book that we think all poultry owners should have is The Chicken Health Handbook by Gail Damerow. Although the title says chickens, it applies to all fowl and covers feeding, disease identification and control and nutrition.
Raising turkey poults is easy after you have a good system and know what to watch for. The most important things are to watch for “starving out,” maintain brooder sanitation and prevent overcrowding of the younger poults. After they are partially grown, major concerns are putting them outside too soon, the poults becoming damp or chilled, and coccidiosis.
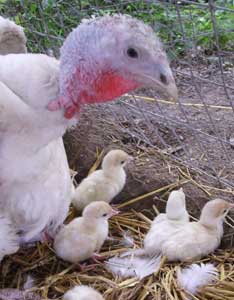
Photos by S and S Poultry


