
How is maple syrup made? Start harvesting maple syrup in your backyard by gathering your maple tree tapping supplies and use these instructions to build a maple sap evaporator from a barrel.
Transforming sap into syrup is one of our family’s favorite spring traditions. We simply tap into a tree to harvest something natural that ends up as delicious syrup.
If you have a maple tree (or your neighbors do), it can be a source of local sweetener that doesn’t cost much to make. When harvesting maple syrup we typically collect more than 60 gallons of sap from two taps of our one huge, old silver maple. The amount of sap that trees will give each year is dependent upon the weather. Conditions must be just right: below-freezing temperatures at night and above-freezing during the day, with sunlight warming the tree to help increase the sap’s flow. Generally, the tapping season lasts 3 to 6 weeks.
Maples need to be at least 10 inches in diameter before tapping. Select a healthy tree with no signs of insect or other damage, and ideally one with a southern sun exposure. A 12-to-20-inch-diameter tree can support one spile, 21 to 27 inches can support two spiles, and 28 inches and greater can support three spiles. If you aren’t sure what type of trees you have on your property, consult Arbor Day or reach out to a local arborist.
Maple Tree Tapping Supplies
A basic sap-collecting setup includes spiles, hooks, and collection buckets or bags.
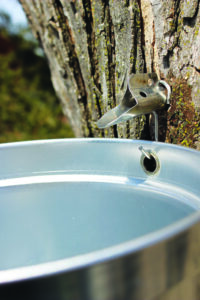
Spiles are hollow metal pieces that get tapped into the trees. The sap flows out of the spile into a collection vessel.
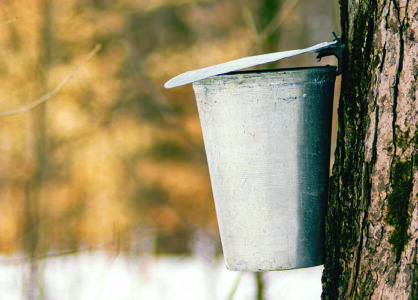
Hooks are used to hang a collection vessel from the spile, and they can be either separate or built into the spile.
Collection buckets or bags collect the sap directly from the tree. Any vessel that’s food-safe, critter-proof, and covered will work. Some people cut a hole in the lid of a 5-gallon food-grade bucket and use tubing to connect the spile to the bucket. Consider the size of the vessel and weight once filled and how often you’ll be available to empty it, knowing that a collection bag or large pail can overflow on days when the sap flows heavily.
Other important maple tree tapping supplies and equipment include a drill to make the tap hole; most spiles require a 7/16- or 5/16-inch bit. Lidded storage buckets will give you a secure place for collecting sap until you have enough to boil it down. You’ll need to filter out bark, bugs, and other foreign matter from the sap before boiling; use cheesecloth or a clean T-shirt. Pliers are useful for removing spiles from trees at the end of the season.
Tapping trees is only the first step in harvesting maple syrup. You’ll also need a way to boil the sap to reduce its water content and concentrate the sugars, thereby transforming it into syrup. You can use an open fire, an outdoor grill burner, a turkey fryer, or build your own barrel stove maple sap evaporator.
Harvesting Maple Syrup by Tapping Trees
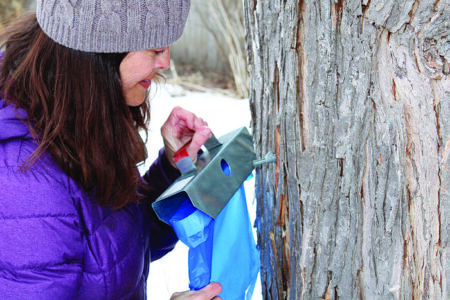
Drill tap holes into trees at about waist height; any higher, and it’ll become difficult to empty the filled sap-collection vessels. Don’t tap within 6 inches of a previous hole. Drill the holes 2 to 2-1/2 inches deep and angled upward at a 5-degree angle to enhance sap flow. Clean out any debris inside the tap holes before inserting the spile. Gently tap the spile into the hole with a hammer, using a piece of wood as a barrier to protect the spile. Don’t hammer too hard, as this may crack the tree bark, which will cause the sap to leak out of the crack instead of down the spile into the collection vessel.
Attach the bag, bucket, or tubing to the spile hook. After the vessel has filled, pour the sap into collection buckets and store them in a cold place, no more than 38 degrees Fahrenheit, until you’re ready to boil. In Minnesota, we store ours in the snow on the shady side of a building. About 40 gallons of sap are required to produce 1 gallon of syrup. If the sap turns yellow or cloudy, it has spoiled and shouldn’t be used to make syrup. Harvesting maple syrup has a season, and You’ll know maple-tapping season is over when the temperatures no longer cooperate, the sap becomes cloudy or yellowish, the sap changes after the tree starts budding out, or flies and other bugs find their way into the collection buckets. The tree will continue to produce sap after you remove the spiles, but eventually the tap holes will heal. Be sure to clean your supplies well with hot, soapy water before storing them for next year.
Freezing and Evaporating: From Sap to Syrup
You can dramatically reduce boil time by first freezing and thawing the sap. This process captures about 80 percent of the sugar and reduces the volume of liquid to less than 20 percent of what you started with. Put a bucket of sap into a chest freezer overnight or, if your area temperatures drop below freezing at night, leave your sap outside.
The next morning, transfer the frozen sap to a draining bucket — a 5-gallon bucket with holes drilled in the bottom that’s elevated inside another bucket. Let this sit at room temperature until about a third of the block has melted. The part that melts first into the bottom bucket will contain most of the sugar. Toss the remaining frozen chunk of (mostly) ice water outside. You can repeat this by refreezing the melted sugary sap again, this time keeping the first half of the melted liquid. Make sure to label those buckets that’ve been previously thawed if you want to do this twice.
The next step is to boil down the sap into syrup (also called “evaporating”). For small-scale tree-tappers, it’s generally a two-step process: first, boiling down the sap outdoors, and secondly, finishing the syrup indoors.
Boiling Down Sap Outdoors in a Maple Sap Evaporator
The purpose of boiling is to reduce the water content in the sap via evaporation. You’ll need one of the following setups:
- DIY barrel stove evaporator (see below)
- Turkey fryer with 7-1/2-gallon pot, high-pressure propane regulator, and 20-pound propane tank, or
- Fire pit with grate, 1 to 2 large stockpots or steam pans, and lots of wood (see photo, opposite)
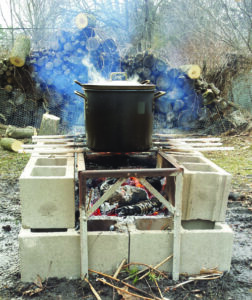
Be sure to keep children and animals away from boiling sap. Boil until the sap has been reduced to about one-fourth of what you started with. Allow it to cool until it’s safe to strain. Carefully pour the sap through a fine-mesh sieve. Transfer the strained sap into a stockpot to finish the syrup indoors. You’ll notice the sap has turned from clear to a slight brownish or golden color, but it’s still watery compared with syrup.
How is Maple Syrup Made? Harvesting Maple Syrup
This part of the process goes relatively quickly. You’ll need:
- Large stockpot
- Candy thermometer or syrup hydrometer
- Large heat-safe measuring cup or bowl
- Fine-mesh sieve with cheesecloth or coffee filters
Transfer the partially reduced sap to a large stockpot and place it on your stove. Watch the stockpot continuously, because boiling sap can quickly boil over onto the stovetop. Finished syrup will begin to crawl up the sides of the pot, and the consistency will change as you stir it. Test it by dipping a spoon into the pot. Turn the spoon sideways over the pot. Large droplets will form on the edge of the spoon when the syrup is ready, whereas the liquid will run off like water when it isn’t yet done. You can use a candy thermometer to test the syrup. The temperature of finished syrup is 7.25 degrees above the boiling point of water, whatever that is for your elevation. Any higher, and the syrup can quickly boil over and turn into sugar.
Remove the finished syrup from the heat and allow it to cool slightly. Then, using a fine-mesh sieve lined with either a coffee filter or cheesecloth, filter the syrup once more to remove any sediment that may have formed during boiling, collecting the filtered syrup in a large measuring cup or bowl. A measuring cup will let you know exactly how much finished syrup you’ve made.
To store the finished syrup, pour it into clean jars and refrigerate; it’ll keep up to a year. Syrup can be kept in the freezer indefinitely in containers filled three-quarters to the top. You can also buy maple syrup bottles made especially for syrup preservation. If you skip the straining, cloudy sediment will collect at the bottom of your jars during storage. This isn’t harmful but can look unappealing. If you ever see mold on your syrup, discard it.
The color and flavor of finished syrup tend to strengthen as the season goes on. Early-season syrup will be light gold, while late-season syrup will be deeper gold or even brown, and the maple flavor will be more prominent.
DIY Barrel Stove Maple Sap Evaporator
Tools and Materials
- Heavy-duty 55-gallon barrel
- Barrel stove accessory kit
- Stainless-steel steam pan
- Stack piping, 6-inch diameter, minimum 4 feet
- High-temperature sealant gasket (optional)
- High-temperature paint (optional)
- Drill or impact driver, with bits to match kit bolts
- Jigsaw
Barrel Stove Instructions
Kits found at many hardware stores make easy work of turning a 55-gallon barrel into an efficient wood-fired sap evaporator. These kits include cast-iron pieces — hinged door, legs, flue insert, and fasteners — for as little as $60. Avoid barrels used to hold fuel or other flammables, and thoroughly clean all barrels before beginning construction.


- Install the door by measuring and marking the center of the barrel’s sealed end. Trace the door opening, then drill pilot holes for bolts. Use a jigsaw to cut along the marked lines.
- Measure the flue hole, making sure it’s in line with the door so the installed flue will stick straight up. Drill and cut the flue opening.
- Measure, mark, and fasten the legs to the bottom of the barrel. This step will be easier if you have a removable lid-style barrel rather than a fully sealed one. If fully sealed, reach through the flue hole instead of going in from the end.
- Measure, mark, and cut out the hole for the steam or boiler pan. Match the hole’s size to the pan’s size, making sure the hole isn’t larger than the pan. This means cutting so the barrel will hold the bottom of the pan up. You want a snug fit to keep smoke from rising around the pan.
- Install flue insert with included fasteners. To better seal the flue, add the optional high-temperature gasket. Coat the barrel with high-temperature paint (optional).
- Add stack piping to the flue insert; pressure fit should be sufficient.
Your DIY barrel stove maple sap evaporator is now complete. Before your first sap boil, fill the steam pan with water and start your first fire to burn off any old paint. An old grill rack in the bottom will help with airflow.
Stephanie Thurow and Michelle Bruhn have taught people across the globe how to garden, preserve food, tend backyard chickens, and more. This excerpt is taken from their book, Small-Scale Homesteading, with the permission of Skyhorse Publishing.


