If you find yourself occasionally having to kill and dispose of rattlesnakes, why not learn a bit about tanning a snake skin and cooking snake meat?
Rattlesnakes can be unwelcome visitors around the homestead. Of course, if I happen upon one of the serpents while riding or hiking in the desert, I let it slither on its way, but when a venomous reptile shows up too close to the house or barn I feel obliged to kill it. Even then, however, I never simply discard the victim of my defensive action because the serpents are just plain too useful to throw away. There’s an old saying about using all of a pig but the squeal. Well, I’ve learned everything from tanning snake skin to cooking snake meat to making snake-bone jewelry–how to use all of a rattlesnake but the hiss!
First, though, let me emphasize that snakes play vital ecological roles in animal and insect control, and that senseless slaughter of the beautiful reptiles is inexcusable. Indeed, commercial hunting has put some of the predators on the endangered species list. But although our aggressive western diamondback (and a number of other poisonous snakes) can be found in healthy (and even dangerous) abundance in many areas, if one of them must be destroyed–to protect your family, pets, and livestock–its carcass should be used.

But Kill With Caution
Since moving to the western desert’s foothills, I’ve occasionally been forced to kill rattlers. And, upon hearing the familiar buzz-z-zz, my primary concern is how to wield a shovel, hoe, or other handy implement to decapitate the serpent without damaging its lovely skin.
I must, however, caution any neophyte snake-harvesters that the diamondback ranks among the world’s most dangerous reptiles and accounts for more serious bites and fatalities than does any other North American viper. Exercise every precaution to avoid being bitten, both while dispatching the snake and when handling the carcass. Be sure, for example, to dispose of the severed head immediately and avoid any accidental contact with the fangs. Remember, too, that long-lasting reptilian reflexes can prompt even the disembodied head to “strike,” so discard the jaws in a place where children and animals can’t get to them.
Snake venom, you see, can cause damage to body tissue, the bloodstream, and the nervous system. Healthy adult humans rarely keel over and die from a bite (as often happens in Western movies), but they can sustain permanent tissue damage: An acquaintance of mine was recently nicked by a trimmed-off head while she was placing it in a garbage bag, and is now lacking part of her finger! Furthermore, when snakebite complications occur, a victim will likely require weeks of expensive hospitalization. (If my warnings prevent you from snake scavenging … fine! I wouldn’t want to push anyone into possible peril.)

Some snake tanners simply buy reptiles fresh-frozen. If that approach interests you, you may be able to find out how to go about doing so by contacting the reptile curator at the nearest zoo. The institution won’t sell to you directly (its stock has a low mortality rate, and a federal law requires that all dead zoo residents be cremated), but the curator will probably have a list of major snake dealers who maintain a stock of frozen serpents. In the Southeast, such people sell rattlesnakes and rat snakes by the foot. Since prices vary greatly from region to region.
In addition, snakes with still-valuable skins can often be found as road kills. The coldblooded creatures sometimes sleep on sun-warmed pavement, though, so be sure your trophy is dead before you pick it up.
Let’s assume, then, that one way or another you’re in possession of a headless, properly dead rattler. The first thing to do is to remove and process the hide.
Skinning and Tanning
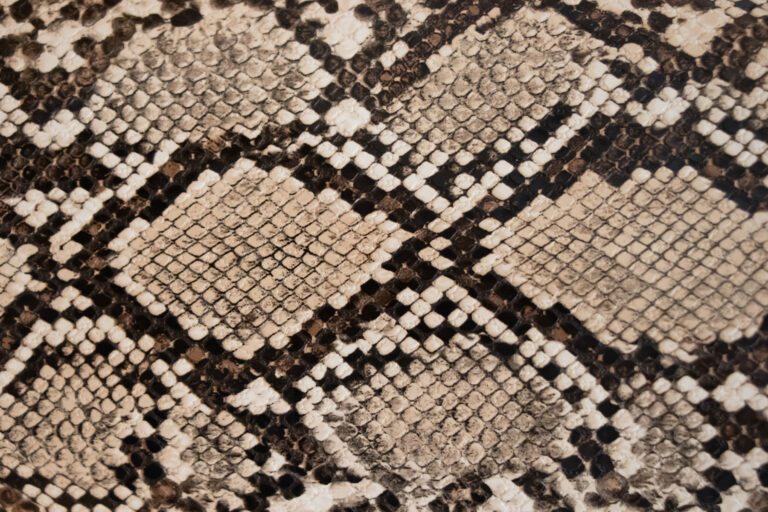
It’s best to waxed or freezer paper when skinning a snake, because the reptile’s body will emit a natural adhesive that can turn newspaper into a gooey mess. First of all, make sure that the trachea (windpipe) and esophagus aren’t sticking to the interior of the hide (if they are, you’ll have to work them free as you cut), then place the snake topside down, and–starting at the neck and working toward the tail–use its small belly vein as a centerline cutting guide.

In skinning a wide-bodied reptile, such as a rattler, I prefer to snip a few inches, peel back the hide, and snip again. (Bandage scissors are good for this task, since the blunt blade can be inserted under the skin without ripping the viscera.)
When you reach the vent (anus), you’ll know your catch is a male if you encounter twin protruding, spiny sex organs (called hemipenes). Any female caught in the late spring may well contain oblong, yolk-like embryos in the rear portion of her body cavity.
Take special care in stripping off the thin skin of the tail until you reach the rattles. At that point, you’ll have to cut through the remaining lower vertebrae and strip off as much of the adhering muscle as possible to end up with a whole skin and attached rattles. (But don’t discard the snake meat. Save it to use in the recipe that follows! ) If some fleshy tissue sticks to the hide, gently scrape off the remains with a table knife, again working from head to tail.
Once that task is completed, rinse the skin thoroughly in cold water and place it–flesh-side up–on a board, a strip of plywood, or a slab of styrofoam. In order to prevent the finished product from curling, grasp the hide by both ends and pull to straighten it. Don’t try to stretch it (that’s done when preparing furs for sale, but not when working with snake skins).

Next, anchor the neck and tail to your drying board with small nails, tacks, or lightweight staples punched in perpendicularly to the hide’s edge. By applying a little pressure at both ends, you’ll cause two ridges to rise down the skin’s length. Now, working with a 3-inch section of one side of the hide at a time, pull at right angles to the skin’s length until the ridges in the section disappear, then place a tack or staple 3/8 inch in from the edge. Continue moving down, 3 inches at a time, until one side is completed. Follow the same routine on the opposite edge, then place a tack or staple between each pair already placed along the sides so that the skin will be secured every 1 1/2 inches and won’t curl excessively during curing.
You can simply sun-dry the viper’s hide, but I’ve gotten much better results by covering the moist inner skin with salt, packing a little extra preservative into the pocket next to the rattles, and adding a bit of pepper to discourage flies. I then let the skin dry for a couple of days, remove it from the backing, and rinse off the seasonings.
Though the diamondback’s epidermis will be preserved at that point, the thick ventrals (belly scales) will curl inward as they dry unless they’re softened or trimmed off. Some folks finish hides by soaking them in a jar containing half glycerin and half alcohol, but I find it convenient to apply the same mixture with a paintbrush. Neat’s-foot oil is also a good softener, and I’ve even got the job done by using Dermassage lotion!

You can make another good “tanning solution” from equal amounts of Prestone antifreeze (I can’t attest to how well other brands would work) and methyl alcohol (it’s sold at pharmacies). If you buy the ingredients in gallon quantities, a long-term supply of this mixture can be used for many future tanning projects. Once the skin is tacked out, shake the solution thoroughly, apply it liberally with a pump-sprayer or a brush, and allow three hours to elapse between coats after the formula is dry.
Trophy skins, those which will be used only for display, will need three to five treatments, depending on the flexibility required, but skins that are to be used in leatherwork should have only one or two coats; more will cause them to retain too much glycerin, which can prevent glue from adhering to the surface.
Whatever method you use to cure your skins, always store them flat–preferably under a weight–in a dry place.
Snake Crafts
Among the most popular items I make from diamondback skins are impressively flashy hatbands, which are (I think) every bit as nice as those that cost retail. Using flexible white glue, I back the thin skin with a strip of fabric or two-ounce leather (hide that’s about 1/16″ thick) and trim it so that it’s slightly wider than the backing. Then, turning the snakeskin’s edge under, I use button cord to secure it with a decorative whipstitch. A plain border can also be created by simply wrapping the “hem” allowance around the leather or cloth and gluing it down. Such creations can then be embellished with the serpent’s rattles, bright feathers, or what have you.

Snakeskins can also be turned into watchbands, purse trimmings, box decorations, or other accessories. In addition, beginner hideworkers can obtain kits from crafts supply stores or from the Tandy Leather Company and dress up the do-it-yourself packages with elegant snakeskin.
In most such kits, some of the precut components are designed to be tooled or carved, and it’s those pieces that should, instead, be decorated with snakeskin. To do so, first use a coarse sandpaper to raise the nap on the rough (flesh) side of both the leather and the skin. Then apply a heavy coat of Barge cement (an excellent contact adhesive) to the sanded areas, and let both items sit until they’re dry to the touch. (This will take up to 30 minutes with regular Barge, but the new Barge Super Speed cement will dry in only five minutes.) When the adhesive is no longer even slightly tacky, carefully position the leather on the skin and tap them together firmly with a rawhide mallet. You could also place them between two pieces of wood and put the “sandwich” under pressure in a bench vise for about ten minutes.
When the bond is secure, trim away any excess skin with scissors, cutting it as close to the leather as possible. Next, place the piece on a flat surface and–using the handle of a table knife and applying firm pressure–scrape off the scale coverings. Be sure that you work with the grain, which runs from head to tail. When you think the job’s done, hold the skin up to the light to see whether you’ve missed a spot or two (it’s very easy to do when you’re working with small-scaled snakes).
With the gluing and scraping done, your project will be ready to stitch. Resist the temptation to penetrate the skin by simply running a needle through the leather piece’s round lacing holes. Instead, use a rotary or single grip punch to pierce the snakeskin through the holes of the leather. This will produce a neater and more professional-looking finished article.
Now, just assemble the piece according to the kit’s instructions, and apply a light coat of neat’s-foot oil to the snakeskin to bring out its natural luster.
Of course, if you’re not interested in crafts yourself, you can often sell snake skins. Some leatherworkers will pay $10 or more for a quality raw skin … which they’ll transform into super serpent creations that fetch super prices.
Regardless of how you choose to use the skin, however, remember that I cautioned you not to let the snake’s carcass go to waste. Let’s backtrack a bit.
Mouthwatering Meals
After you’ve done a careful job of skinning, you’ll be left with a neat snake body containing undisturbed entrails. If your snake has been freshly killed (I don’t eat serpentine traffic victims, or–since they’re not processed as food–the commercially frozen specimens), fillet the meat. To do so, use the same method you’d employ in boning fish: making preliminary cuts along each side of the backbone and then sliding a sharp knife between the flesh and the ribs from neck to tail. The resulting long strips of meat might appear scrawny, but they’re all muscle. A ten-minute cold-water soak will make them bunch and thicken. Since the meat is “chewy,” I prefer to cut each fillet into bite-sized tidbits before cooking it.

Because of its mild flavor and its ability to adapt itself to many cooking methods, people generally describe rattlesnake as tasting like chicken. In fact, my favorite recipe, chicken fried snake, calls for coating the pieces in seasoned flour and frying them until they’re golden brown. The morsels can be eaten plain or with condiments. If you top them with a little seafood sauce, for example, the snake snacks will even make a tasty substitute for fried clams.
Well, now you’ve eaten your snake and tanned its hide, but there’s still another use for the carcass.
Snake-Bone Jewelry
Individual segments of the reptiles’ backbones can be made into interesting (and marketable) jewelry. I must admit, though, that this is the most tedious and least pleasant part of the entire snake-salvaging operation.
Remove the innards, coil the remaining, still fleshy skeleton in a pan of water, and let it simmer (it’ll smell terrible! ) until the meat just begins to fall apart. (Be careful, though, not to overcook the carcass, or the vertebrae will become as soft as the bones in canned salmon.) As soon as the meat can be easily separated, pull the ribs from the spine and discard them. Then use a toothpick to remove any remaining flesh or discoloration from each piece of bone. Once they’re all clean, let them bleach in the sun until they reach a shade that appeals to you.
Notice, now, how the spinal-cord channel running through each piece makes a perfect hole for stringing. But–since the bones have interlocking projections–it’s best to alternate them with round beads when assembling your necklace, dangle earrings, or other costume pieces.
Serpent Appreciation
Many folks, it seems, have a well-developed fear of snakes, or are even repelled by them. In truth, however, the reptiles are exquisite and priceless fellow passengers on our Spaceship Earth. Of course, as pointed out above, there are times when it is simply impractical for humans and venomous serpents to coexist at close quarters. When that’s the situation, the less of our adversaries’ remains that we callously discard, the more worth we’ll gain … and the better we’ll be able to justify their killing.
EDITOR’S NOTE: MOTHER would like to extend a special thanks to Steve Stroupe and Glenn Taylor for supplying additional information for this article.
Originally published as “Tan Your Snake and Eat it Too!” in the May/June 1981 issue of MOTHER EARTH NEWS.


