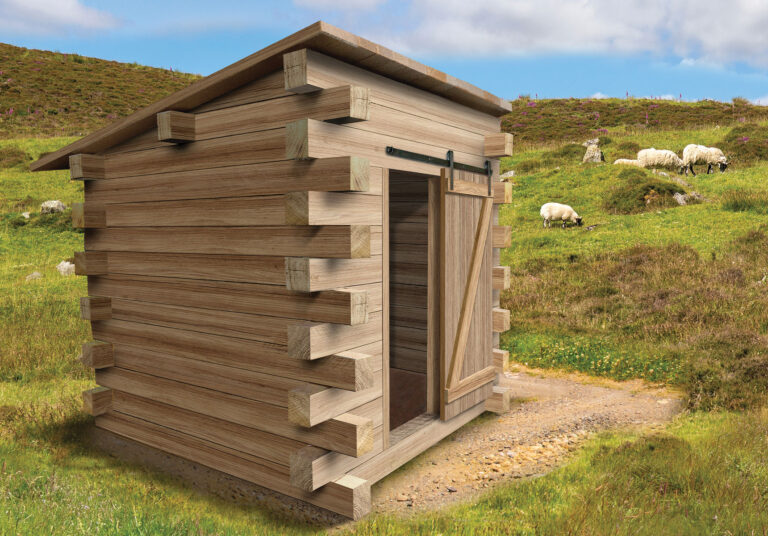
If you built forts with Legos or Lincoln Logs when you were a kid, or if you’ve built retaining walls with landscape timbers as an adult, the building technique described in this article will be familiar. It involves stacking 4×6 landscape timbers “log cabin style” to create a small — and sturdy — animal shelter. This shelter is just the right size for a few goats, pigs, sheep, or chickens.
Some features of this building style make it unique:
- All you’ll have to worry about is the framework of the structure. You won’t have to install exterior or interior sheathing, siding, or paneling.
- It’s easy to modify the size. To make a larger structure, use longer or additional timbers; to make a taller structure, stack the timbers higher.
- The wall timbers and roof boards are screwed in place. You’ll just need a drill, a circular saw, and some basic hand tools.
Tools and Materials
- Circular saw
- Speed square
- Drill with hex bit
- 4-foot level
- Hand tamper
- Sledgehammer
- 10-inch timber screws (200)
- 4-inch timber screws (100)
- Window
- 10-foot Style D roof edge (4)
- Rolled roofing
- Sliding door hardware
- Sliding door lumber
Cut List
Walls
- 4×6 treated landscape timbers,
- 8 feet long (45)
Door and Window Frame
- 2×4 treated lumber, 8 feet long (4 or 5)
Roof
- 2×8 treated lumber, 10 feet long (14)
Note: Amount and size of materials will vary based on the size and height of your shed, the size of your doors and windows, and other factors.
Timber Tips
Construct the walls with 8-foot-long 4×6 treated landscape timbers, which are available at most lumberyards and home centers. Your supplier may carry timbers with two or three different grades of preservative. Make sure the timbers you use for the two lowest rows are rated for “ground contact.” You can use the less expensive “treated to refusal” timbers as you work your way up, but they won’t last as long, and they rarely come with a warranty.
Select straight timbers that have been air- or kiln-dried (if available), and that have similar dimensions. If you buy a banded bundle, or “cube,” from your supplier, chances are your timbers will have warped less and will be more likely to have identical dimensions.
You can use 5×6 timbers, 3×4 landscape timbers (with two flat sides and two rounded sides), or even railroad ties to build your shed using the same basic technique. Just make sure to adjust your design and dimensions accordingly.
Since the timbers shown are 4×6, cutting them with a standard circular saw will take two passes. Mark your timber to length, and then use a speed square to transfer this mark to the other three sides of the timber. Set the saw to its greatest depth, and make cuts on opposite sides of the timber to cut through. You can soak the cut ends of your timbers in an eco-friendly wood preservative for 10 minutes before installing for added protection.
You’ll need a powerful drill to drive in the 10-inch hex-head screws that hold the timbers together. If your cordless drill isn’t up to the task, use a corded drill.
Build a Solid Base
To build a straight, solid structure, you need to start with a level, solid base. Dig out an area 6 inches deep and at least 1 foot longer in each direction than the footprint of your shed. You’ll want an area free of large roots or loose-fill dirt. We dug a 10-by-10-foot area for our 8-by-8-foot shed.
Use a level to make sure the excavated area is relatively flat, and then use a hand tamper to compact the soil. Install 6 inches of washed gravel, and compact it until it’s level, flat, and solid. The gravel will provide an adjustable base for leveling your first row of timbers, and it will also provide drainage for rain or water that works its way into and around the shed.
Set the two “full” side timbers in place parallel to one another. If you’re building an 8-by-8-foot shed, space the timbers 80 inches apart.
Use a 4-foot level to level one timber. Next, place one end of a long, straight 2×4 on one end of the leveled timber, and rest the other end on the opposite timber. Place a 4-foot level on the 2×4 and use this to level one end of the second timber. If you need to raise the timber, lift it and spread more gravel under it. If you need to lower it a hair, you can stand on it and hit it with a sledgehammer. If it needs to be lowered more than an inch, remove the timber and scoop gravel out of the area. Use the 2×4 and level to make sure both timbers are level end to end and with one another.
Next, cut two timbers to go between the two side timbers. For our shed, these were 80 inches. Measure in 4 inches from both ends of the side timbers, and draw a square line. Position the 80-inch “filler” timbers to the inside of these marks, and add or remove gravel until these “filler” timbers are level with the side timbers.
Before screwing these base timbers to one another, cross-tape the ends of the side timbers to make sure the structure is square (see diagram on Page 25). If not, use a sledgehammer to tap the side timbers one way or the other until the measurements are equal. Readjust the “in-between” timbers so they’re on their marks, and then drive 10-inch timber screws through the sides of the side timbers into the ends of the filler timbers. If you’re building on a slope, use landscape timbers to build up the low side(s), and then build your shed upward from there.
Stack the Walls
Stack a full timber on the back wall of the shed, letting the ends extend 4 inches past the side walls in both directions. Secure the full timber to the timber below with 10-inch timber screws, with one near each end and the others spaced about every 2 feet. Place two filler timbers on top of the two side timbers; the ends should be 8 inches back from the front ends of the timbers below.
If you have gaps between the timbers, you have three options: Leave the gaps for additional ventilation; lay a bead of caulk on the lower timber before placing another timber on top; or install sill sealer — narrow strips of fiberglass insulation — on the lower timber before installing the one above. If there are no doors or windows, just keep repeating the above.
Door and Window Openings
Determine the width and location of your door opening, and mark it out on the front filler timber, adding 1½ inches to each side for the door jambs. (If you want a 30-inch door opening, which is what we chose, you’ll need 33 inches between your marks.)
Build your door frame as shown in the diagram on Page 28. Arrange the top of the frame in a way that when the timber running over it is installed, it’ll just “kiss” the top. Install temporary middle and bottom horizontal braces to maintain a correctly sized opening. Install a diagonal cross brace to ensure the frame is square, and then toenail the bottoms of the side jambs to the bottom timber. Use two temporary 2x4s to brace the door frame plumb in the opening.
Position the short filler timbers on the sides of the door frame, with the ends protruding 4 inches beyond the side walls. Secure the short timbers to the timber below with 10-inch screws, and drive it through the door frame with 4-inch screws.
Install the window frame following the same basic plan as the door, except your window frame will have four sides. Select your window ahead of time. If possible, plan your window opening height so the top of the frame will be level with the top of a row of timbers. If the frame height doesn’t come out exactly right, you’ll need to notch out the timber above it, or add a filler piece.
Roof
As you near the top, you’ll need to build the front wall of your shed two timbers higher than the back wall to create the proper roof slope. Once you’ve done this, lay a straight 2×4 on its edge from the top of your front wall to the top of your back wall, and temporarily snug a full timber into the “crotch” created. Do this on both sides. This timber is the intermediate support for your roof boards. Screw this full timber in place so it extends 4 inches beyond each side wall. Cut and install the wedge-shaped filler pieces, as shown in the diagram on Page 27.
Install your roof boards by driving 4-inch timber screws into the front, intermediate, and back timbers. We installed treated 2x8s, but any board width will work. We installed 10-foot-long roof boards to create the extra-wide overhangs at the front and back wall, but you can get by with 8-foot-long boards.
Install Style D roof edging along the four sides of the roof, and then install the rolled roofing using the instructions that come with the product. Metal roofing is another alternative.
Sliding Doors and Windows
First, purchase sliding door hardware. Build your door so it’s at least 1 inch larger than the door opening in every direction. We built our door from 2x6s with horizontal cleats on the top and bottom and a diagonal cross brace. Make sure to hang the sliding track above your door opening at the height described in the directions that come with the hardware. Then, add the rollers to the door and lift it onto the track.
Install your window in the opening, holding it in place with 1-by-1-inch slats on both sides. Then, hang out the FOR RENT sign and welcome the new residents.
Spike Carlsen lives, writes, and builds in Stillwater, Minnesota. His latest book A Walk Around the Block: Squirrels, Sewers, Stoplights, and Other Stuff You See Every Day but Know Nothing About will be available through Harper One in fall 2020.


