According to statistics, an American home or apartment is burglarized every 20 seconds, and those folks who believe their residences aren’t potential break-in targets are likely fooling themselves. The fact is, current crime trends indicate that “average” citizens are increasingly becoming the victims of a new wave of “proletariat plundering” which seems to thrive on the nonselective sacking of many households, rather than of just a few wealthy ones.
Of course, the most effective deterrents to home burglary include the use of security doors, windows, and hardware; door or window alarm systems; or sophisticated intrusion detectors. But the cost of such devices is often steep, if not downright prohibitive, and as many people are finding out from sad experience, locks stop only the honest thieves! So, since you likely can’t guarantee the security of your dwelling, the next best thing is to hide the valuables within it. The made-from-trash security cabinet that MOTHER EARTH NEWS’ Dennis Burkholder cobbled together would be pretty hard to beat for doing just that.
Besides costing only a few bucks to make (many of its parts, including the scrap water heater, are commonly junked items that most folks’d be glad to get rid of), we’re willing to bet that this “undercover” work-a-day appliance — installed in the corner of your basement, laundry room, or utility closet — will attract no more attention than would … well, an unobtrusive old hot water heater!
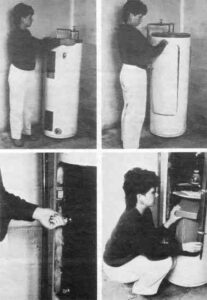
The secret of our hidden safe’s success, you see, is that although it functions as a security cabinet (complete with a storage shelf and a lockable door), it looks just like a working heater, right down to its copper pipes and electrical service line. For convenience, though, the whole affair rests on hidden casters that allow the cylinder to be turned about-face to reveal a sheet-metal hatch cover that conceals the safe’s access door.
To fabricate your own, you’ll need (of course) a defunct electric water heater, with its skin and all its fittings intact (we used a 40-gallon job, though any size will do if large storage capacity isn’t a concern), a couple of panel (or hasp) locks, six magnetic cabinet latches, a strip of sheet metal measuring 3″ x 9″, a 1″ x 14″ piece of 1/8″ flat stock, a 1 1/16″ x 29″ continuous hinge (or several butt hinges), five roller-skate wheels, and a hunk of 1/2″ plywood large enough to serve as an inside shelf.
The required hardware includes five 1/4″ x 1 1/2″ bolts with double nuts, two dozen 1/8″ x 1/4″ pop rivets or No. 5 x 1/4″ machine screws, and — if you don’t have access to a welder — fasteners to secure the hinges, stops, and support tabs.
Besides a ruler, a marking pen, and some basic hand tools, you’ll also need a saber saw (with both wood- and metal-cutting blades), and an electric drill (with an assortment of small bits and a 3/4″ hole saw).
Refer to our Assembly Diagram when following these instructions. Start by removing all the pipes and fittings, loosening the bottom skirt, and slipping the outer jacket and insulation batting from the tank itself. Select a spot opposite the skin’s front face to mark and cut a 12″ x 33″ hatch in the jacket’s sheet metal, with its bottom edge on a line that’s 12 inches up from the tank covering’s lower lip.
With this done, place the jacket back over the reservoir, line it up properly, and mark out the 12″ x 30″ border of the chamber’s door, centered within the hatch opening. Then remove the skin again, and — after drilling a 1/4″ starting hole — use your saber saw to cut the door from the tank wall.
Having completed these preliminaries, you’ll find the actual assembly of your safe a snap. The door is fastened with the outside hinge (bolts will work, but tack welds are better) and is kept from opening inward by ten 1″ x 1″ tabs that are cut from the 14″ strip of flat stock and welded (or bolted) to the inside edge of the door frame. The panel locks are installed in two 3/4″ holes (which you should drill through the door at points 3/4 inch from its side and 9 inches from its upper and lower edges). Their catches are bent, or modified, to angle back toward the door’s face. The skate wheels, which use the 1/4″ x 1 1/2″ bolts as axles, can be mounted to the inside of the annular lip at the tank’s base after you’ve drilled a series of five 1/4″ holes through that ring at points about 1/2 inch from its bottom edge and 10 inches apart.
If you want to include a shelf, scribe a circle, with the same diameter as the inside of your vessel, on the scrap of plywood, then cut the disk out with a saber saw. (The platform can rest on small angle brackets made from the leftover 1″ flat stock and fastened — in a three-point arrangement — to the tank’s inner walls.)
To mount the removable cover panel on the heater jacket, you’ll have to cut your sheet-metal strip into 1 1/2″ x 3″ pieces, then fasten these (by tack-welding or bending-and-bolting) to the outside of the vessel so they protrude perpendicularly from its surface, with the longest edge running vertically. (Ideally, the half-dozen plates should be spaced evenly around the access hole and positioned to meet the edge of the hatch opening when the cylindrical jacket and insulation are slipped back in place.) The magnetic cabinet latches — attached to these mounts with pop rivets or small bolts — will keep the skin in position after everything’s together.
That’s about it. Of course, you’ll want to plumb “dummy” water lines and a fake electrical cable to the rear of the cabinet so everything looks as ordinary as possible (do be sure the door will still open, though). And you may wish to weight the base of the tank with sand or concrete to give it some mass.
Now, you’re one of the select few who know the secret of the trick water heater that “turns” into a safe!


