Learn how to rebuild a wheelbarrow from the tire to the pan and handles.
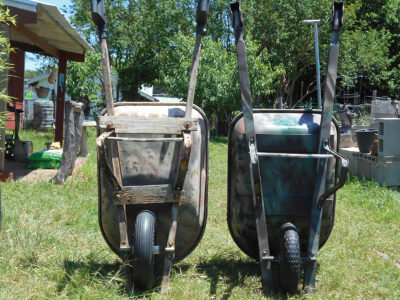
Recently, I volunteered to store furniture and goods while my in-laws moved, including a 2-year-old True Temper wheelbarrow. The wheelbarrow had been rotting on the ground before I got it, and its handles were weak, its pan puckering at the bolt holes, and its tire was flat. I stored it with my wheelbarrow, also a True Temper bought in 1988 – 36 years ago. I decided to “trick out” this decrepit new ‘barrow to its true potential.
My 1988 True Temper has carried several hundred bags of wet concrete as I’ve formed and laid sidewalks and rock walls. I’ve pushed 100 tons of dirt, gravel, sand, and mulch. I’ve moved 50 tons or more of paving stones, bricks, rocks, and firewood. I’ve moved furniture, a grinning dog, and laughing grandchildren. To this day, the pan doesn’t leak, and it’s unbent and square at its bolt holes. I hope to get another 30 years out of it, and I wanted to bring the weaker wheelbarrow up to its speed.
My local Ace Hardware store recently had new True Tempers for $69. Taking that as a baseline, I added a solid rubber, flat-free tire (about $30); new 2-inch square hickory handles (about $14); two 1-by-4-inch, 24-inch-long cedar planks; plus eight longer carriage bolts and four cans of camouflage spray paint (another $30). About five years ago I discovered Simply Dump It, a company that provides pivoting wheelbarrow handle replacements for about $30, which is worth it for those of you who (like me) have aging backs and rickety knees. I later added an 1/8-by-1-1/2-by-18-inch wheel guard for $1, so this wheelbarrow, originally $69, cost $150 – but it’s worth it for what it can do and how long it’ll last.
First, the tire: A pneumatic tire is doomed to fail at the most catastrophic moment. You’ll be pushing 300 pounds of wet concrete up an 18-inch ramp to fill a form, and, kaboom, concrete everywhere. Or, you’ll be pushing 400 pounds of firewood down a trail toward your pickup a half-mile away and, pow! Good luck with that. So, that’s why instead of using a pneumatic tire, I went with a solid rubber tire that’s puncture-proof.
Next, the pan, the weakest part of a wheelbarrow. Imagine a 300-pound load over uneven ground. It pulls and shifts and bends the pan. Old wheelbarrows are bent and cracked at the holes where the bolts go through to the handles. When mixing wet concrete, this is where the wheelbarrow drips and leaks. This weakness can be remedied by adding two cross-braces across the bottom of the pan, necessitating longer carriage bolts by 1 inch. Doing this will save hundreds of dollars for contractors and add years of useful life for homeowners.
Finally, the handles. Imported steel wheelbarrow handles are affordable and common, but I opted for American hickory, which I painted for longevity, and I added the Simply Dump It pivoting handles at the ends to add a little height for my back muscles.
I did have to change out the wheel guard. Wheel guards typically conflict with the front tire. They need a second bolt on each side to prevent that. I was going to weld the original, but the new handles were another inch wide, so I cut a 1/8-by-1-1/2-by-14-inch strap iron to replace it. My final step was to put wheelbarrow hangers on a fence post to keep the wheelbarrow off the ground.
The camouflage paint and hangers make for an aesthetically pleasing way to store my newly up-to-date wheelbarrow.
Do as I did to make a wheelbarrow you can use for the next 36 years. You’ll never regret it!


