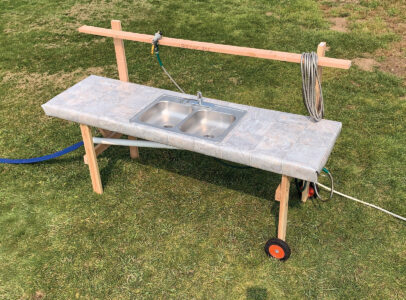
Learn how to make a portable sink for in-the-field cleaning. Our setup allows you to have running water in your outdoor work areas, wherever they might be.
If you’ve ever butchered chickens, you know it’s an outdoor job. And if you’ve ever done it without water, you’re worthy of respect. But why subject yourself to that mess – or any other chore that would be better served by running water – when making a portable field kitchen is so easy and economical? This setup connects to a garden hose but can easily be adapted to hold a small water reservoir so you can move it around your property as you please. It’s light enough for one person to handle on their own but still robust enough to leave outside.
You can get most of the materials you’ll need secondhand, and you may be able to find an old sink at the dump. Check with flooring retailers and other places that sell linoleum; they’ll likely have scrap pieces they’d be willing to part with.
You may have trouble finding a female-female hose-to-pipe adapter. Ask at your local hardware store if you don’t see it on the shelves. It’s called an “NHT-to-NPT” (national hose thread to national pipe thread) adapter. Since you’ll be using this sink outside, I recommend a brass adapter instead of a PVC one.
This is a highly customizable project, so this materials list functions only as a starting point. Once you’ve determined the details for your field kitchen, you can calculate specific materials and amounts.
Tools and Materials
- Handsaw or power saw
- Power drill
- Adjustable wrench
- Partial sheet of 1/4-inch or thicker plywood
- 2x4s
- Deck screws
- Linoleum
- Kitchen sink with drain hardware
- Construction adhesive
- Tacks or staples
- Lawn mower wheels with mounting hardware (2)
- Sink and tub caulk
- Kitchen faucet
- Garden hoses
- Hose-to-pipe adapter, female-female
- Y-splitter, for garden hose
- Garden hose spray nozzle
- PVC pipe
- Discharge hose
Countertop Considerations
- The great part about this project is that it’s highly customizable, including a countertop that can be built to your preferred dimensions. Start by measuring your kitchen countertop as a baseline. If your elbows aren’t at a 90-degree angle when your hands are in a working position, adjust the height of your field kitchen accordingly.
- Next, figure out how long and wide you want your countertop to be, and cut your plywood to that size. Then, cut two 2x4s for the countertop sides and two 2x4s for the countertop ends. Screw the 2x4s to the underside of the plywood to form the countertop edges.
- If your linoleum isn’t already cut to size, go ahead and cut it to roughly the same size as the countertop, leaving enough room to wrap around to the underside.
- Next, you’ll need to cut a hole for the sink in the countertop and the linoleum. Cut your linoleum first, and then use it as a pattern for your countertop. I found it was easiest to cut an “X” into the linoleum where I wanted the sink to go and then gradually make that cutout bigger until it fit the size of my sink. (Remember to leave space for faucet hardware.) Dry-fit the linoleum and sink to make sure everything fits correctly. Once you’re satisfied, transfer the linoleum pattern to your countertop, and then cut the hole.
- Use construction adhesive to attach the linoleum to the countertop. Put something heavy on top of the linoleum to press it down while the adhesive sets. Wrap the linoleum around the edges and secure it to the underside of the 2x4s with tacks or staples.
- Now, measure and cut the 2x4s for the leg boards and braces. (You’ll need two horizontal braces and two knee braces.) Remember to take the wheels into account when you’re measuring the legs. The legs without wheels will need to be cut longer so the field kitchen sits level. Also, if you plan on adding a shelf, keep the back legs long enough to extend above the countertop.
- Add the legs to the countertop, and then add the horizontal braces. Bevel the ends of the knee braces before you attach them so they sit flush against the horizontal braces and the inside of the countertop ends. Attach the wheels.
- Use construction adhesive to attach the sink to the countertop, and then caulk around the seam.
Faucet and Drainage Solutions

- Now, you can connect a faucet and drain system. Because it’s unlikely you’ll have hot water running to your field kitchen, this is a great way to repurpose an old faucet with one leaky side.
- Hook up your water supply to the working side, and then cap off the other side. (It’s possible to run propane or electric-powered hot water to a setup like this, but you’ll need to be mindful of all safety precautions associated with that type of system, as well as any code requirements.)
- Connect a short piece of garden hose to the faucet using a hose-to-pipe adapter.
- Add a Y-splitter to the other end of the hose to attach a faucet and a stand-alone spray nozzle.
- Connect your spray nozzle to the other side of the Y-splitter, and then connect your water source (a garden hose) to the end of the Y-splitter.
What you do with water drainage is up to you, but I’ll tell you one thing: You don’t want to be working in a big mud puddle. If your field kitchen will be stationary and you plan on running a lot of water through it, you may consider digging a gravel sump under the sink. If you’ll be moving the field kitchen around a lot, or you don’t plan on using more than a gallon or two of water at a time, you may be able to just let the water dump on the ground. Otherwise, invest in some PVC pipe and flexible discharge hose to carry water farther away from your feet.

I created my drain by cutting off the p-traps from the drain hardware that came with my sink, and then adding a piece of PVC to the frame that funnels the water away from my field kitchen. (P-traps will freeze and crack outdoors in winter, and they’ll provide a place for mosquitoes to hatch in summer.) I mounted the PVC pipe to the inside of the 2×4 frame using a pipe cap, and cut holes in it that allow it to fit under the sink drain pipes. I also use a discharge hose to extend the reach of my drain.
Optional Accessories for How to Make a Portable Sink
You can add as many accessories and attachments to your field kitchen as you want. One nice addition is a shelf with hooks for tools and a place for soap. (And a Bluetooth speaker so you can rock out while working!) If you’ll be moving the field kitchen around a lot, consider adding a low-mounted handle on the non-wheeled end.
To expand beyond the reach of your garden hose, add a high shelf that can accommodate a water jug or bucket for a refillable reservoir. You can connect a hose from the bucket to your faucet. Keep the water covered, and take some sanitation precautions if you’ll be using the water for food preparation.
Although this setup is sturdy, it’s still light enough that a strong wind can blow it over. Add some hooks, clips, or bungee cords so you can attach it to a fence post or other sturdy structure. It’ll save you from having to make repairs.
Finally, if you’re not naming your equipment, you’re not having enough fun. Think of a name, make a stencil, and paint it on.


