I’m an athlete—a competing bodybuilder—and a few years ago I was faced with a problem. In order to train for competition, I needed ready access to bodybuilding equipment for six days a week. And though I was working out at a nice spa that featured quality equipment, I couldn’t get enough time on the machines. The establishment was always crowded, and it was closed on weekends and holidays. As memberships increased, so did interruptions. The whole situation soon became annoying enough to send me in search of a solution.
A home gym seemed the perfect arrangement. Of course, like most people, I couldn’t afford to invest the money required to buy the heavy-duty home fitness equipment I needed. I considered constructing my own metal gym, which would have cost half as much as buying commercial equipment. But even that plan demanded more cash than I could afford.
A Homemade Solution
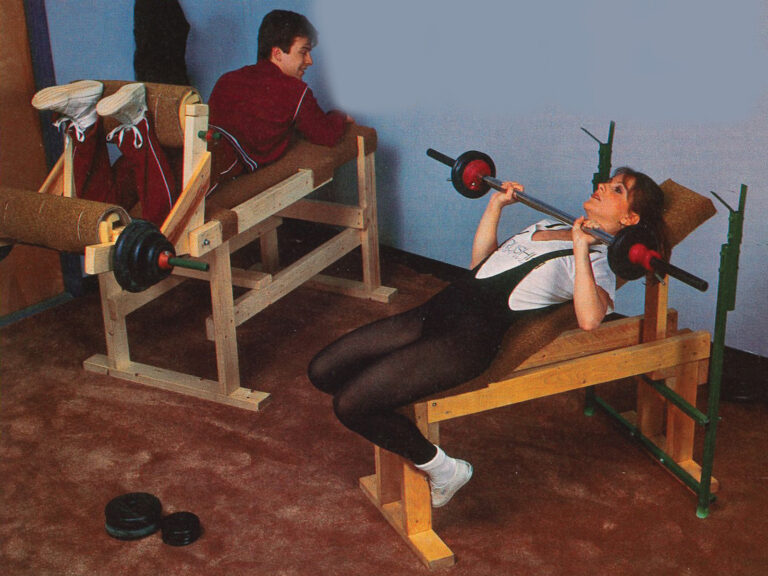
After giving the problem a lot of thought, I decided to try making my own fitness center out of wood . . . even though I’d never seen any wooden gym equipment and wasn’t much of a carpenter! My first project was an adjustable bench. With about $30 worth of materials (including wood, screws, and glue), my training partner, Rod Jackson, and I built the bench in my living room . . . and were almost surprised when it worked!
That success inspired me to draw up plans for building what my wife calls my “wooden gym”. It contains a total of eight pieces, ranging from a pulley machine to a curling bench for the arms, and machines to exercise the legs. Though made of wood, the equipment that Rod and I built is designed to function as the expensive metal machines do. People are always amazed when they see the gym . . . and some have traveled 250 miles just to take a look!
Proven Success
With the help of this equipment, I won the 1980 Virginia State Physique Championships (Mr. Old Dominion) … the 1981 United States Physique Championships (Mr. U.S.A.) . . . and the 1981 North American Physique Championships (Mr. North America)—all in little over a year! Then, in 1982, Rod won the title of Mr. U.S.A., as well. You can see, then, that the gym has worked quite well for us!
Keeping the cost down did involve a little improvising. For example, the cable and pulleys we used for the “lat” machine were salvaged from a wrecked aircraft at no cost. I think, however, that any resourceful builder could manage to spend as little as we did. If, like us, you can buy pipe at a junkyard, do it! The materials don’t have to be new.
It is necessary, however, to select unwarped wood that’s free of knots, splits, or other damage that would weaken it. Cut the pieces, then drill the holes for the pipes and bolts before you assemble the equipment. And, to avoid splitting the wood, connect the pieces with screws instead of nails. (I used No. 10 X 2 3/4″ screws.) I also found that drilling a small pilot hole eases the task of putting in the screws, and that applying Elmer’s Carpenters’ Glue to the joints before assembly makes for a sturdier bond. Additionally, you should be sure that the wood is clean, smooth, and free of rough edges before you paint it.
Finally, padding is needed on those parts of the gym that will come in contact with the body, but that material doesn’t have to be expensive either. I used old carpet tied into place with string.
Long-Term Satisfaction
We’ve enjoyed the comfort and convenience of our own private gym for more than three years now. We don’t pay dues to spas . . . we no longer wait in line to use the equipment . . . and we train whenever we want to.
My next challenge will be the Mr. Universe Contest. I’m just wondering if anyone there will believe that I trained on gym equipment made of wood!
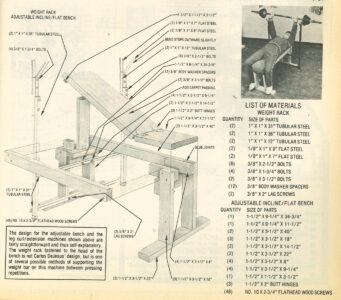
Adjustable DIY Weight Bench with Incline
(1) 1 1/2″ X 9 1/4″ X 34 3/4″
(1) 1 1/2″ X 9 1/4″ X 11 1/2″
(2) 1 1/2″ X 3 1/2″ X 40″
(3) 1 1/2″ X 3 1/2″ X 18″
(2) 1 1/2″ X 3 1/2″ X 14 1/2″
(2) 1 1/2″ X 3 1/2″ X 22″
(4) 1 1/2″ X 3 1/2″ X 8″
(4) 1 1/2″ X 3 1/2″ X 9 1/4″
(1) 1 1/2″ X 1 1/2″ X 3 1/2″
(3) 1 1/2″ X 2″ butt hinges
(46) No. 10 X 2 3/4″ flathead wood screws
DIY Curling Bench and Extension Machine
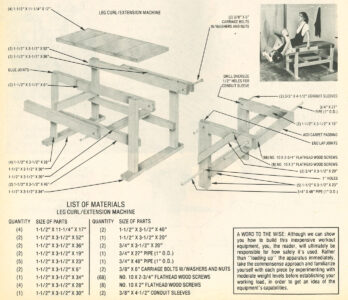
(4) 1 1/2″ X 11 1/4″ X 17″
(2) 1 1/2″ X 3 1/2″ X 52″
(2) 1 1/2″ X 3 1/2″ X 36″
(2) 1 1/2″ X 3 1/2″ X 19″
(5) 1 1/2″ X 3 1/2″ X 23″
(2) 1 1/2″ X 3 1/2″ X 6″
(1) 1 1/2″ X 3 1/2″ X 34″
(4) 1 1/2″ X 3 1/2″ X 28″
(1) 1 1/2″ X 3 1/2″ X 30″
(2) 1 1/2″ X 3 1/2″ X 46″
(1) 1 1/2″ X 3 1/2″ X 20″
(2) 3/4″ X 3 1/2″ X 20″
(1) 3/4″ X 27″ pipe (1″ O.D.)
(1) 3/4″ X 48″ pipe (1″ O.D.)
(2) 3/8″ X 6″ carriage bolts with washers and nuts
(68) No. 10 X 2 3/4″ flathead wood screws
(8) No. 10 X 2″ flathead wood screws
(2) 3/8″ X 4 1/2″ conduit sleeves
Weight Rack
(2) 1″ X 1″ X 31″ tubular steel
(2) 1″ X 1″ X 36″ tubular steel
(2) 1″ X 1″ X 12″ tubular steel
(2) 1/8″ X 1″ X 8″ flat steel
(2) 1/8″ X 1″ X 7″ flat steel
(8) 3/8″ X 2 1/2″ bolts
(4) 3/8″ X 1 3/4″ bolts
(2) 3/8″ X 3 1/2″ bolts
(12) 3/8″ body washer spacers
(2) 3/8″ X 2″ lag screws
EDITOR’S NOTE: The two plans presented here are excerpted from Carlos DeJesus’ booklet describing his entire gym. We were impressed enough with the equipment that we featured the designs for six more of the author’s wooden workout machines in A Bodybuilding Champ’s Wooden Fitness Center, including a calf block; a curling bench; and hyperextension, “lat,” standing calf, and seated calf equipment. Should you want more information on Mr. DeJesus’ Wooden Gym booklet, his Natural Instinctive Training manual, or the natural bodybuilding school he’s founded, contact The School of Natural Bodybuilding.
A word to the wise: Although we can show you how to build this inexpensive workout equipment, you, the reader, will ultimately be responsible for how safely it’s used. Rather than “loading up” the apparatus immediately, take the commonsense approach and familiarize yourself with each piece by experimenting with moderate weight levels before establishing your working load, in order to get an idea of the equipment’s capabilities.


